CATEGORIES
- System and Environment
- Network
- Public IP
- DNS Utilities
- Mounting Volumes
- General Linux Tips
- Ubuntu Tips
- Raspberry PI Tips
- Kali Tips
- Forensics Tools
- Western Digital NAS
- VMWare ESXi Tips
- NVIDIA Drivers
- AMD GPU Drivers
SYSTEM AND ENVIRONMENT
sudo hostnamectl set-hostname newHostName
id || (whoami && groups) 2>/dev/null
id -un
uname
uname -a
uname -r
uname -m
neofetch
inxi -F
w
last -aiF
lastb -adF
last reboot
journalctl --list-boots
arch
lsb_release -rd
cat /proc/version
(cat /proc/version || uname -a) 2>/dev/null
systemctl show-environment
env
set
uptime
lsblk
lsblk -f
lscpu
lsusb
lspci
lspci -vvv
lsmod
echo $SHELL
echo $HOME
reset
man commandName
tldr commandName
apropos commandName
systemd-analyze
systemd-analyze blame
systemd-analyze critical-chain
Manage physical (discrete) memory:
dmidecode -t memory
lsmem
lsmem -a
chmem -d 0x0000000878000000-0x000000087fffffff
chmem -e -b 271
History of commands:
history -c
history -r
set +o history
# history does not store this command
set -o history
history
!123
HISTTIMEFORMAT="%Y-%m-%d %T "
cat ~/.bash_history | fzf -i
Prevent a command from being saved to history by starting it with a space (~/.bashrc):
HISTCONTROL=ignoreboth
List all available commands, aliases, bash built-ins, bash keywords, and bash functions:
compgen -c
compgen -a
compgen -b
compgen -k
compgen -A function
Display kernel ring buffer messages sent to syslog since the last boot (human-readable timestamp, watch live, filter content, and clear buffer):
sudo dmesg -T
sudo dmesg -w
sudo dmesg | grep error
sudo dmesg | grep usb
sudo dmesg -c
List timers and services:
systemctl list-timers --all
systemctl list-units --type=service
systemctl --all
Rootless services:
systemctl edit --force --full serviceName --user
systemctl start serviceName --user
Enable lingering (keep processes running after the user logs off):
loginctl show-user userName | grep Linger
loginctl enable-linger userName
Storage volume speed test:
sudo apt install hdparm -y
hdparm -tv -direct /dev/sdc1
Inodes:
ls -i
stat fileName
df -i
sudo apt install inotify-tools -y
inotifywait -m -q -e modify /var/log/applicationLogs
Note: there is a kernel module called fanotify that can monitor and intercept filesystem events.
List users, superusers, logged-in users, login history, last login per user, and all users and groups:
cat /etc/passwd | cut -d: -f1
awk -F: '($3 == "0") {print}' /etc/passwd
w
last
lastlog
for i in $(cut -d":" -f1 /etc/passwd 2>/dev/null);do id $i;done 2>/dev/null | sort
id userName
Get password policy:
grep "^PASS_MAX_DAYS\|^PASS_MIN_DAYS\|^PASS_WARN_AGE\|^ENCRYPT_METHOD" /etc/login.defs
Find files writable by anyone or any group:
find / '(' -type f -or -type d ')' '(' '(' -user $USER ')' -or '(' -perm -o=w ')' ')' 2>/dev/null | grep -v '/proc/' | grep -v $HOME | sort | uniq
for g in `groups`; do find \( -type f -or -type d \) -group $g -perm -g=w 2>/dev/null | grep -v '/proc/' | grep -v $HOME; done
find . -mindepth 1 -type f -name "*.zip"
find . -mindepth 1 -type f -name "*.zip" -printf x | wc -c
Read a specific line number from a file:
awk 'NR==50' fileName
sed '50!d' fileName
Running processes:
ps aux
ps -ef
pgrep -l ssh
pgrep -u root
top -n 1
Run a process with a given priority, or change the priority of a running process:
nice -n 3 script.sh
renice +1 -p PID
renice 5 -p PID
Note: PID is the process ID, which can be found using the ps command. The priority range is -20 (highest) to +19 (lowest).
Reparent a running program to a new terminal:
sudo reptyr PID
sudo reptyr -s PID
List detailed information about all PCI buses and devices:
lspci
Configure and update Grub:
sudo nano /etc/default/grub
sudo os-prober
sudo update-grub
See also the configuration files inside /etc/grub.d/.
Adding net.ifnames=0 and biosdevname=0 to the Grub config makes the Linux kernel name interfaces like eth*.
GRUB_CMDLINE_LINUX="net.ifnames=0 biosdevname=0"
Check out Clover [Link] as an alternative to Grub. It is especially useful as a bootloader that runs from a thumb drive to boot from an NVMe drive on systems with older BIOS firmware that cannot do so directly.
Remove the welcome banner:
touch .hushlogin
Command-line calendar:
cal
Create a Linux password hash:
mkpasswd -m sha-512
Refresh a cloned instance or virtual machine:
apt purge cloud-init -y
apt install cloud-init -y
nano /etc/cloud/cloud.cfg
cloud-init clean
cloud-init init
Package managers by distribution:
- apt – Debian
- pacman – Arch
- yum – CentOS
- dnf – Fedora
- zypper – openSUSE
- apk-tools – Alpine
- snap – Ubuntu-based
- flatpak – Multiple
Flatpak basic commands:
sudo apt install flatpak gnome-software-plugin-flatpak -y
flatpak remotes
flatpak remote-add --if-not-exists flathub https://flathub.org/repo/flathub.flatpakrepo
flatpak remote-delete flathub
flatpak search firefox
flatpak update
flatpak list
flatpak list --app
flatpak history
Scheduling a shutdown:
shutdown -h 20
shutdown +20
shutdown -r 20
shutdown -r +20
shutdown -h 17:30
Cancel a scheduled shutdown:
shutdown -c
Managing processes with Supervisor:
sudo apt install supervisor -y
sudo systemctl enable --now supervisor
sudo nano /etc/supervisor/conf.d/appName
[program:appName]
command=/path/to/your/app
autostart=true
autorestart=true
startretries=3
stderr_logfile=/var/log/appName.err.log
stdout_logfile=/var/log/appName.out.log
environment=HOME="/home/user",USER="myUser"
sudo supervisorctl reread- Reload the configuration without restarting processes.
sudo supervisorctl update- Apply the updated configuration.
sudo supervisorctl start appName- Start a process.
sudo supervisorctl stop appName- Stop a process.
sudo supervisorctl restart appName- Restart a process.
sudo supervisorctl restart all- Restart all processes.
sudo supervisorctl status- List all managed processes and their statuses.
sudo supervisorctl tail appName- View logs for a specific process.
sudo supervisorctl shutdown- Stop Supervisor itself.
NETWORK
hostname -I
ip address
ip route
ip neighbor
ip link
sudo ip route add default via 192.168.2.1 dev wlan0
sudo ip route add 10.0.0.0/24 via 192.168.2.1 dev eth0
sudo ip route del 10.0.0.0/24 via 192.168.2.1 dev eth0
ip route get 8.8.8.8
ip route get 8.8.8.8 fibmatch
ip route get 8.8.8.8 from 192.168.1.100 fibmatch
ip -4 -br a s dev wth0
ip route show scope host table all
ip route show scope link
ip route show scope global
ip route show table main
ip route show table local
ip route show table default
ip rule
nmcli device status
nmcli con show
nmcli connection show SSID
nmcli connection show "Wired connection 1"
nmcli -g ip4.address,ip4.dns connection show SSID
ss --tcp
ss --udp
ss --listening
ss -ltn
arp -e
arp -a
systemd-resolve --status
resolvectl
sudo systemctl restart systemd-resolved
nslookup example.com
nslookup -type=ns example.com
nslookup -type=mx example.com
nslookup -type=aaaa example.com
nslookup -type=txt example.com
nslookup 8.8.4.4
netplan try
netplan apply
netplan generate
Measure the throughput of a network connection between client and server:
iperf -s                   # for the server
iperf -c 10.0.0.1          # for the client
Check the process ID connected to a specific port, and list open ports:
lsof -i
lsof -i :22
(netstat -punta || ss --ntpu)
sudo ss -ltpn
Capture / Sniff TCP traffic:
tcpdump -D
tcpdump -i eth0 -c 10 host 8.8.4.4
tcpdump -i eth0 src host 8.8.4.4
tcpdump -i eth0 dst host 8.8.4.4
tcpdump -i eth0 net 10.10.10.0 mask 255.255.255.0
tcpdump -i eth0 net 10.10.10.0/24
tcpdump -i eth0 port 53
tcpdump -i eth0 host 8.8.4.4 and port 53
tcpdump -i eth0 port not 23 and not 22
tcpdump -w network_traffic.pcap
timeout 10 tcpdump
Change network interface metric:
sudo apt install ifmetric -y
sudo ifmetric wlx70f11c1927ef 599
ip route
Manage network connections over CLI:
nmtui
Check the routing path using Trace Route (ICMP) and Trace Path (UDP):
traceroute 8.8.8.8
tracepath 8.8.8.8
Troubleshoot conntrack:
sudo apt install conntrack -y
sudo conntrack -L
sudo conntrack -L -p tcp
sudo conntrack -S
cat /proc/sys/net/netfilter/nf_conntrack_count
cat /proc/sys/net/netfilter/nf_conntrack_max
PUBLIC IP
curl https://ipinfo.io/ip
curl http://ipecho.net/plain
dig +short myip.opendns.com @resolver1.opendns.com
dig -4 +short myip.opendns.com @resolver1.opendns.com
dig -6 +short myip.opendns.com @resolver1.opendns.com
API TEST
Use HTTPie to query and visualize HTTP headers [Link].
sudo apt install httpie -y
http example.com
DNS UTILITIES
sudo apt install dnsutils -y
dig example.com
dig +trace example.com
whois example.com
nmcli dev show | grep 'IP4.DNS'
host example.com
Using Systemd Resolver:
systemd-resolve domain.com
systemd-resolve --status
systemd-resolve --flush-caches
sudo systemctl restart systemd-resolved
OR
resolvectl status
resolvectl flush-caches
To resolve any domain ending with .local to the same IP address:
sudo apt update && sudo apt install dnsmasq -y
echo 'address=/.local/10.10.10.100' >> /etc/dnsmasq.conf
echo 'server=8.8.8.8' >> /etc/dnsmasq.conf
echo 'server=1.1.1.1' >> /etc/dnsmasq.conf
sudo systemctl restart dnsmasq
The configuration above resolves any domain ending with .local to 10.10.10.100. All other domains are forwarded to Google and Cloudflare upstream servers, respectively.
Do not forget to update the system resolver (/etc/resolv.conf) to point to 127.0.0.1.
VOLUMES
Find mounted volumes in the system:
findmnt
findmnt -l
List all Samba/Windows shares in your workgroup:
nmblookup -S WORKGROUP
List and connect to SMB shares:
smbclient -L \\\\192.168.1.10
smbclient \\\\192.168.1.10\\IPC$
Show the tree of hosts and shares in the Windows Network:
smbtree
Manually mount a private share with write privileges for the current user:
sudo mount -t cifs -o username=${USER},password=${PASSWORD},uid=$(id -u),gid=$(id -g) //server-address/folder /mount/path/on/ubuntu
Mount anonymous shares from SMB locally with read and write privileges for all users on boot:
//192.168.1.10/Public /home/user/Public cifs rw,username=geek,password=geek,noperm 0 0
List NFS exports (locally and remotely):
showmount -e
showmount -e 192.168.1.1
Check and repair file system:
sudo umount /dev/sdb1
sudo fsck -p /dev/sdb1
sudo mount /dev/sdb1
Note: the -p option allows the tool to automatically repair problems that can be safely fixed without user intervention.
Use Bind Mount to mount a directory inside another directory (like an alias, mirror, or mapping point):
sudo mount --bind /PATH/dataSource /PATH/mountLocation
sudo mount --rbind /PATH/dataSource /PATH/mountLocationRecursive
Check all real mount points on the system:
sudo findmnt --real
GENERAL LINUX TIPS
Send a message to all active terminal sessions:
sudo wall "System under maintenance!"
Prevent a package from being upgraded:
sudo apt-mark hold packageName
Revert the hold above:
sudo apt-mark unhold packageName
Get all hardware info:
sudo apt install -y hardinfo
Create a backup of a file when editing with Nano:
nano -B fileName
Basic Bash expansions:
mkdir name{1..10}
mkdir name{a,b,c}
Ways to create a file of a specific size:
truncate -s 10M fileName
fallocate -l $((10*1024*1024)) fileName
head -c 10MB /dev/zero > fileName
head -c 10MB /dev/urandom > fileName
dd if=/dev/zero bs=10MB count=1 of=fileName
dd if=/dev/urandom bs=10MB count=1 of=fileName
Safely overwrite all unused space on a drive:
dd if=/dev/random of=big || rm big
Cleanly kill processes:
sudo sigterm PID
sudo sigkill PID
sudo sigstop PID
Overwrite files before deleting:
shred -f -n 5 -z -u -v filename
ARP scan to find all devices on the network (replace wlan0 with your interface):
sudo apt install arp-scan -y
sudo arp-scan --interface=wlan0 --localnet
Print file content to the terminal:
cat file.txt | more
cat file.txt | less
less file.txt
Shortcut to rename or copy a file, useful for backups:
mv file.{conf,bkp}
cp file.{conf,local}
Execute a single command across multiple targets:
mkdir -p -v /home/josevnz/tmp/{dir1,dir2,dir3}
Create a unique temporary file or directory (useful to avoid collisions in automation scripts):
TMPFILE='mktemp' || exit 1
echo "Temporary file name $TMPFILE"
TMPDIR='mktemp -d' || exit 1
echo "Temporary directory name $TMPDIR"
Measure latency between your device and another:
sudo apt install mtr
mtr google.com
Check the ports your server is listening on:
netstat -lt
netstat -lu
netstat -nr
netstat -tulpn
netstat -s
netstat -tp
netstat -an | grep ":22"
Run a script to check for outdated shared libraries running on your server:
curl -s -L https://kernelcare.com/uchecker | sudo python
Alternative to wget (axel) with multi-threading support:
axel -a -n 1 "https://example.com/file.zip"
Aria2 is another alternative to wget and axel. It resumes interrupted downloads and supports multiple threads, torrents, and metalinks.
aria2c -s8 "https://example.com/Linux.iso"
aria2c -s8 -c "https://example.com/Linux.iso"
aria2c --max-download-limit=1M "https://example.com/Linux.iso"
aria2c -d /path/downloaded/ "https://example.com/Linux.iso"
aria2c --http-proxy=http://proxy.com:8080 "https://example.com/Linux.iso"
aria2c -S linux.torrent
aria2c --select-file=6-8,10 linux.torrent
Automate responses to repetitive prompts from an application or script (use with caution):
yes | command
yes string | command
See also the expect command for more granular automation based on expected prompts and responses.
Record an entire terminal session, including commands, output, and prompts. The recording is saved to a file that can be replayed for auditing:
script --timing=record.Times record.Output
To end the recorded session, type exit.
scriptreplay --timing=record.Times record.Output
scriptreplay --timing=record.Times --speed 2 record.Output
scriptreplay --timing=record.Times --speed 0.5 record.Output
You just ran a command without sudo. Try this:
ufw status
sudo !!
Or if the command was incomplete:
sudo apt
!! update
Reuse the last word from the previous command:
mkdir directoryName
cd !$
Add a user to multiple groups:
sudo usermod -aG group1,group2,group3 user
Remove a user from a group:
sudo gpasswd -d user groupName
Change a user’s home directory and move its contents:
usermod -d /home/newHome --move-home userName
Show a user’s password expiration information:
chage -l userName
Change a user’s password expiration:
sudo chage -M 90 userName
sudo chage -M 2030-12-31 userName
Watch multiple log files at the same time (alternative to tail -f):
sudo apt install multitail -y
multitail kern.log syslog
Watch a directory, file, or command output, refreshing every second:
watch -n 1 "ls -l"
Search for an application:
which nmap
whatis nmap
dpkg --get-selections
dpkg -l | grep sshfs
rpm -qa | grep sshfs
Install compilers and kernel headers to meet application installation requirements:
sudo apt install gcc make build-essential linux-headers-$(uname -r) -y
List installed kernel modules:
modprobe -h
Install and run 7-Zip to extract a .7z file:
sudo apt install p7zip p7zip-full p7zip-rar -y
7z e file.7z
List the contents of a ZIP file:
zipinfo -1 file.zip
unzip -l file.zip
Mount an archive file as a read-only volume:
archivemount fileName.tar.gz /Path/MountingPoint
Place an executable in this folder to make it accessible system-wide:
echo $PATH
mv script.sh /usr/local/bin
View command history:
history
Check what the current user is allowed to run with sudo:
sudo -l
Allow a user to run sudo without a password prompt:
sudo nano /etc/sudoers.d/userName
Add the following:
userName ALL=(ALL) NOPASSWD: ALL
Keep sudo active without prompting for a password during the session:
sudo -l
Check out run0 as an alternative to sudo:
run0 commandName
Lock and unlock users:
usermod -L userNameToLock
usermod -U userNameToUnlock
OR
passwd -u userNameToLock
passwd -u userNameToUnlock
Create a directory symbolic link:
ln -d -s /targetFile /symbolicLinkName
Get the destination of a symbolic link:
readlink -m symbolicLinkName
Transform piped input into arguments for a command:
ls | xargs cat
Navigate to a user’s home directory:
cd ~userName
Remove duplicate values and return only unique ones:
cat listOfItems.txt | sort | uniq
Pipe output to clipboard:
echo "hi" | xclip
Encode and decode Base64:
echo "ABC" | base64
echo "QUJDCg==" | base64 -d
base64 <<< "ABC"
base64 -d <<< "QUJDCg=="
Define variables in Bash and use them in commands:
export ip=10.0.0.1 port=53
nc -v $ip $port -e /bin/bash
Create an alias for a command (add to ~/.bash_aliases):
alias ll="ls -l"
Cut and merge videos with FFMPEG:
ffmpeg -i video1.mp4 -ss 00:01 -to 01:18 output_1.mp4
ffmpeg -i video2.mp4 -ss 00:02 -to 01:01 output_2.mp4
ffmpeg -f concat -i list.txt -c copy output_merged.mp4
The list.txt file should contain the files to merge:
file output_1.mp4
file output_2.mp4
Change the default start mode for VMs in VirtualBox to headless:
VBoxManage modifyvm "vm name" --defaultfrontend headless
VBoxManage setproperty defaultfrontend headless
Run an application or script in the background, detached from the terminal:
nohup appToRunInBg.sh &
Detach background jobs from your terminal session:
disown jobId
Using the < operator to pass file contents as input to a command:
cat < fileName.txt
Using the << operator, useful for scripting:
telnet server.com << EOL
firstCommand
secondCommand
EOL
Temporary file systems (tmpfs):
/dev/shm- always tmpfs (RAM).
/tmp- on-disk but can be tmpfs; does not retain files across reboots.
/var/tmp- never on tmpfs; retains files across reboots.
Automate X via command line:
sudo apt install xautomation -y
xte "str Hello!"
xte "key Return"
xte "keydown Control_L"
xte "keyup Control_L"
Convert Markdown to PDF:
pandoc -o new.pdf original.md
Manipulate PDF files:
sudo apt install qpdf -y
qpdf --empty --pages cover.pdf pages*.pdf -- combined.pdf
qpdf --empty --pages book-one.pdf 2-7 book-two.pdf 3,5 -- selected-pages.pdf
qpdf book.pdf book-page.pdf --split-pages          # output file names: book-page-1.pdf book-page-2.pdf ...
qpdf --rotate=+90:1 original.pdf rotated.pdf
qpdf --encrypt viewPassword editPassword 256 -- not-encrypted.pdf encrypted.pdf
qpdf --decrypt --password=viewPassword encryted.pdf not-encrypted.pdf
- —
- Refers to standard input when data is being piped.
- –empty
- Tells qpdf not to expect an input file and to use piped data instead. Requires —.
- –encrypt
- Requires two passwords: one for viewing and one for editing. They can be the same, but if different, the security restrictions will apply accordingly.
Emulate a KVM (keyboard + video + mouse) switch to control multiple systems [Link].
Generate a 6-digit TOTP from a seed directly on the command line:
oathtool --totp -b SEED
Unlike >, which writes immediately, sponge buffers all input before writing. This is important when multiple processes write to the same file simultaneously.
sudo apt install moreutils -y
cat read.data | sponge write.data
Crawl and mirror a website:
wget --mirror --convert-links --adjust-extension --page-requisites --no-parent -P exampleBackup https://example.com/path/
Rename multiple files and directories in a text editor:
sudo apt install moreutils -y
vidir
UEFI firmware upgrade:
sudo apt update
sudo apt install fwupd -y
sudo fwupdmgr get-devices
sudo fwupdmgr refresh --force
sudo fwupdmgr get-updates
sudo fwupdmgr update
Upload all files from the current directory to FTP:
sudo apt install lftp -y
lftp -u user:pass 192.168.0.10 -p 2221
> mput *
UBUNTU TIPS
Remove auto-mounted icons from the dock:
gsettings set org.gnome.shell.extensions.dash-to-dock show-mounts false
A powerful tool to configure your Gnome desktop (similar to Regedit on Windows, use with caution):
sudo apt install dconf-editor -y
Find, enable, and disable keyboard backlight (brightness from 0 to 3):
find /sys/class/leds -name '*kbd_backlight'
echo 2 | sudo tee /sys/class/leds/dell::kbd_backlight/brightness
echo 0 | sudo tee /sys/class/leds/dell::kbd_backlight/brightness
Set the keyboard backlight timeout (in seconds):
sudo nano /sys/devices/platform/dell-laptop/leds/dell::kbd_backlight/stop_timeout
Set the timezone and adjust the clock:
sudo timedatectl set-timezone America/Toronto
sudo date +%T -s "23:59:59"
sudo date +%Y%m%d -s "20220110"
Install ClipGrab (video download tool) in Ubuntu 20.04 (from the Bionic repository):
sudo add-apt-repository ppa:clipgrab-team/ppa    # edit the repository list and change distribution from focal to bionic
sudo apt update && sudo apt install clipgrab -y
Change the behavior when the laptop lid is closed in Ubuntu 20.04:
sudo gedit /etc/systemd/logind.conf
HandleLidSwitch=lock/ignore/poweroff/hibernate
systemctl restart systemd-logind.service
Check the integrity of installed DEB packages and their dependencies:
sudo apt install debsums -y
debsums nano
rdebsums nano
Enable hibernation on Ubuntu 20.04:
sudo systemctl hibernate
RASPBERRY PI TIPS
Set a different user as the default auto-login for Raspbian (autologin-user=pi, replace pi with your desired username):
nano /etc/lightdm/lightdm.conf
List all USB devices connected to your machine:
lsusb
Remove line 8 from a text file:
sed -i '8d' ~/.ssh/known_hosts
Redirect output to null (useful with crontab):
> /dev/null 2>&1
Install all .deb files from the current directory:
sudo dpkg -i *.deb
Check disk and RAM usage:
sudo free
sudo df -h
sudo du -sh /
sudo du -sh /*
sudo du -had 1 . | sort -rh
sudo du -Sh / | sort -rh | head -5
sudo ncdu /
Show progress while copying or transferring large files:
pv file.zip > /tmp/file.zip
Block ping responses in Ubuntu/Debian:
sudo nano /etc/sysctl.conf
net.ipv4.icmp_echo_ignore_all = 1
sudo sysctl -p
Online services to test your server’s IPv6 connectivity:
https://tools.keycdn.com/ipv6-ping
https://ipv6-test.com/validate.php
Keyboard-driven web browser for the CLI:
sudo apt install lynx -y
lynx http://www.google.com
sudo apt install links -y
lynx http://example.com
Convert images in batches:
mogrify -format jpg *.png
Batch resize images:
mogrify -resize x400 *.jpeg
OR
mkdir -p resized && mogrify -path resized -resize x400 *.jpeg
Convert iPhone .HEIC images to .JPG:
sudo apt install libheif-examples -y
for i in *.HEIC; do heif-convert "$i" "${i%.HEIC}.jpg"; done
OR
sudo apt install libheif-examples -y
ls *.HEIC | xargs -n 1 -P 5 sh -c 'heif-convert "$1" "${1%.HEIC}.jpg"' _
Convert iPhone .MOV videos to .MP4:
sudo apt install ffmpeg -y
ls *.MOV | xargs -n 1 -P 5 -I {} bash -c 'ffmpeg -y -i "$1" -map_metadata 0 -movflags +faststart -c:v libx264 -crf 18 -preset slow -c:a aac -b:a 192k "${1%.*}.mp4"' _ {}
Return to the previous directory:
cd -
pushd /var
...
popd
Matrix screensaver in the terminal:
sudo apt install cmatrix -y
cmatrix
Print input in columns:
mount | column -t
Terminal shortcuts:
- ctrl+l – Clear screen.
- ctrl+u – Clear line.
- ctrl+r – Search command history.
KALI TIPS
Toggle a theme that makes Kali look like Windows 10:
kali-undercover
Fix Kali issues after an upgrade:
sudo apt install xfce4-settings -y
Manage the GNOME keyring:
sudo apt install seahorse -y
Then open the start menu and search for Passwords and Keys.
Disable hardware beep (consider adding to /etc/rc.local):
#!/bin/bash
rmmod pcspkr
exit 0
Create the service file /etc/systemd/system/rc-local.service:
[Unit]
 Description=/etc/rc.local Compatibility
 ConditionPathExists=/etc/rc.local

[Service]
 Type=forking
 ExecStart=/etc/rc.local start
 TimeoutSec=0
 StandardOutput=tty
 RemainAfterExit=yes
 SysVStartPriority=99

[Install]
 WantedBy=multi-user.target
Mark as executable and enable the service on boot:
sudo chmod +x /etc/rc.local
sudo systemctl enable rc-local
Adjust the vertical and horizontal position of a display:
xrandr
xrandr --output DP-1-3 --panning 1920x1080 --transform 1,0,-4,0,1,-5,0,0,1
The first command lists display names. Replace DP-1-3 with the display you want to adjust.
Full upgrade:
sudo apt update && sudo apt full-upgrade -y
[ -f /var/run/reboot-required ] && sudo reboot -f
Userspace reboot (Soft Reboot) restarts everything except the kernel and firmware:
sudo systemctl soft-reboot
Manage handlers for lid, power, and other switches:
sudo nano /etc/systemd/logind.conf
Remote Desktop:
sudo apt install -y novnc x11vnc
x11vnc -display :0 -autoport -localhost -nopw -bg -xkb -ncache -ncache_cr -quiet -forever
/usr/share/novnc/utils/launch.sh --listen 8081 --vnc localhost:5900
ss -antp | grep vnc
Create an SSH tunnel for VNC:
ssh [email protected] -L 5900:localhost:5900
PDF tools pre-installed in Kali:
pdftotext fileName.pdf output.txt
pdftohtml fileName.pdf output.html
FORENSICS TOOLS
Safely erase files in Linux with BleachBit (also available for Windows):
sudo apt install bleachbit -y
sudo bleachbit
=> Windows version available at https://www.bleachbit.org/.
=> Alternative: Eraser, available at https://eraser.heidi.ie/.
Encrypt system, disk, and volumes in Windows:
VeraCrypt available at https://www.veracrypt.fr/.
Create a 1GB file for download testing or other purposes:
sudo dd if=/dev/zero of=1gb.zip bs=1 count=0 seek=$[1024*1024*1024]
Write an ISO file to a USB drive using DD:
sudo dd bs=4M if=file.iso of=/dev/sdX conv=fdatasync status=progress
OR
sudo dd if=Downloads/file.iso of=/dev/sda1 bs=1M status=progress
WESTERN DIGITAL NAS
Mount WD MyCloud Home in Linux manually:
sudo mount -t cifs //mycloud/Public /home/user/MyCloud/ -o username=geek,password=geek,uid=$(id -u),gid=$(id -g),forceuid,forcegid
Mount WD MyCloud Home in Linux automatically via /etc/fstab:
//mycloud/Public /home/user/MyCloud/ cifs username=geek,password=geek,iocharset=utf8,file_mode=0777,dir_mode=0777
WORKING WITH STRINGS AND FILES
Count the number of lines and the length of the longest line in a file:
wc -l /directory/file.txt
wc -L /directory/file.txt
Search for files containing a specific string:
grep -l 'text' *.*
Search for a string in compressed files:
zcat fileName.gz | grep -l 'text'
zgrep -l 'text' *.*
See also zmore, zless, and zdiff.
Find the position and line number of a specific byte (in hex) in a file:
grep -aob $'\x9d' fileName.txt
sed -n '/\x9d/=' fileName.txt
Grep with inverted match (returns lines that do not match the pattern):
cat fileName | grep -v 'string'
Search for a string in files recursively:
grep -R 'password' --include='*.py' --color /path
Print file content in reverse line order:
tac file.txt
Wrap output to fit a specified width (default: 80 columns):
fold file.txt
fold -w60 file.txt
fold -s file.txt
Compare files:
diff file1.txt file2.txt
Get information about a file:
file file.zip
stat file.txt
Print the readable strings from a binary file:
strings binaryFile
Inspect binary files in hex format:
xxd binaryFile
xxd -s 0x000123abc binaryFile | head -n 5
Note: the second example seeks the given offset and prints only 5 lines. This is useful for inspecting content at a specific position within a large file.
Print numbers from 1 to 10 separated by spaces:
echo {1..10}
Usage of cut: -d " " sets the delimiter to a space, and -f 4 selects the fourth column.
echo "a b c d e f g" | cut -d " " -f 4
Usage of tr: -d " " deletes spaces; " " "\n" replaces spaces with newlines; [a-z] [A-Z] converts lowercase to uppercase; -s "a" squeezes repeated characters to one; -cd [:digit:] keeps only digits; -d [:digit:] removes digits.
echo "a b" | tr -d " "
echo "a b" | tr " " "\n"
echo "a b" | tr [a-z] [A-Z]
echo "a b" | tr [:lower:] [:upper:]
echo "aaa" | tr -s "a"
echo "a1b" | tr -cd [:digit:]
echo "a1b" | tr -d [:digit:]
Reverse the order of characters:
echo "ABC" | rev
VMWARE ESXi TIPS
Enable external USB drives as datastores:
/etc/init.d/usbarbitrator stop
chkconfig usbarbitrator off
ls /dev/disks/
Prepare the disk:
partedUtil mklabel /dev/disks/mpx.vmhba33:C0:T0:L0 gpt
eval expr $(partedUtil getptbl /dev/disks/mpx.vmhba33:C0:T0:L0 | tail -1 | awk '{print $1 " \\* " $2 " \\* " $3}') - 1
partedUtil setptbl /dev/disks/mpx.vmhba33:C0:T0:L0 gpt "1 2048 9999999999 AA31E02A400F11DB9590000C2911D1B8 0"
vmkfstools -C vmfs6 -S USB-Datastore /dev/disks/mpx.vmhba33:C0:T0:L0:1
Note: replace mpx.vmhba33:C0:T0:L0 with your actual USB disk path, and 9999999999 with the last sector calculated by the second command.
NVIDIA DRIVERS
Check the GPU model, add repositories, and install the driver.
lspci | grep -iE "3d|display|vga" | grep -i nvidia
Newer Hardware
sudo apt install nvidia-detect -y
sudo nvidia-detect
If a driver is available for your hardware, an installation command will be shown. It will likely be:
sudo apt install nvidia-driver -y && sudo reboot
Older Hardware
It is strongly recommended to disable the open-source nouveau kernel module, which often conflicts with NVIDIA’s drivers.
echo 'blacklist nouveau' | sudo tee /etc/modprobe.d/blacklist-nouveau.conf
echo 'options nouveau modeset=0' | sudo tee -a /etc/modprobe.d/blacklist-nouveau.conf
sudo update-initramfs -u && sudo reboot
First check if your specific model has an installer on the official NVIDIA website [Link].
For some models, the installation route may be:
sudo sed -i 's/main/main non-free contrib/g' /etc/apt/sources.list
Or:
sudo sed -i 's/main/main non-free contrib/g' /etc/apt/sources.list.d/debian.sources
Or:
sudo apt-add-repository contrib && sudo apt-add-repository non-free && sudo apt update
Drivers for legacy hardware can be installed as follows:
sudo apt install --no-install-recommends nvidia-tesla-535-driver nvidia-tesla-535-kernel-dkms nvidia-smi -y
Or:
sudo apt install nvidia-legacy-390xx-driver nvidia-smi -y
Or:
apt-get install nvidia-driver-pinning-580 nvidia-smi -y
Reboot and verify:
sudo reboot
sudo lsmod | grep nvidia
sudo nvidia-smi
Hold (lock) the package to prevent upgrades:
sudo apt-mark hold nvidia-legacy-390xx-driver
For use with Docker and GPU workloads:
curl -fsSL https://nvidia.github.io/libnvidia-container/gpgkey | sudo gpg --dearmor -o /usr/share/keyrings/nvidia-container-toolkit-keyring.gpg
curl -s -L https://nvidia.github.io/libnvidia-container/stable/deb/nvidia-container-toolkit.list | sed 's#deb https://#deb [signed-by=/usr/share/keyrings/nvidia-container-toolkit-keyring.gpg] https://#g' | sudo tee /etc/apt/sources.list.d/nvidia-container-toolkit.list
sudo apt-get update
sudo apt-get install -y nvidia-container-toolkit
sudo systemctl restart docker
AMD GPU Drivers
On Ubuntu:
sudo apt install build-essential dkms linux-headers-amd64 wget curl rsync -y
wget https://repo.radeon.com/amdgpu-install/latest/ubuntu/noble/amdgpu-install_7.2.4.70204-1_all.deb
sudo dpkg -i amdgpu-install*.deb
sudo apt update && sudo apt upgrade -y
For Mesa (+ Vulkan):
sudo amdgpu-install -y --accept-eula --opencl=rocr --opengl=mesa --vulkan=pro
OR for ROCm:
sudo amdgpu-install -y --usecase=rocm
Verify the installation:
sudo dmesg | grep -i amdgpu
sudo lshw -c video
On Debian:
sudo apt update
sudo apt install rocminfo libamdhip64-5 rocm-smi -y
Verify that the kernel module loads properly:
sudo rocminfo
sudo rocm-smi
The AMD Radeon RX 6400 is based on the RDNA 2 architecture (specifically the gfx1034 microarchitecture) and is not officially supported by ROCm. A workaround is to trick ROCm into treating it as a supported card, such as the RX 6800 (gfx1030).
Since I was previously running with an NVIDIA card, I had to reinstall Ollama so it pulls the ROCm libraries instead.
curl -fsSL https://ollama.com/install.sh | sudo sh
sudo systemctl edit ollama
You may also need to disable CUDA (NVIDIA):
[Service]
Environment="OLLAMA_VULKAN=1"
# Radeon
#Environment="GGML_VK_VISIBLE_DEVICES=0"
# Nvidia
#Environment="GGML_VK_VISIBLE_DEVICES=1"
Leaving GGML_VK_VISIBLE_DEVICES unset allows Ollama to use both GPUs as needed.
sudo systemctl daemon-reload
sudo systemctl restart ollama
This is also a useful tool for listing available GPUs:
sudo apt install mesa-vulkan-drivers vulkan-tools
vulkaninfo --summary
Results of running a model that fits in neither the 8GB NVIDIA nor the 4GB Radeon alone, but works across both combined:
![]()
About 7.3GB on NVIDIA.
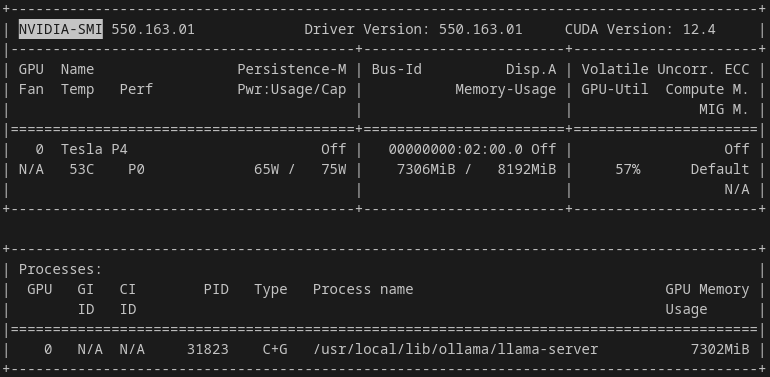
The rest on AMD.
