Assuming you already have an SSL/TLS key that you may have created for your HTTP server [Read It], we will use it for VSFTPD.
sudo apt update
sudo apt install vsftpd
sudo service vsftpd status
sudo ufw allow from 200.200.200.200 to any
For now, allow your public IP (replace 200.200.200.200 with yours) to have full access to your server to avoid any issues with open ports on your firewall. We will remove this rule later and apply more precise port settings.
Test connecting to your FTP server with FileZilla (for example). Now edit the configuration file:
sudo cp /etc/vsftpd.{conf,bkp}
sudo nano /etc/vsftpd.conf
Find all of these settings and make them match the following:
listen=NO
listen_ipv6=YES
anonymous_enable=NO
local_enable=YES
write_enable=YES
local_umask=022
dirmessage_enable=YES
use_localtime=YES
xferlog_enable=YES
connect_from_port_20=YES
secure_chroot_dir=/var/run/vsftpd/empty
pam_service_name=vsftpd
utf8_filesystem=YES
For SSL/TLS, add the following at the end of the file:
rsa_cert_file=/etc/apache2/md/domains/domain.com/pubcert.pem
rsa_private_key_file=/etc/apache2/md/domains/domain.com/privkey.pem
ssl_enable=YES
allow_anon_ssl=NO
force_local_data_ssl=YES
force_local_logins_ssl=YES
ssl_tlsv1=YES
ssl_sslv2=NO
ssl_sslv3=NO
require_ssl_reuse=NO
ssl_ciphers=HIGH
Note: This tutorial assumes the server already has a certificate issued by Let’s Encrypt using Apache’s MD module. If your certificate was generated differently, locate those files on your system. In most cases, only the domain name in the paths above will need to change.
You should also enable Passive Mode (recommended):
pasv_enable=Yes
pasv_min_port=40000
pasv_max_port=50000
Restart the service, confirm it is running, and test the connection from FileZilla:
sudo systemctl restart vsftpd
sudo systemctl status vsftpd
Now remove the broad firewall rule and replace it with precise ones. First, find the rule number:
sudo ufw status numbered | grep 200.200.200.200
Remember that 200.200.200.200 is your client’s public IP, not the server’s IP.
[ 7] Anywhere ALLOW IN 200.200.200.200
The number in brackets is the rule to delete. In this example it is 7. Delete it (confirm when prompted):
sudo ufw delete 7
Add the new rules:
sudo ufw allow 20:21/tcp comment "FTP"
sudo ufw allow 40000:50000/tcp comment "FTP Passive Mode"
The second rule applies only if you enabled Passive Mode. The port range (40000:50000) must match exactly between the VSFTPD configuration file and the firewall.
How wide should the range be? That is up to you. A smaller range like 50 ports is fine if you do not expect many simultaneous transfers.
Now configure Fail2Ban to monitor and protect the FTP server. Assuming you already have Fail2Ban running [Read It], you just need to add VSFTPD to the configuration:
sudo nano /etc/fail2ban/jail.local
Search for vsftpd (Ctrl+W) and make sure it looks like this:
[vsftpd]
enabled = true
port = ftp,ftp-data,ftps,ftps-data
logpath = %(vsftpd_log)s
Then open the filter file:
sudo nano /etc/fail2ban/filter.d/vsftpd.conf
It should look like the following. If it differs, replace its contents with this:
[INCLUDES]
before = common.conf
[Definition]
__pam_re=\(?%(__pam_auth)s(?:\(\S+\))?\)?:?
_daemon = vsftpd
failregex = ^%(__prefix_line)s%(__pam_re)s\s+authentication failure; logname=\S* uid=\S* euid=\S* tty=(ftp)? ruser=\S* rhost=<HOST>(?:\s+user=.*)?\s*$
^ \[pid \d+\] \[[^\]]+\] FAIL LOGIN: Client "<HOST>"(?:\s*$|,)
^ \[pid \d+\] \[root\] FAIL LOGIN: Client "<HOST>"(?:\s*$|,)
ignoreregex =
Restart Fail2Ban, check the status of the new jail, and attempt a failed login to confirm it is being captured:
sudo systemctl restart fail2ban
sudo fail2ban-client status vsftpd
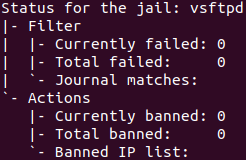
After a failed login attempt, “Total failed” will start counting.
If you accidentally ban yourself, run the following command with your IP address:
sudo fail2ban-client unban 200.200.200.200