The following steps will work on any Raspberry Pi running Raspberry Pi OS, regardless of the model.
Use the installation tool to write the operating system to the memory card. Downloads are available on the official website [Link].
Create an empty file called ssh inside the boot partition:
sudo touch ssh
Then add the Wi-Fi configuration inside the rootfs partition:
sudo nano etc/wpa_supplicant/wpa_supplicant.conf
Add these lines at the end of the file, replacing SSID and PASSWORD. You can repeat this block more than once to configure multiple networks:
network={
  ssid="SSID"
  psk="PASSWORD"
}
Boot the Raspberry Pi with the newly created image. SSH and Wi-Fi are now configured, and the default hostname is “raspberrypi“. Try connecting using the hostname first.
If the hostname does not work, find the IP address assigned to your RPi:
sudo arp-scan ‐‐interface=wlan0 ‐‐localnet
Replace wlan0 with your own adapter name.
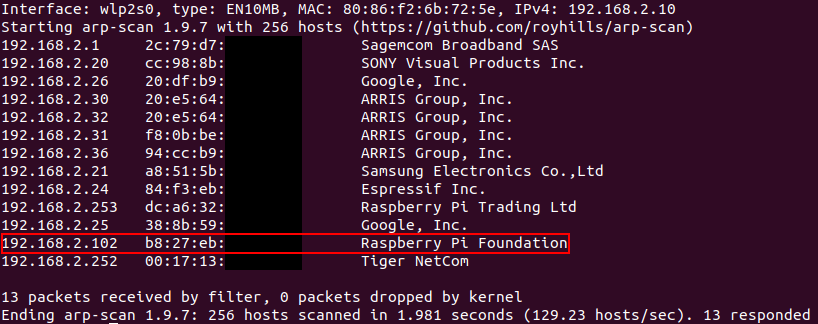
In this example, the assigned IP is 192.168.2.102, so connect via SSH:
ssh pi@192.168.2.102
The default password is “raspberry“.
sudo raspi-config
Go to Rasp-Config > Interfacing Options > VNC > Yes.
You can now use any VNC viewer to access your RPi. RealVNC is a good option [Link].
Use the same IP address to connect via VNC, just as you did with SSH.
Recommendations:
- Install UFW;
- Allow port 22 (SSH);
- Allow port 5900 (VNC);
- Enable the firewall to run at startup;
- If your RPi does not connect to Wi-Fi, consider connecting via Bluetooth Network (PAN) as a fallback [Read It].