Synchronizing or replicating a database protects data integrity across servers, and provides high availability, reliability, fault-tolerance, and accessibility.
Models
Master-to-Slave: The master feeds the slave with real-time updates.
Master-to-Master: Both servers feed each other with the latest updates.
Note: Master-to-Master should not be used in high-transaction applications on MySQL versions before 8. Prefer Master-to-Slave with multiple failover/read-only copies of your data.
Configuring Master-to-Slave
- Master IP: 10.0.0.1
- Slave IP: 10.0.0.2
BOTH
sudo apt update
sudo apt install mysql-server mysql-client -y
MASTER
sudo nano /etc/mysql/mysql.conf.d/mysqld.cnf
Under [mysqld], change the following lines and uncomment or add the others if necessary:
bind-address = 0.0.0.0
server-id = 1
log_bin = /var/log/mysql/mysql-bin.log
Restart and verify it is running:
sudo systemctl restart mysql
sudo systemctl status mysql
Create a user for the slave to connect to the master:
sudo mysql -u root -p
mysql> CREATE USER 'repli_user'@'%' IDENTIFIED BY 'strong_password';
mysql> GRANT REPLICATION SLAVE ON *.* TO 'repli_user'@'%';
mysql> FLUSH PRIVILEGES;
mysql> FLUSH TABLES WITH READ LOCK;
mysql> SHOW MASTER STATUS;
Note the two values returned (mysql-bin.000004 and 731):

SLAVE
sudo nano /etc/mysql/mysql.conf.d/mysqld.cnf
Under [mysqld], change the following lines and uncomment or add the others if necessary:
bind-address = 0.0.0.0
server-id = 2
log_bin = /var/log/mysql/mysql-bin.log
Restart and verify it is running:
sudo systemctl restart mysql
sudo systemctl status mysql
Log into the MySQL shell, configure the slave to connect to the master using the credentials created earlier, and insert the values noted previously:
sudo mysql -u root -p
mysql> STOP SLAVE;
mysql> CHANGE MASTER TO MASTER_HOST='10.0.0.1', MASTER_USER='repli_user', MASTER_PASSWORD='strong_password', MASTER_LOG_FILE='mysql-bin.000004', MASTER_LOG_POS=731;
mysql> START SLAVE;
mysql> SHOW SLAVE STATUS\G;
Check the status:
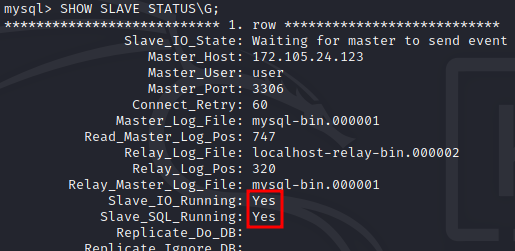
At this point, everything should work for Ubuntu 18.04 with MySQL 5.7 (if successful, skip to the Testing step). For Ubuntu 20.04 with MySQL 8.0, you may get the following result instead:
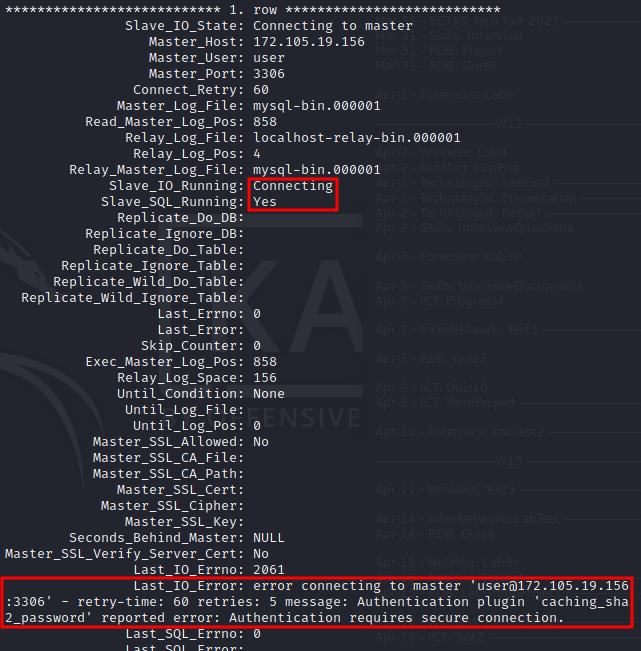
This can be fixed by running the following command on the slave server to import the public key from the master:
mysql --ssl-mode=DISABLED -h 10.0.0.1 -u repli_user -p --get-server-public-key
Then check the status again:
sudo mysql -u root -p
mysql> SHOW SLAVE STATUS\G;
Testing:
Create a database on the master and verify it appears on the slave.
mysql> CREATE DATABASE ABC;
mysql> SHOW DATABASES;
mysql> SHOW DATABASES;
Configuring Master-to-Master
Complete all the steps from Master-to-Slave and confirm replication is working.
SECOND MASTER (previously the Slave)
To promote the slave to a second master, create a replication user and connect it to the first master:
sudo mysql -u root -p
mysql> CREATE USER 'repli_user'@'%' IDENTIFIED BY 'strong_password';
mysql> GRANT REPLICATION SLAVE ON *.* TO 'repli_user'@'%';
mysql> FLUSH PRIVILEGES;
mysql> FLUSH TABLES WITH READ LOCK;
mysql> SHOW MASTER STATUS;

FIRST MASTER
sudo mysql -u root -p
mysql> STOP SLAVE;
mysql> CHANGE MASTER TO MASTER_HOST='10.0.0.2', MASTER_USER='repli_user', MASTER_PASSWORD='strong_password', MASTER_LOG_FILE='mysql-bin.000002', MASTER_LOG_POS=1045;
mysql> START SLAVE;
mysql> SHOW SLAVE STATUS\G;
If needed, apply the same public key fix used on the second master:
mysql --ssl-mode=DISABLED -h 10.0.0.2 -u repli_user -p --get-server-public-key
DISABLING REPLICATION
RESET SLAVE