To have a smooth cloud experience with Windows, it must be customized for use in a VPS.
If you do not have a custom Windows installation, start creating a fresh installation of the desired Windows version locally using VirtualBox.
- Create the VM and install all the drivers you will need.
- Power off the local VM.
- Compress (compact) the virtual disk image to save storage:
VBoxManage modifyhd --compact "disk.vdi"
- Clone the virtual disk from VirtualBox to an image file:
VBoxManage clonemedium --format RAW W10.vdi W10.img
VPS
- Create a VM in Linode, DigitalOcean, or any other cloud provider with enough storage to hold the W10.img.
- Minimum: 2 CPUs, 4 GB RAM, and 25 GB disk.
- Power off the VM.
LINODE
The image can be copied by resizing and creating another disk (Method 1) or by booting into Rescue Mode (Method 2).
Method 1 is required when Rescue Mode has no network connection.
- On the Storage menu, resize the main partition to 10000 MB.
- Create another disk using all the remaining available space.
- On the Configuration tab, click Edit and assign the new disk as /dev/sdc.
- Save and Power On.
- Log in and out to confirm SSH is working properly.
- Run the copy command:
dd if=W10.img | ssh [email protected] "dd of=/dev/sdc"
# to copy in the opposite direction: ssh [email protected] "dd if=/dev/sda" | dd of=W10.img
- Power off the VM.
- On the Configuration tab, click Edit and set:
- VM Mode: Full Virtualization
- Select Kernel: Direct Disk
- Block Device Assignment: /dev/sda to the new disk.
- Delete all other disks and resize the new disk to maximum capacity.
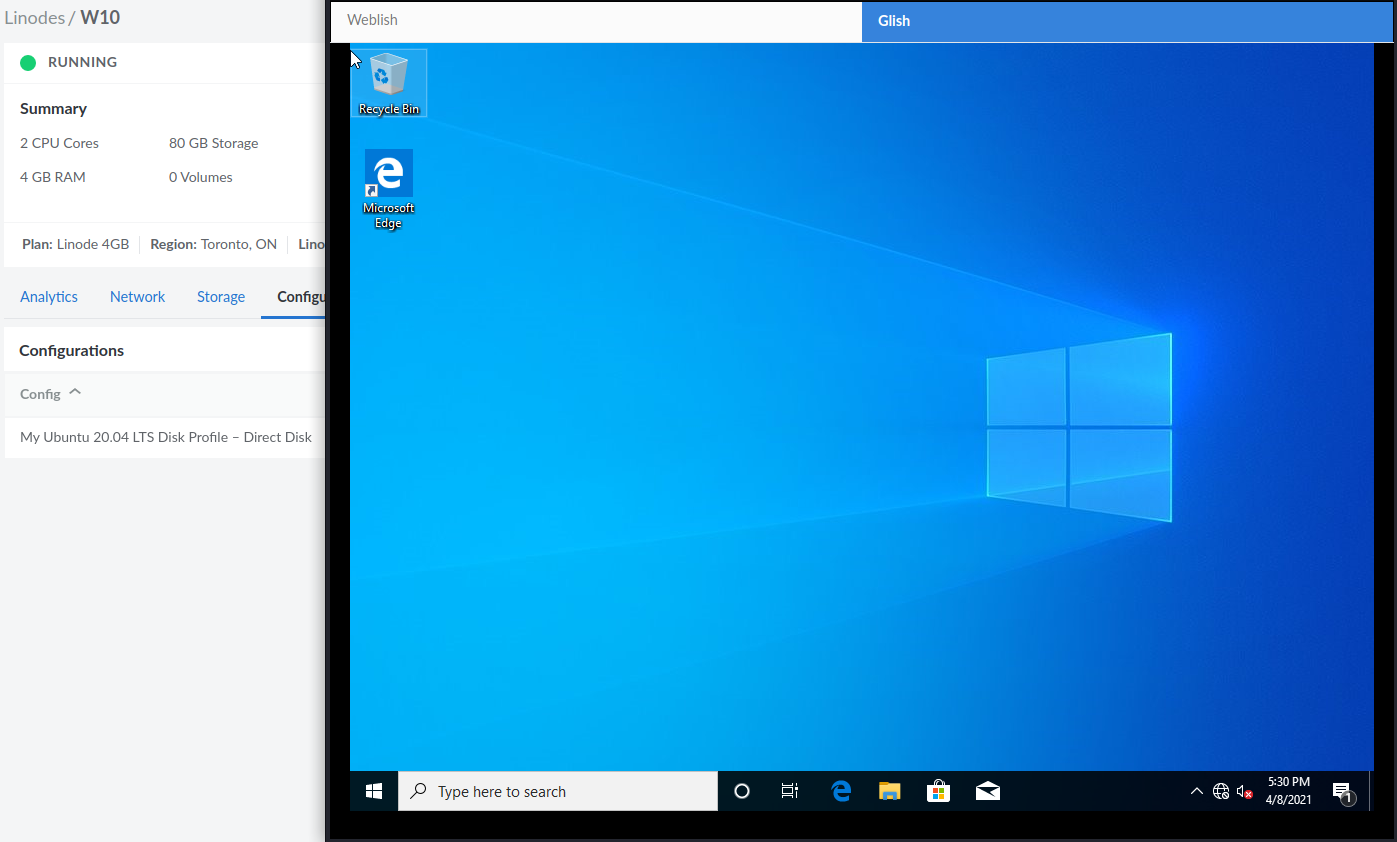
- Power on and use the LISH Console to access the VM.
Method 2 is very similar but does not require resizing the disk before copying.
- Boot into Rescue Mode.
- Open the LISH Console.
- Check internet connectivity.
- Download the image file directly to the VPS using:
wget -O- https://example.com/W10.gz | gunzip | dd of=/dev/sda
- Or start SSH:
service ssh start
- Log in and out to confirm SSH is working properly.
- Then copy the disk image:
dd if=W10.img | ssh [email protected] "dd of=/dev/sda"
- Power off the VM.
- On the Configuration tab, click Edit and set:
- VM Mode: Full Virtualization
- Select Kernel: Direct Disk
- Block Device Assignment: /dev/sda to the new disk, and None to the others.
- Power on and use the LISH Console to access the VM.
Regardless of the method used, the VM will not obtain an IP address from DHCP. Configure the Public and Private IPs manually as applicable.
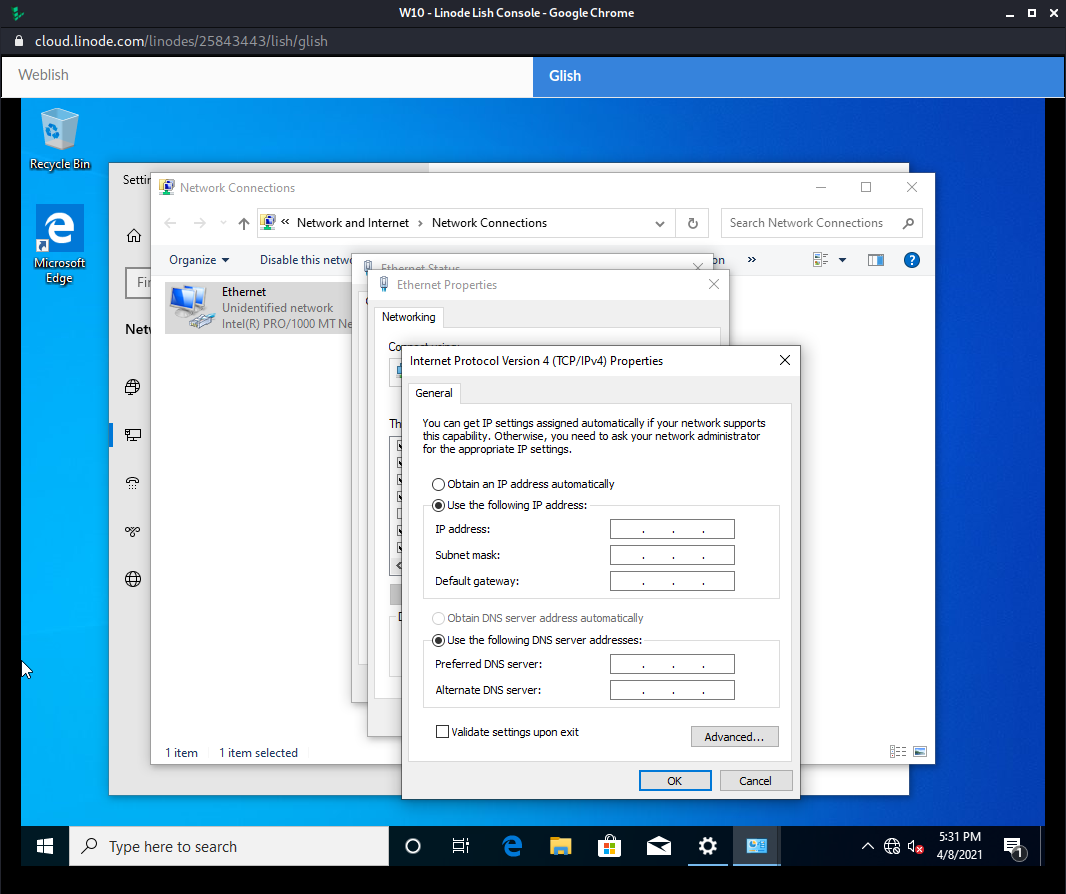
For more than one IP, click Advanced. It is recommended to restart the VM afterward.
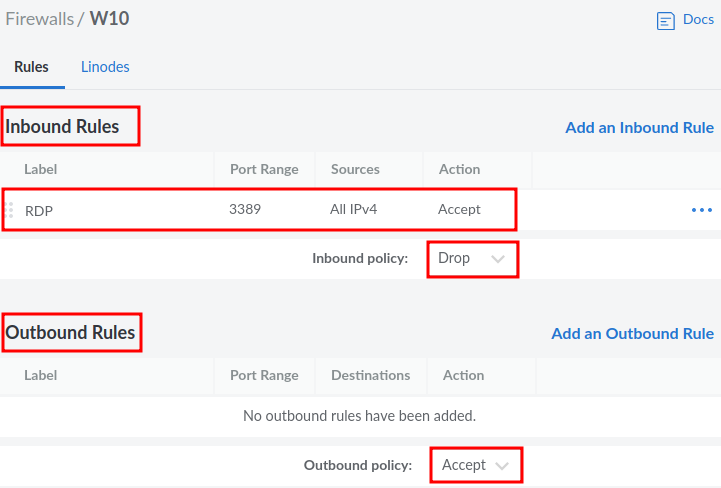
RDP is the standard way to connect to the new VM. Enable it by following these steps:
- Start Menu > System (Control Panel) > Advanced System Settings > Remote > Remote Desktop > Allow Remote Connections to this Computer.
- Windows Defender Firewall > Allow an App or Feature Through Windows Firewall > Change Settings > select Remote Desktop on both Public and Private networks.
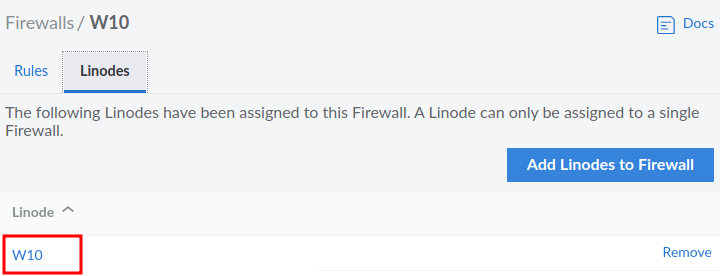
Finally, create a Firewall in Linode to secure your Windows VM, allowing only RDP connections (TCP port 3389), and preferably only from your own IP.

DIGITALOCEAN
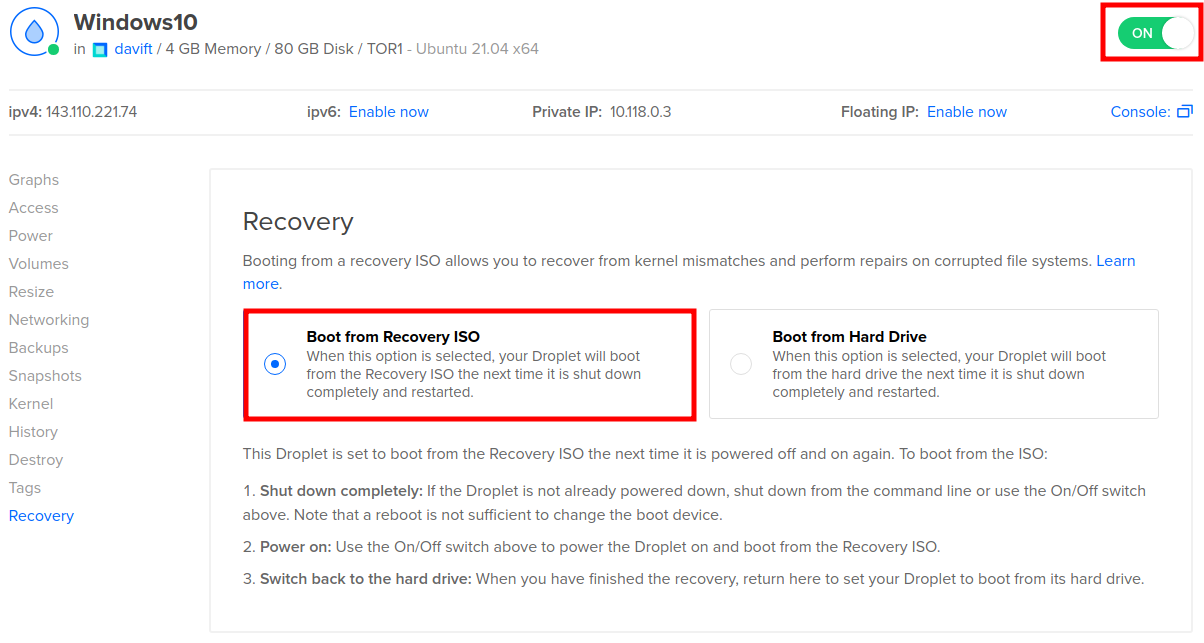
Go to Recovery > Select Boot from Recovery ISO > Power Off > Power On.
On the Console, type 6 and press Enter to open a shell.
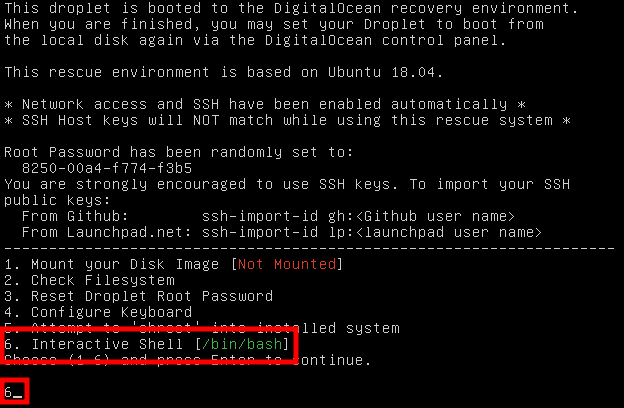

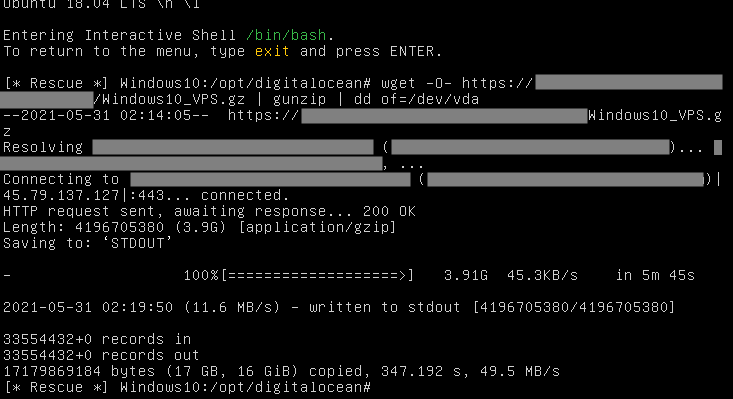
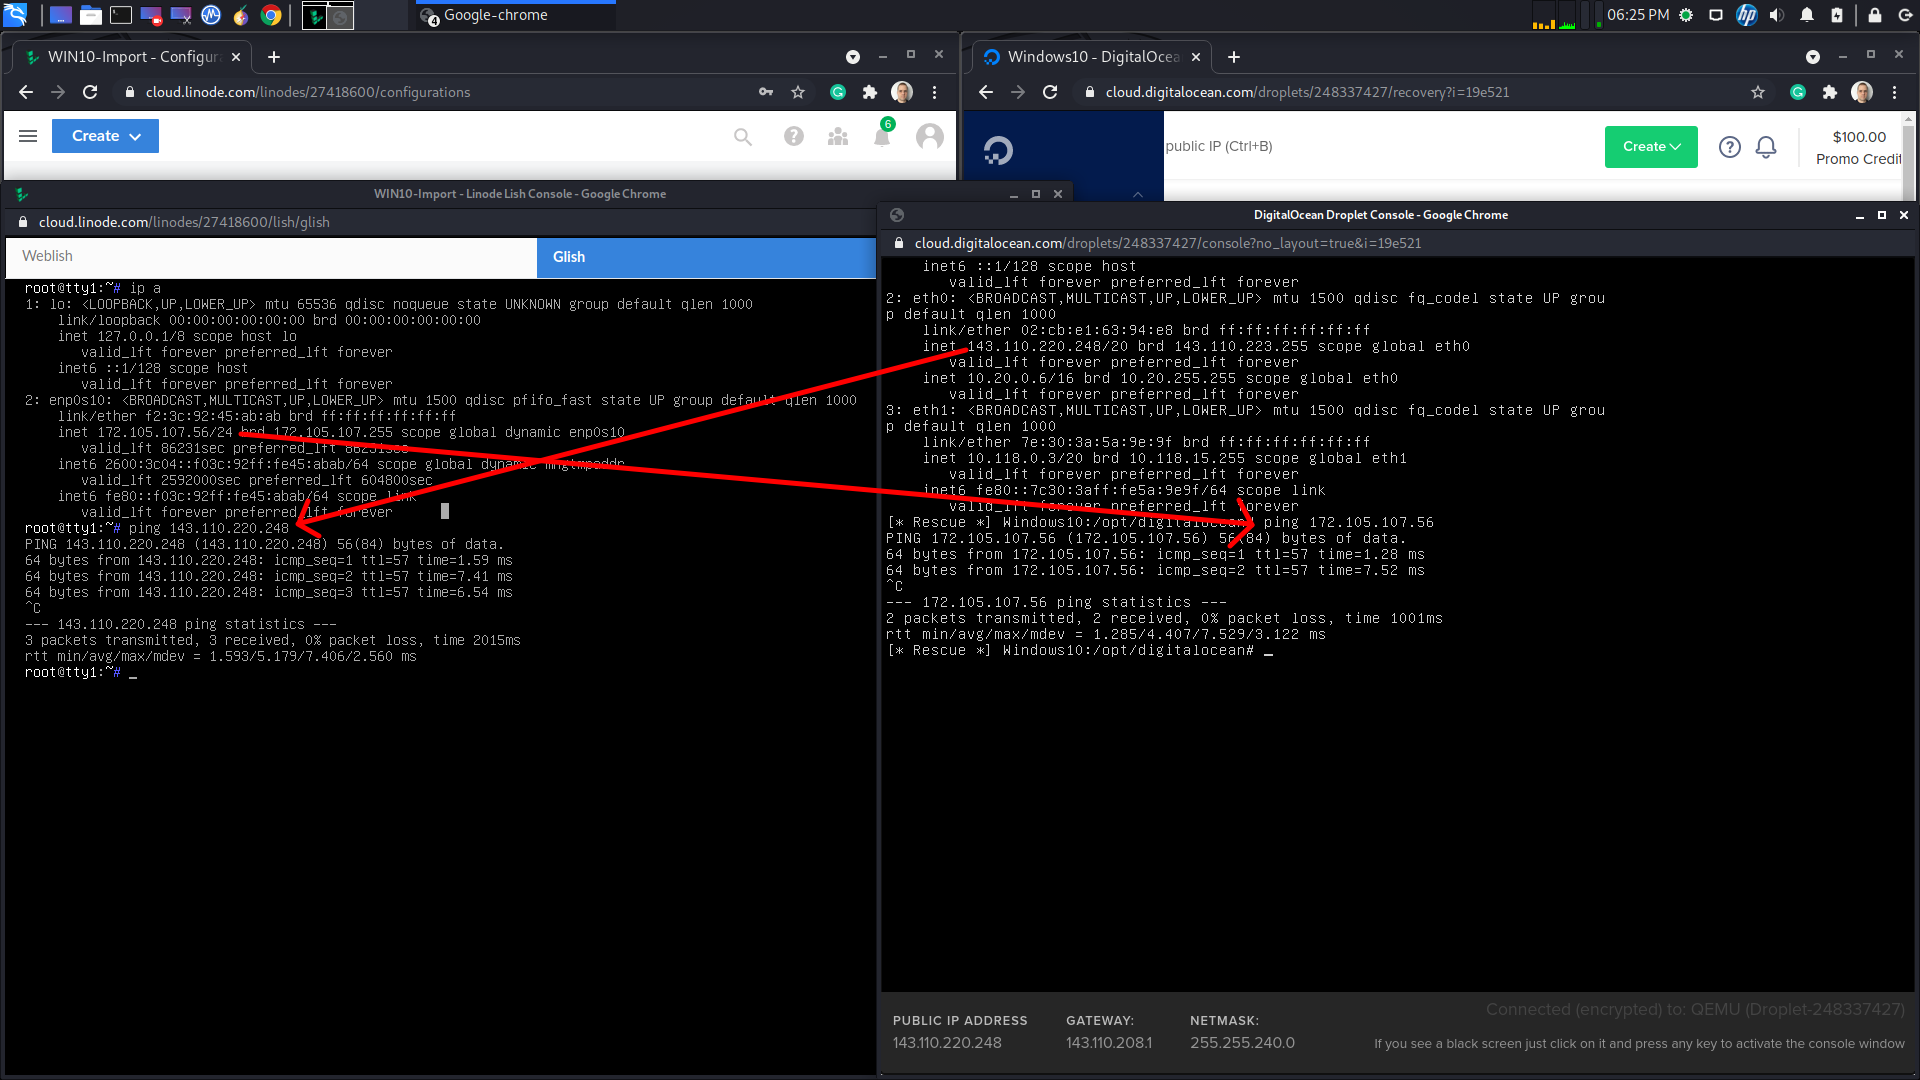
Run the command to download the image to the virtual disk. Note that the disk is at /dev/vda instead of /dev/sda.
wget -O- https://example.com/W10.gz | gunzip | dd of=/dev/vda
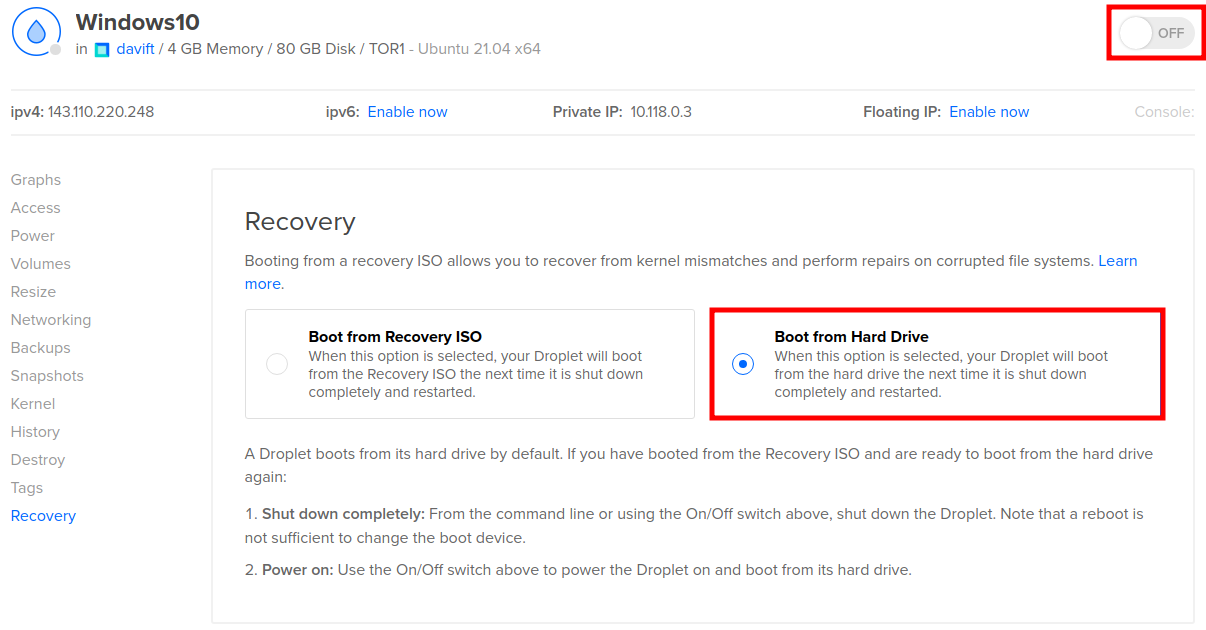
Once the download is complete, go back to Recovery > Select Boot from Hard Drive > Power Off > Power On.
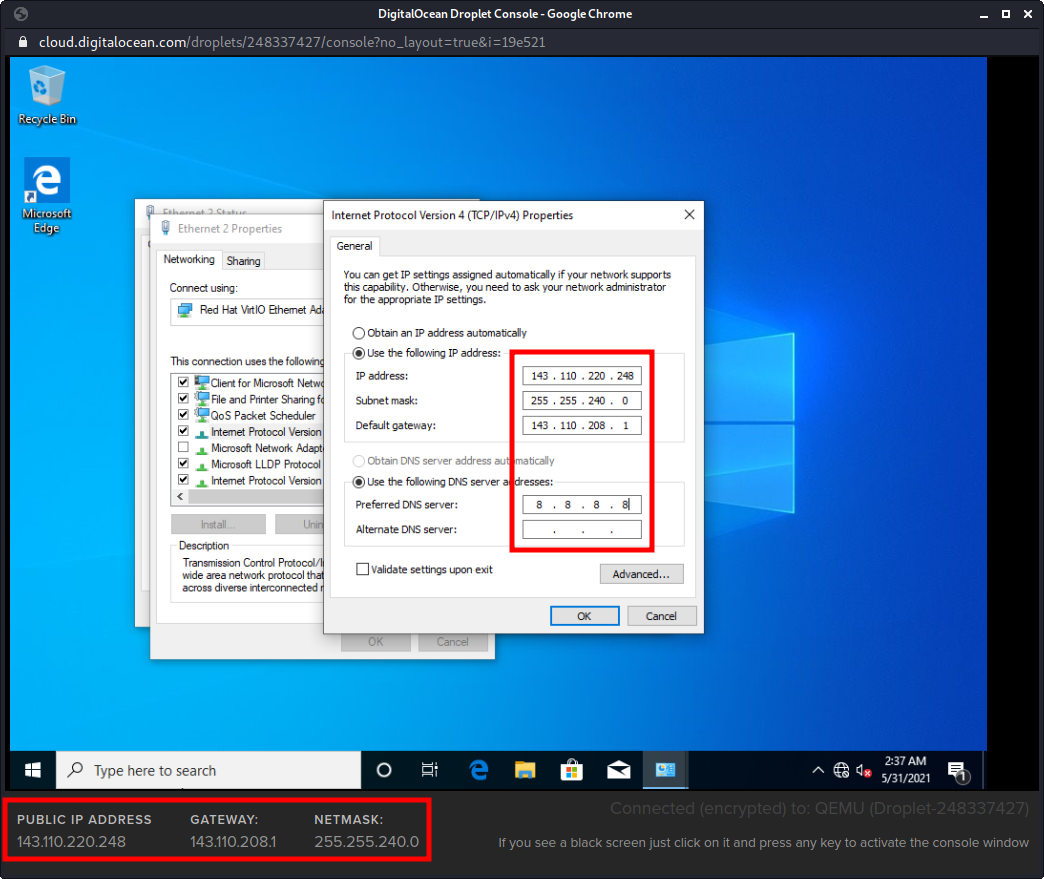
On the Console, configure the network adapter using the settings shown in the footer and set your preferred DNS server.
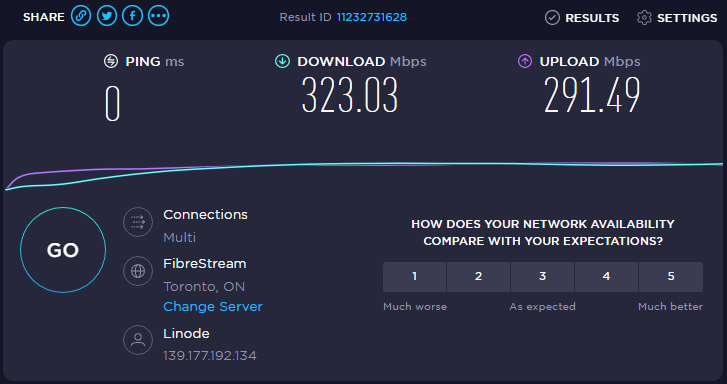
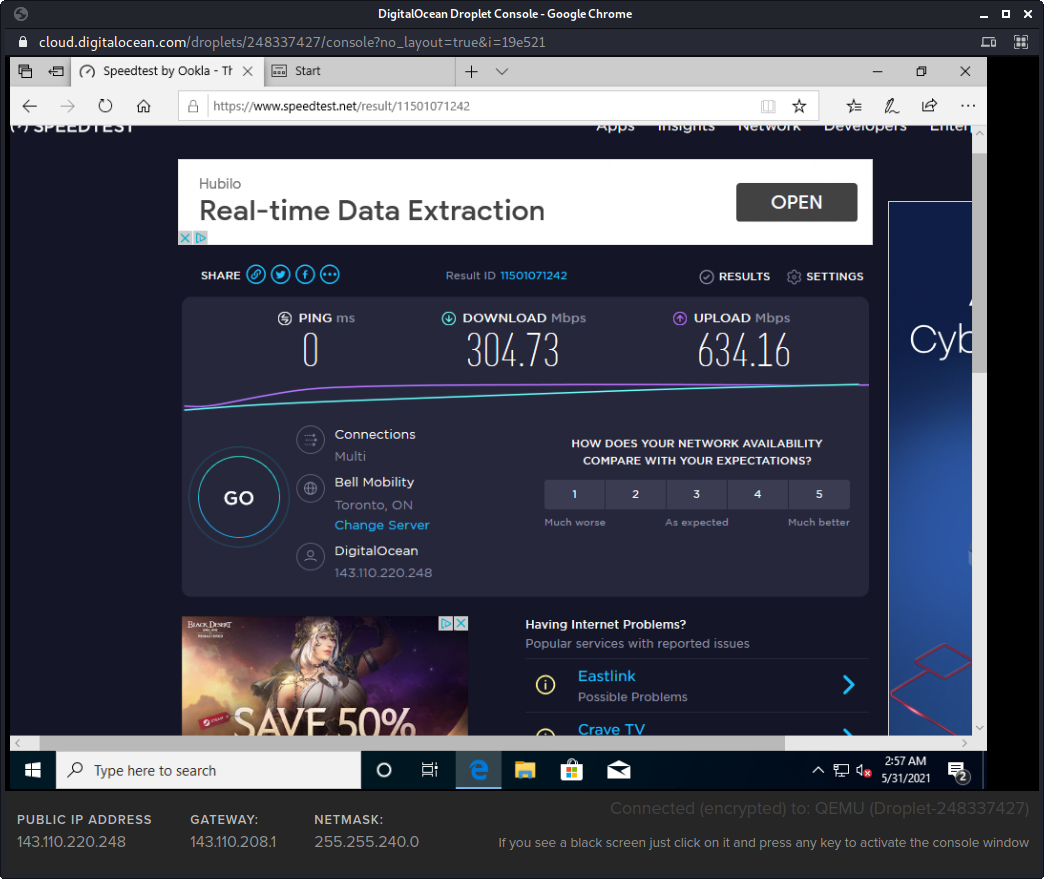
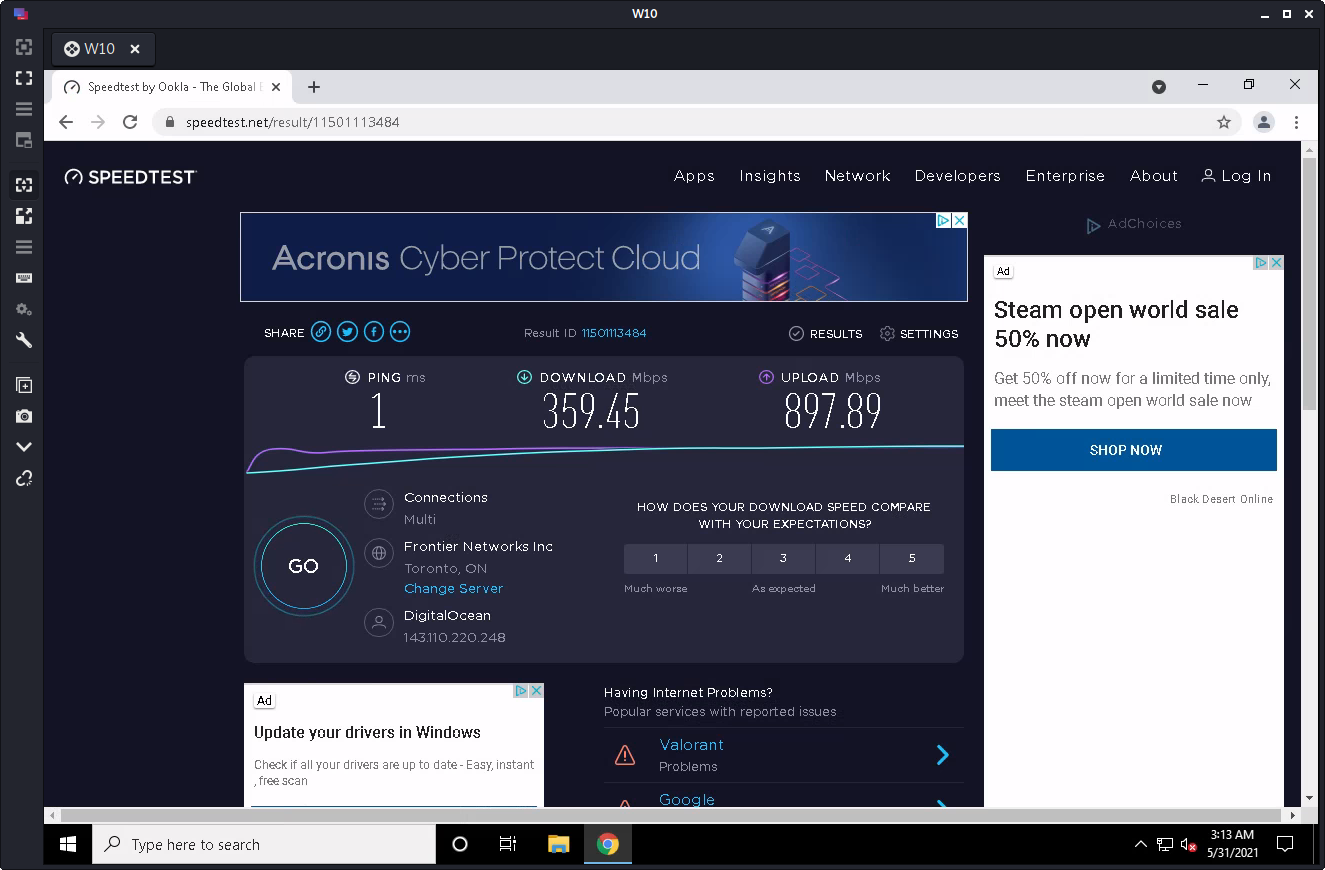
Below is the first speed test on a Droplet with 2 vCPUs and 2 GB of RAM, run over the Console.
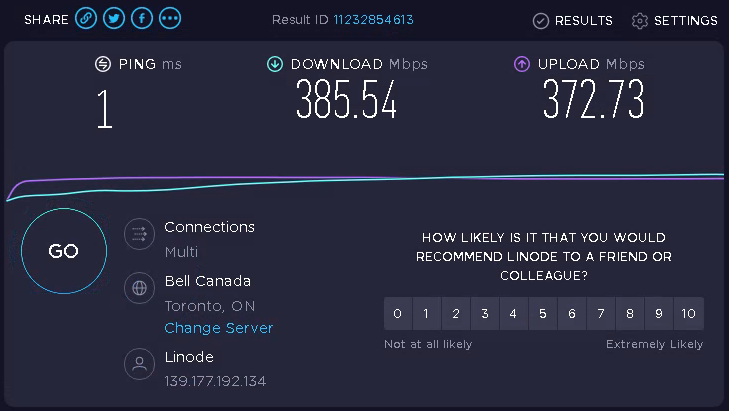
The same speed test repeated over RDP shows improved performance.
MIGRATION
The migration procedure can be used to transfer a VM between cloud providers or to upload/download from a local machine.
Verify connectivity between both VMs and confirm the SSH connection works from one to the other (using password authentication rather than SSH keys is recommended).
You can either push or pull the image depending on which direction the SSH connection is easier to establish.
Pushing from Local to Remote:
dd if=/dev/sda | gzip -1 - | ssh root@remote_ip dd of=/dev/sda

OR

dd if=image.gz | gzip -1 - | ssh root@remote_ip dd of=/dev/sda
Pulling from Remote to Local:
ssh user@remote_ip "dd if=/dev/sda | gzip -1 -" | dd of=/dev/sda

OR

ssh user@remote_ip "dd if=/dev/sda | gzip -1 -" | dd of=image.gz
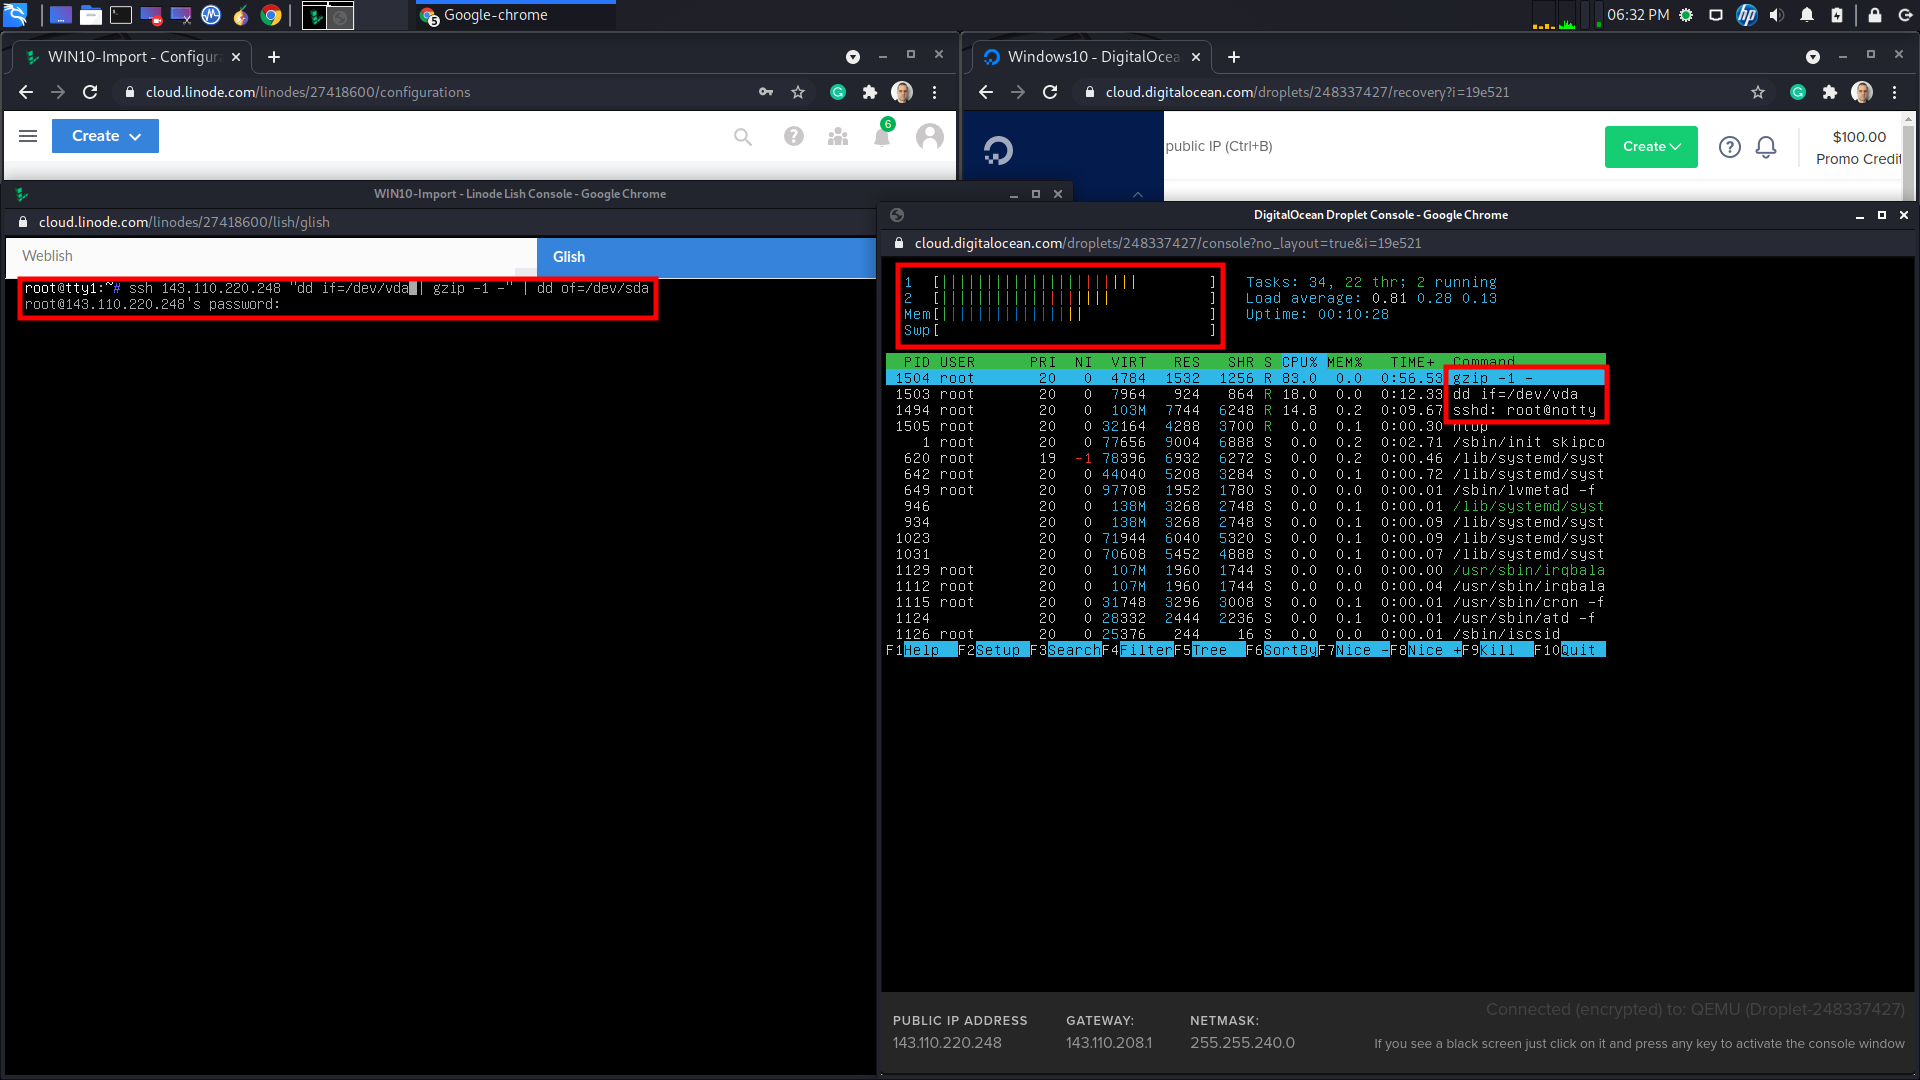
To verify the transfer is in progress, monitor the process on the remote VM.
Alternatively, add pv to the pipe to track progress locally:
dd if=/dev/sda | gzip -1 - | pv | ssh user@remote_ip dd of=/dev/sda
WINDOWS SERVER
It is recommended to fully customize the image before pushing it to the cloud.
The main issue is the login screen: neither Linode nor DigitalOcean provide a way to send Ctrl + Alt + Del through the console.
For this reason, you should create and enable a user for RDP access, and set the IP address manually before pushing the image to the cloud. The only exception is if you have a cloud infrastructure with VLANs and a gateway providing DHCP to the Windows machine, though you will still need an RDP-enabled user regardless.