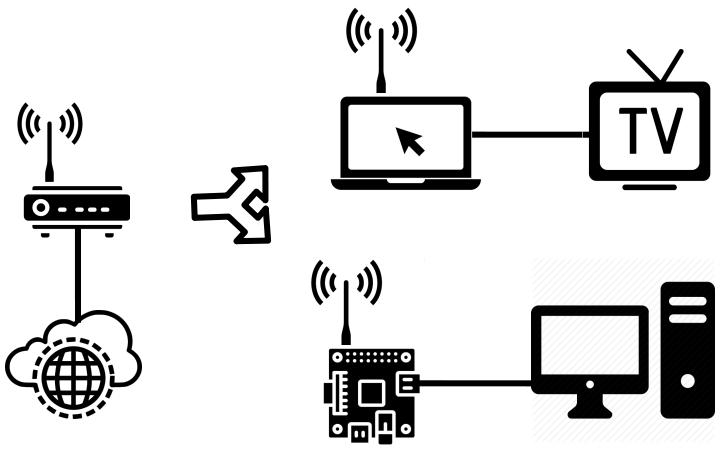
This post will show how to share the Internet between two network adapters on Ubuntu Desktop 18.04 (any architecture) and Raspbian Buster 10 (for Raspberry Pi).
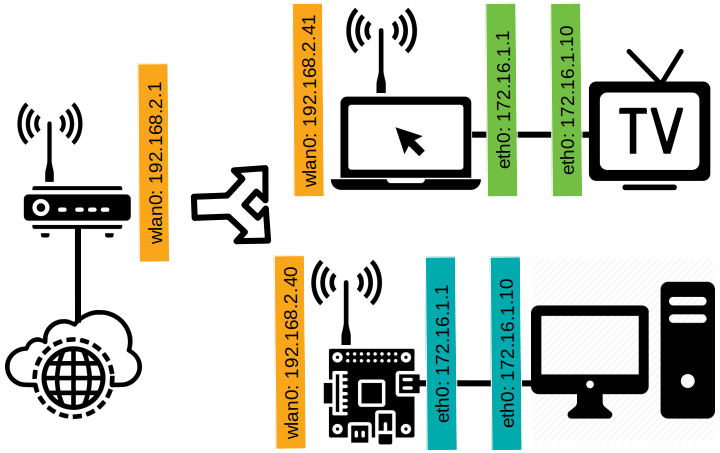
The most common situation is when your device (a laptop or Raspberry Pi) is connected to the Internet via WiFi and you want to share this connection with another device via Ethernet (port RJ45), such as a Smart TV or a desktop that has no integrated WiFi.
What is necessary:
- WiFi already set up with Internet access.
- Laptop or Raspberry Pi with a wireless card
- Linux operating system (Ubuntu or Raspbian)
- Ethernet cable
- The device you want to connect (TV, computer, printer, etc.)
What will be configured:
- Configure the NIC (network adapter)
- Install a DHCP server (auto-assigns IPs) [learn more – CertBros]
- Configure NAT (routing) [learn more – CertBros]
- Install a DNS server (optional) [learn more – Techquickie]
Configuring the NIC
ip a
1: lo: <omitted unnecessary text>
inet 127.0.0.1/8 scope host lo
<omitted unnecessary text>
2: eth0: <omitted unnecessary text>
inet 172.16.1.1/24 brd 172.16.1.255 scope global noprefixroute eth0
<omitted unnecessary text>
3: wlan0: <omitted unnecessary text>
inet 192.168.2.40/24 brd 192.168.2.255 scope global dynamic noprefixroute wlan0
<omitted unnecessary text>
1: lo: The loopback interface. Ignore this virtual interface.
2: eth0: The Ethernet adapter that will be connected to the TV, computer, printer, etc.
3: wlan0: The wireless adapter that must be connected to your WiFi with a working Internet connection.
Note: Interface names may vary. In this example, eth0 (LAN) and wlan0 (WAN).
In this example, eth0 is already manually configured.
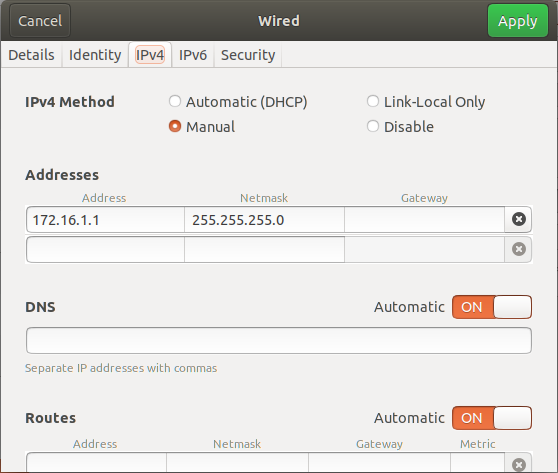
On Ubuntu, configure eth0 using the graphical interface as shown below:
On Raspbian, configure eth0 via the terminal by editing /etc/dhcpcd.conf:
sudo nano /etc/dhcpcd.conf
Add this code at the end of the file:
interface eth0
static ip_address=172.16.1.1/24
nogateway
Restart the computer after making this change.
Pay attention to the IPs in the new scenario:
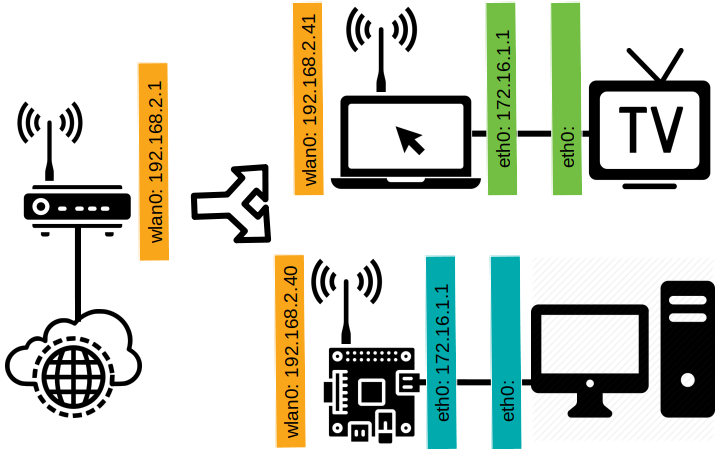
Regardless of whether you are setting up a laptop + TV or a Raspberry Pi + PC, pay attention to the color-coded IPs. All orange IPs are in the same subnet; blue and green IPs belong to other subnets.
The TV and PC each need an IP to communicate on the subnet. You can either configure each device manually or let them get an IP automatically via DHCP.
Installing the DHCP Server
sudo apt-get update
sudo apt-get install isc-dhcp-server -y
sudo nano /etc/default/isc-dhcp-server
Set the network adapter that DHCP will serve (LAN):
INTERFACESv4="eth0"
Edit the configuration file:
sudo nano /etc/dhcp/dhcpd.conf
Clear the file and replace it with this:
default-lease-time 600;
max-lease-time 7200;
option subnet-mask 255.255.255.0;
option broadcast-address 172.16.1.255;
option routers 172.16.1.1;
option domain-name-servers 8.8.8.8, 8.8.4.4;
option domain-name "host.local";
subnet 172.16.1.0 netmask 255.255.255.0 {
range 172.16.1.10 172.16.1.100;
}
Run the following commands:
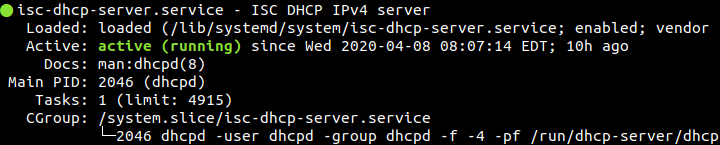
sudo systemctl restart isc-dhcp-server
sudo systemctl enable isc-dhcp-server
sudo systemctl status isc-dhcp-server
The second command may fail on Raspbian. That is fine, just continue.
Verify that the service is ACTIVE (shown in green):
Devices can now get their IP configuration automatically:
All of this configuration is customizable. In the example above, the laptop and the Raspberry Pi intentionally share the same IP address range, but they are on physically separate networks. The same applies to the TV and PC; they may both receive the first available IP from their respective DHCP servers. Verify that each device received its IP correctly.
Configuring NAT (for Ubuntu):
sudo ufw enable
sudo nano /etc/ufw/sysctl.conf
Uncomment the following line, or add it if it is not present:
net/ipv4/ip_forward=1
Do the same in /etc/sysctl.conf.
Edit the startup script:
sudo nano /etc/rc.local
Paste this content into the file:
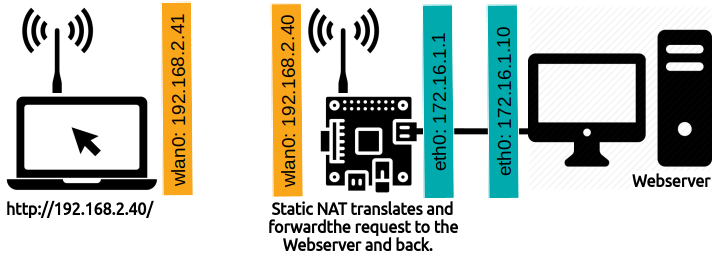
#!/bin/bash
iptables -P INPUT DROP
iptables -P FORWARD DROP
iptables -A INPUT -i lo -j ACCEPT
iptables -A INPUT -i eth0 -j ACCEPT
iptables -A INPUT -i wlan0 -m conntrack --ctstate ESTABLISHED,RELATED -j ACCEPT
iptables -t nat -A PREROUTING -p tcp -d 192.168.2.40 --dport 80 -j DNAT --to-destination 172.16.1.10:80
iptables -A FORWARD -i eth0 -o wlan0 -j ACCEPT
iptables -A FORWARD -i wlan0 -o eth0 -m conntrack --ctstate ESTABLISHED,RELATED -j ACCEPT
iptables -t nat -A POSTROUTING -j MASQUERADE
exit 0
Note: the italicized line in the middle is a template for Static NAT (Port Forwarding). Replace 192.168.2.40 with your public IP and 172.16.1.10 with your private IP (a web server in this case, on port 80). If you are not using port forwarding, simply delete that line. See the illustration below:
Make the file executable:
sudo chmod 755 /etc/rc.local
Configuring NAT (for Raspbian):
sudo nano /etc/rc.local
Add this code at the end of the file, right before the last line: exit 0
iptables -A INPUT -i lo -j ACCEPT
iptables -A INPUT -i eth0 -j ACCEPT
iptables -A INPUT -i wlan0 -m conntrack \
--ctstate ESTABLISHED,RELATED -j ACCEPT
iptables -A FORWARD -i eth0 -o wlan0 -j ACCEPT
iptables -A FORWARD -i wlan0 -o eth0 -m conntrack \
--ctstate ESTABLISHED,RELATED -j ACCEPT
iptables -t nat -A POSTROUTING -j MASQUERADE
systemctl start isc-dhcp-server
Restart Ubuntu/Raspbian for the changes to take effect, then verify that the TV and/or PC have Internet access.
Installing the DNS Server (optional)
With the current configuration, the DHCP server automatically points devices (TV, PC, printer, etc.) to Google’s public DNS servers (8.8.8.8 and 8.8.4.4). Another option is to use your wireless router’s DNS server (in this example, 192.168.2.1).
You can also set up your own private DNS server for full control. This lets you apply blacklists or whitelists for parental controls, business policies, or any other purpose.
sudo apt install bind9 -y
sudo nano /etc/bind/named.conf.options
Replace the entire file content with:
options{
directory "/var/cache/bind";
recursion yes;
forwarders {
8.8.8.8;
8.8.4.4;
};
forward only;
};
Note: the DNS server forwards requests it does not know how to resolve. After the first lookup, it caches the result for faster responses going forward.
Restart the DNS and DHCP servers:
sudo systemctl restart bind9
sudo systemctl restart isc-dhcp-server.service
Now restart all connected devices so they request a new configuration from the DHCP server and begin using the local DNS server.
Everything is set up and running!
To reserve a specific IP for a device, append the following to /etc/dhcp/dhcpd.conf:
host mytv {
hardware ethernet A4:BA:DB:14:BD:4F;
fixed-address 192.168.110.10;
}
BONUS
For port forwarding on a single network interface:
#!/bin/bash
iptables -P INPUT DROP
iptables -P FORWARD DROP
iptables -A INPUT -i lo -j ACCEPT
iptables -A INPUT -i eth0 -j ACCEPT
iptables -t nat -A PREROUTING -p tcp -d 192.168.1.5 --dport 443 -j DNAT --to-destination 192.168.1.50:443
iptables -A FORWARD -s 192.168.1.0/24 -j ACCEPT
iptables -t nat -A POSTROUTING -j MASQUERADE
exit 0
Alternatively, use nftables to manage iptables rules:
sudo ufw disable
sudo systemctl disable ufw
sudo apt install nftables -y
sudo systemctl enable nftables
sudo sed -i 's/#net.ipv4.ip_forward=1/net.ipv4.ip_forward=1/g' /etc/sysctl.conf
sudo sysctl -p
sudo nft list ruleset
sudo nft flush ruleset
sudo nft list ruleset
sudo nft flush ruleset
sudo nft add table nat
sudo nft 'add chain nat postrouting { type nat hook postrouting priority 100 ; }'
sudo nft 'add chain nat prerouting { type nat hook prerouting priority -100; }'
sudo nft 'add rule nat prerouting ip daddr 192.168.1.5 tcp dport { 21 } dnat 192.168.1.50:21'
sudo nft 'add rule nat prerouting ip daddr 192.168.1.5 tcp dport { 60000-65000 } dnat 192.168.1.50:60000-65000'
sudo nft add rule nat postrouting masquerade
sudo nft list ruleset | sudo tee /etc/nftables.conf
To manage rules:
sudo nft -a list table nat
sudo nft delete rule nat prerouting handle 7
How to configure NAT with nftables:
sudo nano /etc/sysctl.conf
net.ipv4.ip_forward = 1
sudo nano /etc/nftables.conf
table inet nat {
    chain prerouting {
        type nat hook prerouting priority -100; policy accept;
    }
    chain postrouting {
        type nat hook postrouting priority 100; policy accept;
        oifname "eth0" masquerade
    }
}
table inet filter {
    chain forward {
        type filter hook forward priority 0; policy drop;
        iifname "eth1" oifname "eth0" accept
        ct state established,related accept
    }
}
sudo sysctl -p
sudo nft -f /etc/nftables.conf