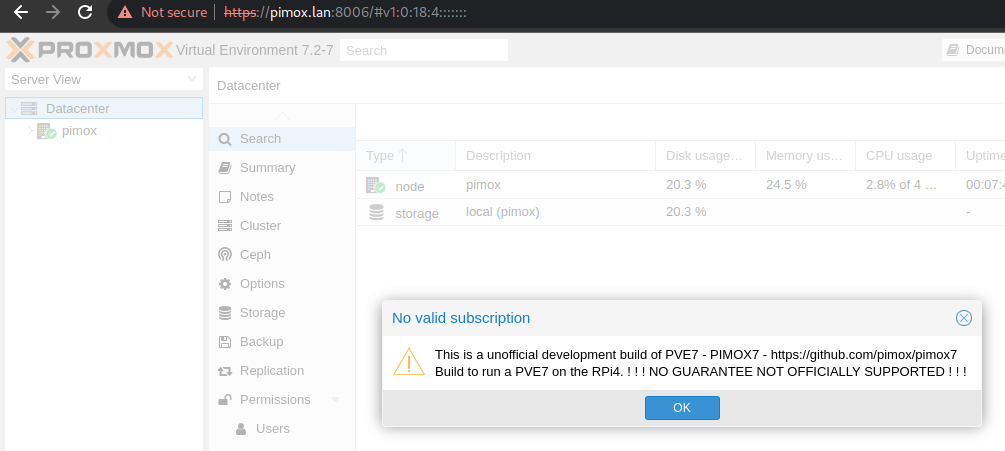
Proxmox officially does not run on Raspberry Pi but Pimox does [Link].
Pimox is an adapted build of Proxmox tailored to work on the Raspberry Pi 4 (ARM64 architecture).
REQUIREMENTS
- Raspberry Pi 4
- 2 GB of RAM works but is limited.
- 4 GB of RAM works well.
- 8 GB of RAM is recommended.
- 1.5 GB must be reserved for the host system.
- Storage
- Minimum 16 GB microSD or USB.
- Recommended: 32 GB or more of fast SSD, NVMe, or M.2 over USB.
- Accessories
- Power supply.
- A closed case.
- Heatsink (passive cooling).
- 5V fan (active cooling) such as a Fanshim [Link].
If necessary, update the RPi firmware to prioritize USB boot over microSD.
Write the latest Raspberry Pi OS Lite image to the storage media of your choice and boot it up.
PROCEDURES
Do NOT proceed with the installation via SSH, as it will drop the connection and interrupt the installation.
Using the console (physical keyboard, mouse, and monitor), run the following commands as root. Do NOT use sudo.
sudo su -
curl https://raw.githubusercontent.com/pimox/pimox7/master/RPiOS64-IA-Install.sh > RPiOS64-IA-Install.sh
chmod +x RPiOS64-IA-Install.sh
./RPiOS64-IA-Install.sh
Note: The installer will ask for a static IP because it does NOT work with DHCP. Just follow the prompts.
The Proxmox web interface address will be shown at the end.
To increase the default swap size on the host:
nano /etc/dphys-swapfile
...
CONF_SWAPSIZE=2048
...
systemctl enable dphys-swapfile
It is recommended to install GPU drivers and libraries to access the RPi hardware features.
sudo apt update && sudo apt install mesa-utils libraspberrypi-bin -y
vcgencmd measure_temp ; vcgencmd get_mem gpu
sudo reboot
GUEST SYSTEMS
LXC (Linux Containers) are recommended over VMs to maximize performance and resource utilization. Read more at [Link].
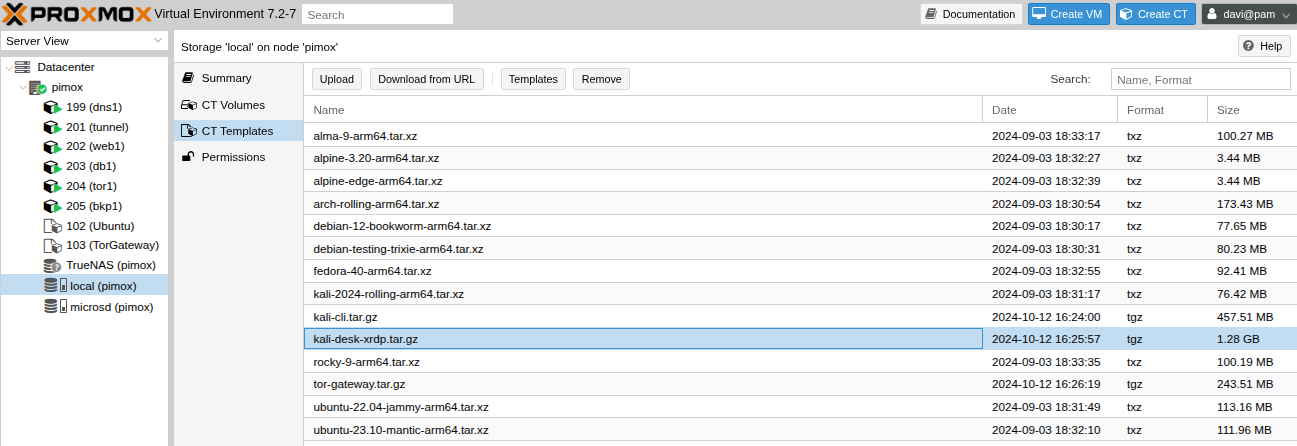
Make sure the LXC repository you download from is trustworthy. Only the file rootfs.tar.xz is required [Link].

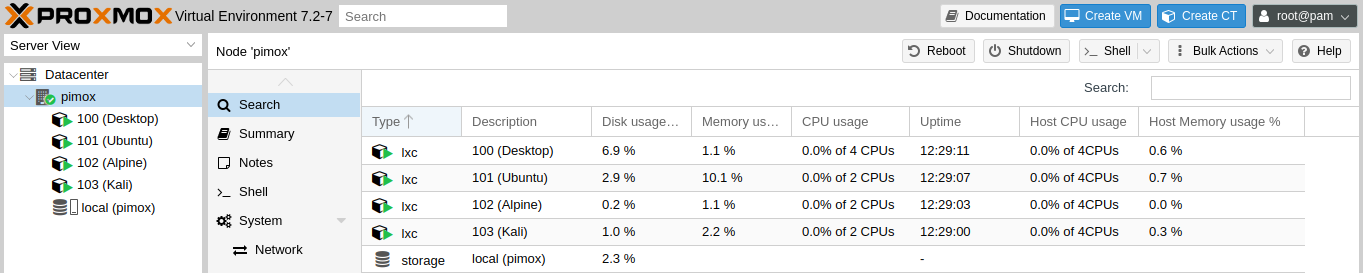
Note: VMs (Virtual Machines) do not work on this platform. CTs are much better anyway.
ONLINE REPOSITORY OF LXC TEMPLATES
Unfortunately, Pimox does not include a custom repository for ARM64 templates, likely because it requires hosting infrastructure and ongoing maintenance.
I have developed and maintained a single source for an updated list of ARM64 images on GitHub called Pimox7 LXC Images [Link].
Installation of the Templates Repository:
wget https://raw.githubusercontent.com/davift/pimox7-lxc-images/main/install.sh -O install.sh && chmod +x install.sh && sudo ./install.sh
It will download the latest version of the installation script and prompt for confirmation before each task:
- Replace/Update the LXC list of templates (y/N)?
- If confirmed, it will back up the original files (incompatible) and download the repository list with ARM64 images.
- Download the templates from linuxcontainers.org (y/N)?
- All images can be downloaded from linuxcontainers.org at once. This may require approximately 1.2 GB.
- Download custom templates (y/N)?
- It will ask to download all custom images I produced and shared.
What are the custom images?
- Kali CLI
- Includes the full Kali command prompt look and feel, plus all basic tools.
- Kali Desktop with XRDP
- After creating and starting a CT with this image, use any RDP client to connect to a full virtual desktop.
- Tor Gateway
- This appliance works as a gateway to route all traffic through the Tor Network.
- The first network adapter
eth0onvmbr0(Internet) with DHCP. - Create a secondary adapter
eth1onvmbr2(isolated network) with the IP10.10.10.1. - All inbound traffic on
eth1will be routed through Tor. 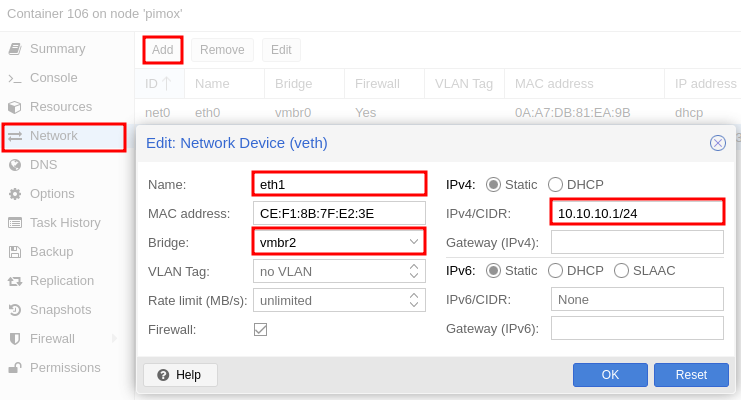
- The first network adapter
- Any other CT connected to vmbr2 needs the following network configuration:
- IPv4
10.10.10.2/24to10.10.10.254/24. - Gateway
10.10.10.1. 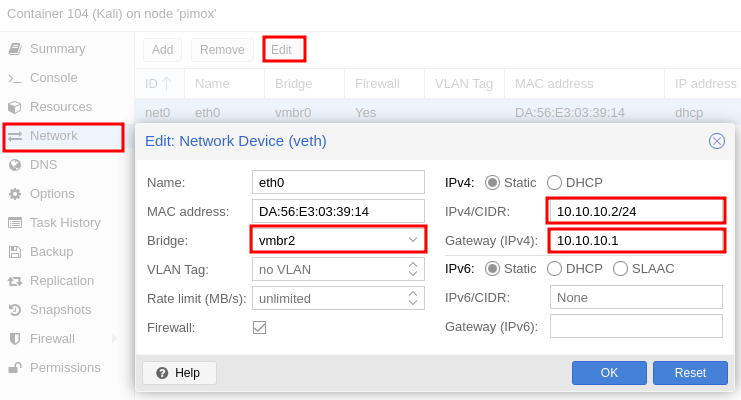
- IPv4
- This appliance works as a gateway to route all traffic through the Tor Network.
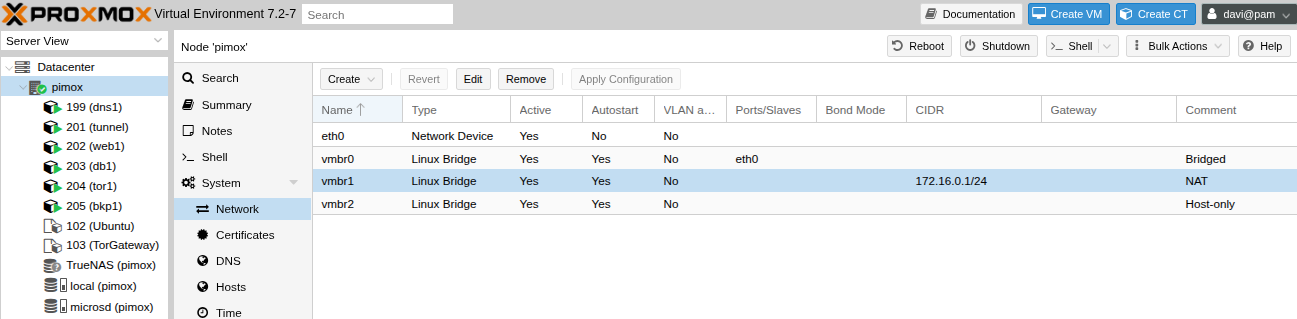
INTERNAL NETWORKS
Out of the box, Proxmox creates a bridge network vmbr0 linked to the physical port eth0. The wireless adapter wlan0 becomes unusable (a workaround is coming soon).
Additional private networks may be useful:
vmbr0- Each CT or VM gets its own MAC address and will receive an IP from the network attached to the Ethernet port.
vmbr1- A private network with NAT to provide internet access while reusing the host IP address. See steps below.
vmbr2- An isolated network with no internet access, useful for sandboxing applications or local workloads.
vmbr3- (In progress: a network linked to the wireless interface.)
NAT NETWORK WITH DHCP vmbr1
On the Pimox host, navigate to System > Network and click Create > Linux Bridge.
Enter 172.16.0.1/24 in the IPv4/CIDR field. No other fields are required.
This creates a private network that can communicate with the host, but traffic will not be routed out yet.
Setting up the DHCP server via SSH or Shell on the host:
sudo apt-get update && sudo apt-get install isc-dhcp-server -y
sudo nano /etc/default/isc-dhcp-server
Bind the DHCP server to vmbr1 for IPv4 only (disable IPv6):
INTERFACESv4="vmbr1"
#INTERFACESv6=""
Specify the DHCP parameters:
sudo nano /etc/dhcp/dhcpd.conf
Append the following to the file:
default-lease-time 600;
max-lease-time 7200;
option subnet-mask 255.255.255.0;
option broadcast-address 172.16.0.255;
option routers 172.16.0.1;
option domain-name-servers 9.9.9.9;
option domain-name "host.local";
subnet 172.16.0.0 netmask 255.255.255.0 {
range 172.16.0.10 172.16.0.100;
}
Apply the changes:
sudo systemctl restart isc-dhcp-server
sudo systemctl enable isc-dhcp-server
sudo systemctl status isc-dhcp-server
Any new CT or VM attached to this network will now receive an IP automatically.
Setting up Forwarding / Routing via SSH or Shell on the host:
sudo ufw enable
sudo nano /etc/ufw/sysctl.conf
Uncomment or add the following line:
net/ipv4/ip_forward=1
Do the same in /etc/sysctl.conf.
Edit or create the startup script:
sudo nano /etc/rc.local
Add the following content:
#!/bin/bash
WAN="vmbr0"
LAN="vmbr1"
iptables -A INPUT -i lo -j ACCEPT
iptables -A OUTPUT -o lo -j ACCEPT
# Port forwarding rules must be placed here
iptables -A FORWARD -i $LAN -o $WAN -j ACCEPT
iptables -A FORWARD -i $WAN -o $LAN -m state --state RELATED,ESTABLISHED -j ACCEPT
iptables -t nat -A POSTROUTING -o $WAN -j MASQUERADE
exit 0
Apply the changes:
sudo chmod +x /etc/rc.local
sudo /etc/rc.local
Guests on vmbr1 should now be able to reach the Internet.
Optionally, install a DNS server on the host [Link] or deploy a Pi-Hole in a CT [Link].
DEPLOYING USEFUL CT SYSTEMS
Kali Remote Terminal
sudo apt update && apt dist-upgrade -y
sudo apt install ssh wget curl nano man bind9-dnsutils inetutils-tools iputils-* kali-defaults zsh zsh-syntax-highlighting zsh-autosuggestions kali-linux-arm -y
sudo apt purge network-manager -y
sudo systemctl start ssh && systemctl enable ssh
sudo adduser kali
sudo usermod -aG sudo kali
Kali Remote Desktop
Install all the same packages from the Kali Remote Terminal section before proceeding.
sudo apt install kali-desktop-xfce xorg xrdp -y
sudo systemctl enable xrdp
sudo reboot
The routing rules on the host can be updated as follows to forward the RDP port to the Remote Desktop:
#!/bin/bash
WAN="vmbr0"
LAN="vmbr1"
iptables -A INPUT -i lo -j ACCEPT
iptables -A OUTPUT -o lo -j ACCEPT
iptables -A FORWARD -i $WAN -o $LAN -p tcp --dport 3389 -m state --state NEW,RELATED,ESTABLISHED -j ACCEPT
iptables -t nat -A PREROUTING -i $WAN -p tcp --dport 3389 -j DNAT --to-destination 172.16.0.13:3389
iptables -A FORWARD -i $LAN -o $WAN -j ACCEPT
iptables -A FORWARD -i $WAN -o $LAN -m state --state RELATED,ESTABLISHED -j ACCEPT
iptables -t nat -A POSTROUTING -o $WAN -j MASQUERADE
exit 0
Tor Proxy Gateway
A Tor Proxy Gateway routes traffic through the Tor Network via a SOCKS5 proxy for maximum privacy.
It can sit between vmbr0 or vmbr1 (which have internet access) and an isolated network such as vmbr2.
apt update && apt upgrade -y && apt install tor nano curl -y
nano /etc/tor/torrc
...
SocksPort 0.0.0.0:9050
...
systemctl restart tor && systemctl enable tor
curl --socks5-hostname 127.0.0.1:9050 http://ip.me
Compare the output IP with your real public IP. Guest systems on the isolated network vmbr2 should use the SOCKS5 proxy from the Tor Gateway.
CloudFlare Bridge
Navigate to CloudFlare > Zero Trust > Access > Tunnels.
apt update && sudo apt upgrade -y && sudo apt install curl -y
curl -L --output cloudflared.deb https://github.com/cloudflare/cloudflared/releases/latest/download/cloudflared-linux-arm64.deb
dpkg -i cloudflared.deb
cloudflared service install **********
Replace ********** with your connector string.
Installing a GUI on Ubuntu 22.04
Prepare the system:
apt update && apt upgrade -y
Choose one of the options below:
For Xfce (lightweight):
apt install xfce4 xrdp -y
For Gnome:
apt install ubuntu-desktop-minimal xrdp -y
For KDE (heaviest):
apt install kde-plasma-desktop xrdp -y
Enable RDP on startup:
systemctl enable xrdp && reboot
CREATING CUSTOM LXC TEMPLATES
Deploy a new CT using the base image of your choice and customize it.
When ready to turn the CT into a shareable template, back it up and select GZIP as the compression format.
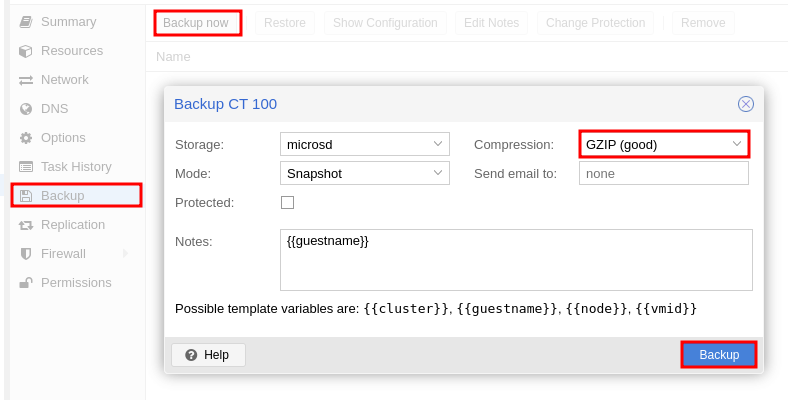
This will produce a backup file at /<PATH>/dump/vzdump-lxc-<CT_ID>-<TIMESTAMP>.tar.gz.
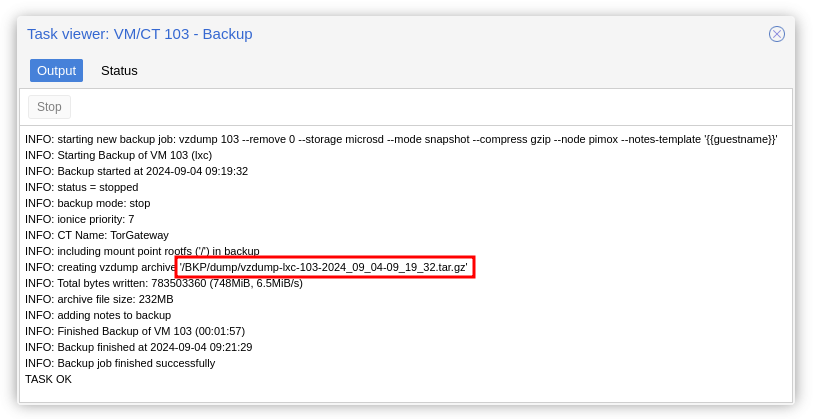
Transfer the file via SCP and you are done!
FOLLOW UP
Over 3 years ago, I wrote this post when I started the experiment with Pimox as a replacement for 3 instances I had running on Linode. Here are my results and reflections.
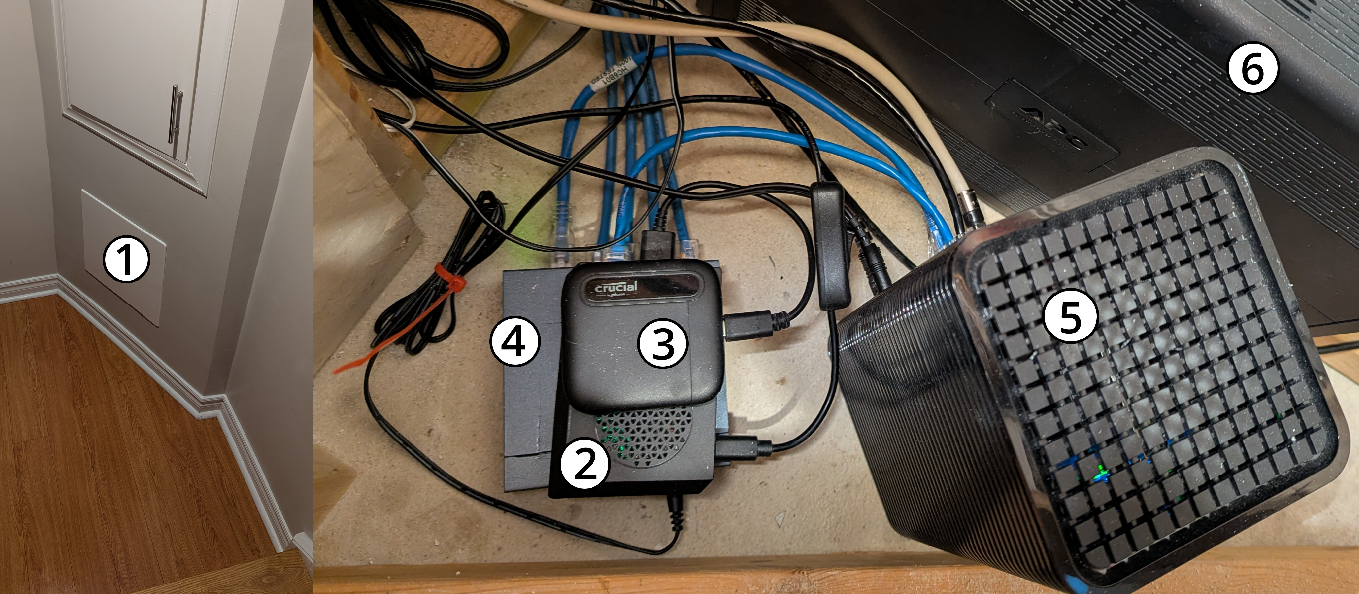
- Yes, it lives silently and hidden inside my wall, right below the electric panel and the internet entry point.
- It is a Raspberry Pi 4 with 4GB of RAM that boots and runs off an SSD.
- I also have a 120GB MicroSD card for backups.
- And a PWM-controlled fan hat [Link].
- The USB 3.0 SSD has 512GB of storage and appears to be faster than the Pi demands.
- An unmanaged switch distributes the DMZ (untrusted) around my home for IoT devices, APs, and my isolated homelab network (that is another story).
- The Pi is directly connected to the gigabit cable modem.
- A UPS keeps everything running for up to 2.5 hours.
No need to say that I never returned to using Linode for this micro production environment, right?
- The uptime goes back as far as I have lived in my new home.
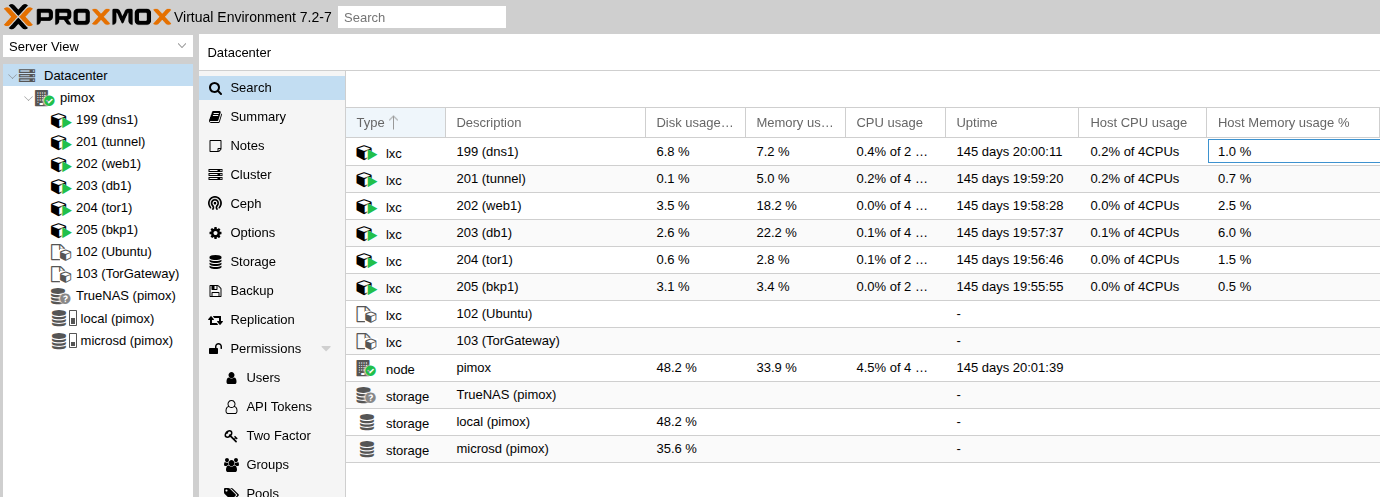
dns1is a Pi-hole with multiple Protective DNS features to protect my entire network.- Workloads 200+ are isolated in a network that cannot access my LAN, nor receive requests from it.
tun1is the tunnel to CloudFlare for exposing services publicly.web1is the web server running WP (this blog) plus a handful of other sites.db1is a MySQL database serving the WP websites.tor1hosts a collection of Tor hidden services [Link].bkp1pushes backups daily to my local S3-compatible object storage and to AWS S3 Deep Glacier.
- All containers are based on Alpine, and CPU units (number of cores and CPU time) are capped to protect overall system health.
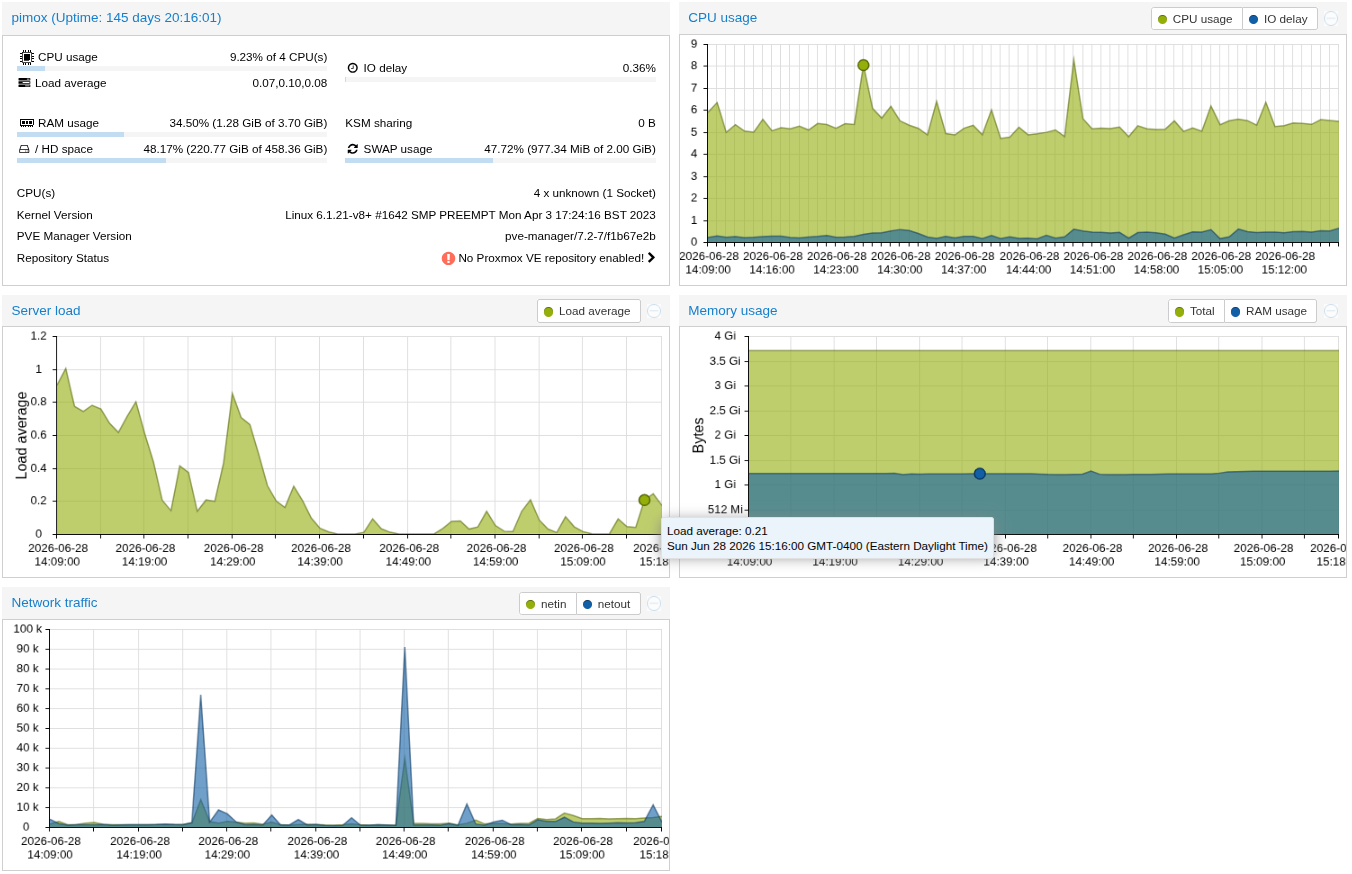
The Pi does not appear to be under much load, as most of the overhead is handled by CloudFlare (TLS termination and CDN cache hits).
Firewall policies (that I would reveal) isolate the vmbr1 traffic from my LAN.
A series of custom images, including full desktop environments, can be found at Link.
See also the project TorTunnel [Link].
- It assumes the default gateway of an isolated network (in my case
vmbr2) and routes ALL traffic through the Tor Network. - Excellent for safely deploying malware and experimenting with untrusted code.
- Offers maximum privacy for research and stealthy investigations.