This post was last tested and updated for Ubuntu 24.04 LTS.
A VPN encrypts data traffic between two points. For general internet browsing, it is NOT necessarily end-to-end encrypted.
There are many reasons why a VPN may be necessary:
- Connect from home to the office over the public internet (sensitive information),
- Hide your traffic from the network administrator (ISP, hotel, Wi-Fi, etc),
- Access region-restricted content (streaming, ACL, etc),
- Download copyrighted or censored material,
- And more.
What are the alternatives to VPN and what type of “protection” do they offer?
| Expected | Internet Service Provider | Incognito Mode | Public VPN | Private VPN (truly end-to-end) | Tor Network Only | Tor Browser | Observations |
|---|---|---|---|---|---|---|---|
| Tracking Protection | NO | NO | NO | NO | Tunneling your traffic over an encrypted network does not make tracking any harder. All identifiable information still passes through the tunnel. | ||
| Fingerprinting Protection | NO | NO | NO | NO | NO | Only the Tor Browser removes or replaces identifiable information (fingerprints), making all users appear the same. | |
| Geo-blocking Evasion | NO | NO | Geo-blocking is usually based on IP address (e.g. streaming services). This is one of the most common uses of VPN for the general public. | ||||
| Man-in-the-middle Protection | NO | NO | NO | NO | NO | Tunneling traffic over third-party networks is always susceptible to MITM attacks. Even Tor exit nodes should never be trusted. |
NOTE: Websites with SSL/TLS (HTTPS) are end-to-end encrypted between the browser and the server (e.g. internet banking via browser or app). Your ISP or network administrator may know you are connecting to your bank or email provider, but they cannot see the content or tamper with it. On the other hand, if you are torrenting through a public VPN, the VPN provider can see your traffic in plain text, though the rest of the internet cannot see you behind the VPN server, and your traffic is mixed with that of many other users. Keep this in mind!
DEPLOYING A PRIVATE VPN SERVER
Download the installation script:
wget https://git.io/vpn -O openvpn-install.sh
If the command above does not work, get the script directly from GitHub – Nyr/OpenVPN Install [Link] or [OpenVPN-Install].
chmod -v +x openvpn-install.sh
sudo ./openvpn-install.sh
The script will ask a few questions. It is recommended to use:
First question: UDP;
Second question: default port 1194;
Third question: Google DNS;
The fourth question is the name you want to give to the specific client you are creating, for example: client1
The script creates a configuration file at /root/client1.ovpn (the filename matches the name you gave).
This file must be transferred to the client machine. It is recommended to use an encrypted transfer method such as:
scp [user]@[ip or hostname of the server]:/root/client1.ovpn .
The service starts automatically on the server and can be managed with:
sudo systemctl stop [email protected]
sudo systemctl start [email protected]
sudo systemctl restart [email protected]
sudo systemctl status [email protected]
From the client side (a Linux desktop, for example), run the following commands:
dig +short myip.opendns.com @resolver1.opendns.com
sudo apt install openvpn
sudo cp client1.ovpn /etc/openvpn/client.conf
sudo systemctl start openvpn@client
ping 10.8.0.1 -c 2
dig +short myip.opendns.com @resolver1.opendns.com
If you run these commands in order: the first checks your current public IP (your home ISP or the public Wi-Fi you are on); the fourth connects to the VPN; the fifth pings the VPN server twice through the tunnel; and the sixth checks your public IP again, this time returning the IP of your VPN server. Verify that it changed!
Note that on the client side, the VPN runs as a service and starts automatically on boot. To enable or disable this behaviour:
sudo nano /etc/default/openvpn
Find and uncomment the line AUTOSTART=”none” to prevent it from starting automatically.
For configuring OpenVPN Client in pfSense, see the next post [Link].
CUSTOMIZING CLIENT-SIDE: /etc/openvpn/client.conf
- pull-filter ignore “redirect-gateway”
- Prevents all traffic from being tunneled. Only traffic destined for the VPN network will go through the tunnel.
- dhcp-option DNS 10.8.0.254
- Forces a specific DNS server for this client over the VPN connection. DNS servers received during the connection will have lower priority.
- dhcp-option Domain test.local
- Forces a specific domain for this client over the VPN connection. Useful for Active Directory environments and can be combined with the DNS option.
CUSTOMIZING SERVER-SIDE: /etc/openvpn/server/server.conf
- #server-ipv6 fddd:1194:1194:1194::/64
- Comment this line to prevent IPv6 address assignment.
- #ifconfig-pool-persist ipp.txt
- Comment this line to allow dynamic IP assignment, or edit the file to assign static IPs per client.
- push “dhcp-option DNS 8.8.4.4”
- Add or comment out as many of these lines as needed, listed in the desired priority order.
- duplicate-cn
- Adding this line allows the same client certificate to be used for multiple simultaneous connections.
IMPORTANT: Stop the service before editing configuration files, and start it again afterward.
OPENVPN MONITOR
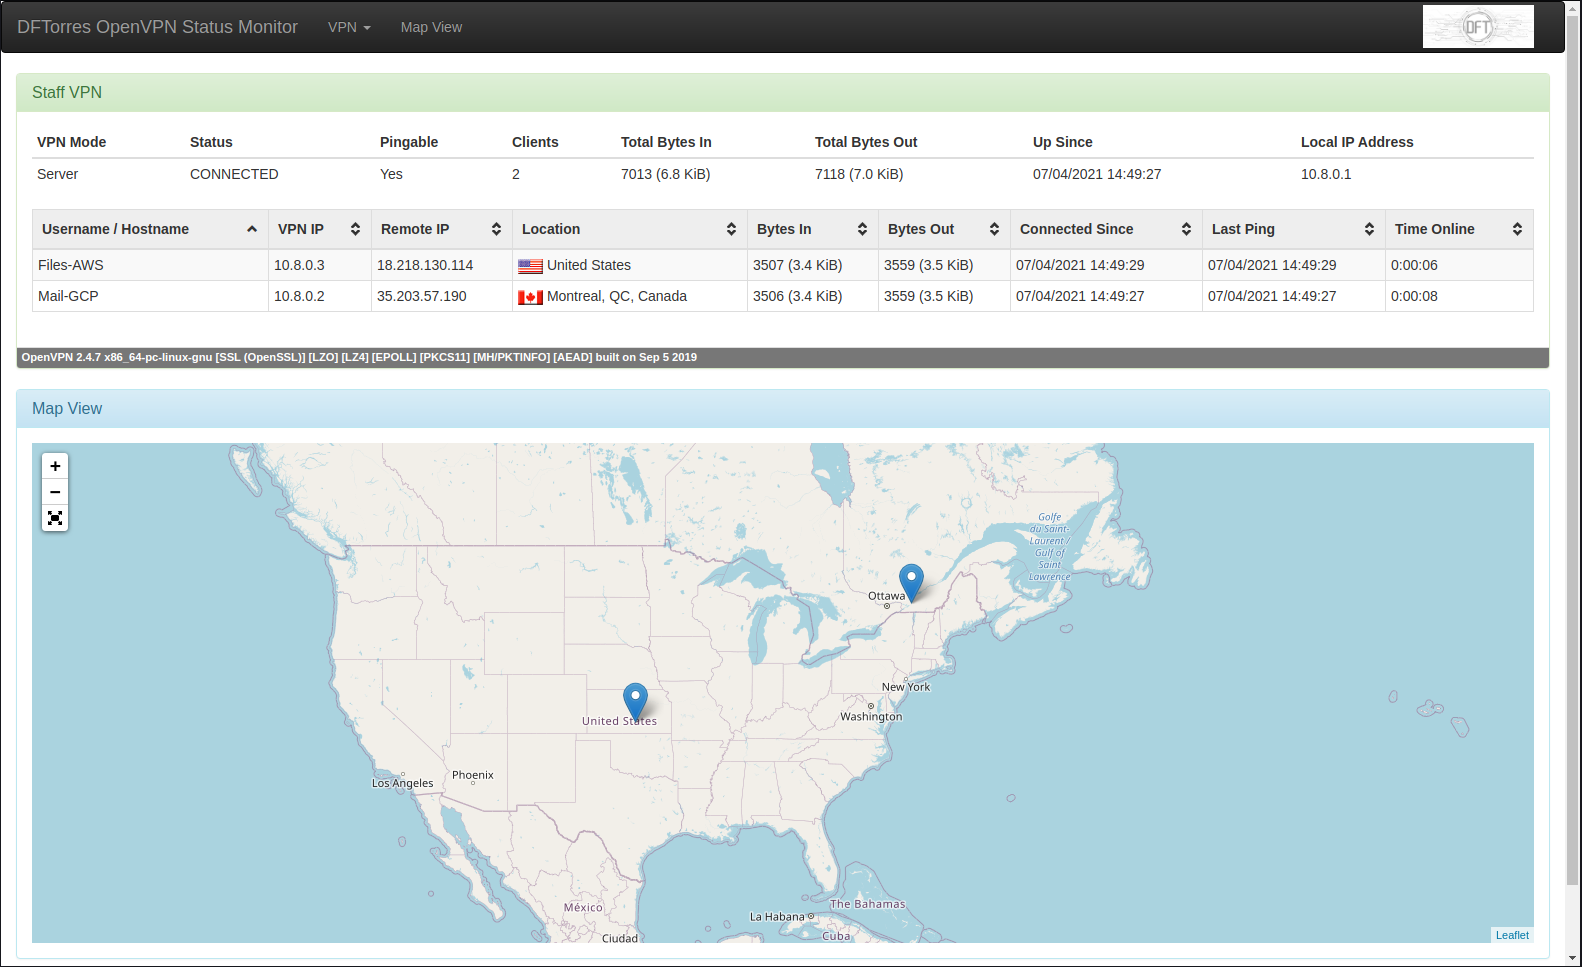
sudo nano /etc/openvpn/server/server.conf
Add the following line at the end:
management 127.0.0.1 17562
Before restarting the service, verify that port 17562 is not already in use, then confirm the service starts correctly.
lsof -i :17562
sudo systemctl restart [email protected]
sudo systemctl status [email protected]
Install all dependencies:
sudo apt install git apache2 libapache2-mod-wsgi python3-geoip2 python3-ipaddr python3-humanize python3-bottle python3-semantic-version geoip-database geoipupdate
sudo git clone https://github.com/furlongm/openvpn-monitor.git /var/www/openvpn-monitor
Configure the monitor:
sudo cp /var/www/openvpn-monitor/openvpn-monitor.conf{.example,}
cd /var/www/openvpn-monitor
grep -irl 5555 . | xargs -I {} sed -i 's/5555/17562/' {} (double check)
Adjust the configuration to match your location:
sudo nano /var/www/openvpn-monitor/openvpn-monitor.conf
Example:
[openvpn-monitor]
site=DFTorres
logo=logo.jpg
latitude=43.6655
longitude=-79.4204
maps=True
maps_height=500
geoip_data=/var/lib/GeoIP/GeoLite2-City.mmdb
datetime_format=%d/%m/%Y %H:%M:%S

[VPN1]
host=localhost
port=17562
name=Staff VPN
show_disconnect=False
Download and place the GeoLite2-City.mmdb file from the GitHub repository [Link].
Configure Apache:
sudo nano /etc/apache2/sites-available/openvpn-monitor.conf
Paste the following into the new file:
ScriptAlias / /var/www/html/openvpn-monitor/openvpn-monitor.py
<Directory /var/www/html/openvpn-monitor>
Options +ExecCGI
AddHandler cgi-script .py
DirectoryIndex openvpn-monitor.py

AllowOverride None
Require ip 192.168.0.0/16
</Directory>
Replace 192.168.0.0/16 with your allowed network.
Set ownership to the www-data user:
sudo chown -R www-data: /var/www/openvpn-monitor/
Check the configuration syntax, enable the new site, and disable the default site:
sudo apachectl -t
sudo a2ensite openvpn-monitor.conf
sudo a2dissite 000-default.conf
sudo a2enmod cgi
sudo systemctl restart apache2
Try accessing your server in a browser at http://server-ip-or-name/
If the Python script is not executing and instead displays its source code, you may need to update the first line of the .py file (#!/usr/bin/env python) to match your server’s Python configuration:
sudo nano /var/www/openvpn-monitor/openvpn-monitor.py
Replace the first line with:
#!/usr/bin/python3
Or if that does not work:
#!/usr/bin/python
If this server hosts other websites, customize openvpn-monitor.conf using a VirtualHost block as shown below, and skip the step to disable the default site (sudo a2dissite 000-default.conf):
<VirtualHost *:80>
ServerAdmin [email protected]
ServerName openvpn-server-name-or-ip
DocumentRoot /var/www/html/openvpn-monitor
ErrorLog ${APACHE_LOG_DIR}/error.log
CustomLog ${APACHE_LOG_DIR}/access.log combined
</VirtualHost>

<Directory /var/www/html/openvpn-monitor>
Options +ExecCGI
AddHandler cgi-script .py
DirectoryIndex openvpn-monitor.py
AllowOverride None
Require ip 192.168.0.0/16
</Directory>
Instead of restricting access by IP (Require ip 192.168.0.0/16), you can expose the monitor on the internet using password authentication:
sudo apt-get install apache2-utils
sudo htpasswd -c /etc/apache2/.htpasswd user1
sudo htpasswd /etc/apache2/.htpasswd user2
...
NOTE: use the -D argument to delete a user.
Repeat the third line for each additional user you want to create.
sudo nano /etc/apache2/sites-available/openvpn-monitor.conf
Add the bold lines to the existing configuration:
<Directory /var/www/openvpn-monitor/>
Options +ExecCGI
AddHandler cgi-script .py
DirectoryIndex openvpn-monitor.py
AllowOverride None

AuthType Basic
AuthName "Restricted Content"
AuthUserFile /etc/apache2/.htpasswd
Require valid-user
</Directory>
Restart Apache and test the page.
OpenVPN Monitor provides real-time information about connected users. IPFM complements it by acting as an IP Flow Meter, logging total data usage per user.
IP FLOW METER

sudo apt install ipfm
sudo systemctl stop ipfm
sudo cp /etc/ipfm.conf /etc/ipfm.conf.bkp
sudo nano /etc/ipfm.conf
Since the VPN network is 10.8.0.0/24, configure it as follows:
DEVICE tun0
NEWLOG
LOG 10.8.0.0/255.255.255.0
FILENAME "/var/log/ipfm/vpn-%Y-%m-%d"
DUMP EVERY 1 minute
CLEAR NEVER
SORT TOTAL
Restart the service and watch the folder for reports:
sudo systemctl start ipfm
watch -n 1 "ls -l /var/log/ipfm/"
Log files will appear in the directory and be updated every minute. A new file is created at the start of each month.
CHECK FOR CONNECTED CLIENTS
Add the following lines to /etc/openvpn/server/server.conf:
management 127.0.0.1 7505
log-append /var/log/openvpn.log
status /var/log/openvpn-status.log
verb 3
Restart the service and test the management interface with netcat or telnet:
nc 127.0.0.1 7505
echo "status 3" | timeout 1 nc 127.0.0.1 7505 | grep -E "^CLIENT_LIST"
sudo cat /var/log/openvpn-status.log
sudo tail -f /var/log/openvpn.log
If you only need a secure connection for up to 2 simultaneous devices, such as a smartphone and a laptop, consider using the OpenVPN Access Server [Link]. Licensing details are available at [Link].
OpenVPN-AS is a full-featured web-based GUI that simplifies the setup considerably. The only limitation is that more than 2 users requires a paid license.
Read Also
Performance OpenVPN vs WireGuard [Link]
Setting Up WireGuard VPN [Link]
pfSense with OpenVPN Client [Link]
GRE VPN Tunnel on Cisco [Link]