In this scenario, the blue and red blocks represent groups of computers in different physical locations (floors of a building).
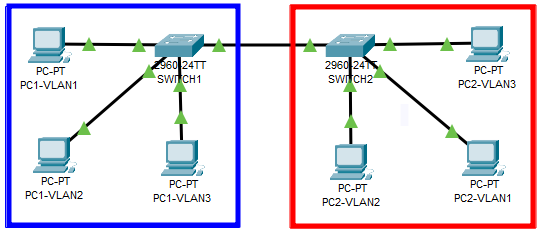
VLAN1 is the default VLAN on all ports, meaning any computer can reach the others with no filters or restrictions.
The connection between both switches works as a “bridge”.
Dividing the network into VLANs increases security, reduces the number of routers needed, and reduces broadcast traffic across segments.
The “bridge” interconnecting the switches becomes a Trunk Link.
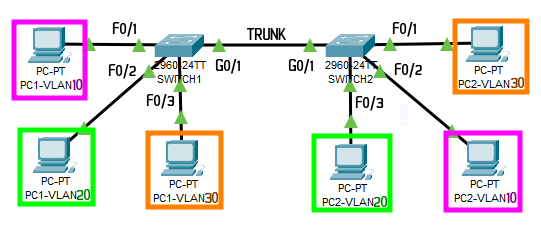
Configuration:
Switch1
enable
configure terminal
hostname Switch1
no ip domain lookup
line con 0
logging synchronous

vlan 10
name Pink
vlan 20
name Green
vlan 30
name Orange

interface f0/1
switchport mode access
switchport access vlan 10
interface f0/2
switchport mode access
switchport access vlan 20
interface f0/3
switchport mode access
switchport access vlan 30

interface range f0/4-24
shutdown

interface g0/1
switchport mode trunk
Switch2
enable
configure terminal
hostname Switch2
no ip domain lookup
line con 0
logging synchronous

vlan 10
name Pink
vlan 20
name Green
vlan 30
name Orange

interface f0/1
switchport mode access
switchport access vlan 30
interface f0/2
switchport mode access
switchport access vlan 10
interface f0/3
switchport mode access
switchport access vlan 20

interface range f0/4-24
shutdown

interface g0/1
switchport mode trunk
Now, even if all computers are assigned IPs in the same network, they will not be able to communicate with each other unless they are in the same VLAN.
To verify the configuration on each switch, use the following commands:
show vlan brief
show interface trunk
Learn more about [VLAN – NexGenT]
Learn more about [TRUNK – Network Direction]
The following post covers centralizing VLAN configuration using a server-client hierarchy called VTP [Read It].