The Tor Network relies completely on volunteers to route traffic from origin to destination.
If you plan to run an exit node, I recommend using a VPS from a privacy-friendly provider such as 1984Hosting [Link] (Iceland) or Njalla [Link] (Sweden). Refer to the reference list [Link].
TYPES OF TOR NODE
There are 3 main types of nodes:
- Guard
- The entry point of the Tor network.
- Relay
- Middle node.
- Exit
- Exit node to the public internet.
Other types, such as Bridges and Snowflakes, are non-advertised hosts that help prevent nations or organizations from blocking publicly listed nodes.
SETTING UP UNATTENDED UPGRADES
Prepare the server to automatically patch vulnerable applications and keep itself up to date.
sudo timedatectl set-timezone America/New_York
sudo apt update && sudo apt upgrade -y
sudo apt install unattended-upgrades apt-listchanges -y
sudo nano /etc/apt/apt.conf.d/50unattended-upgrades
Uncomment the following lines:
"${distro_id}:${distro_codename}-updates";
Unattended-Upgrade::Remove-Unused-Kernel-Packages "true";
Unattended-Upgrade::Remove-Unused-Dependencies "true";
Unattended-Upgrade::Automatic-Reboot "true";
Unattended-Upgrade::Automatic-Reboot-Time "17:00";
Unattended-Upgrade::Automatic-Reboot-WithUsers "true";
Configure the auto-upgrade parameters:
sudo nano /etc/apt/apt.conf.d/20auto-upgrades
Replace the file content with:
APT::Periodic::Update-Package-Lists "1";
APT::Periodic::Unattended-Upgrade "1";
APT::Periodic::AutocleanInterval "5";
APT::Periodic::Verbose "1";
Test for errors:
sudo unattended-upgrades --dry-run
sudo cat /var/log/unattended-upgrades/unattended-upgrades.log
Then activate Unattended-Upgrades:
sudo dpkg-reconfigure -plow unattended-upgrades
Answer YES to allow automatic download and installation of stable updates.
For Enterprise Linux derivatives (e.g., CentOS, Alma, Rocky), use yum-cron to handle package updates. Note that it does not automatically reboot the system when needed (e.g., after a kernel upgrade).
INSTALLING AND CONFIGURING THE TOR NODE
sudo apt update && apt upgrade -y
sudo apt install apt-transport-https -y
wget -qO- https://deb.torproject.org/torproject.org/A3C4F0F979CAA22CDBA8F512EE8CBC9E886DDD89.asc | sudo gpg --dearmor | sudo tee /usr/share/keyrings/tor-archive-keyring.gpg >/dev/null
echo 'deb [signed-by=/usr/share/keyrings/tor-archive-keyring.gpg] http://deb.torproject.org/torproject.org noble main' | sudo tee /etc/apt/sources.list.d/tor-priject.list
sudo apt update && sudo apt install tor -y
sudo nano /etc/tor/torrc
Append or replace the entire file content with:
Nickname NodeNick
ORPort 443
ExitRelay 0
SocksPort 0
ControlSocket 0
ContactInfo [email protected]
Note: Setting ExitRelay to 1 will turn this node into an exit relay.
sudo systemctl restart tor@default
sudo ufw enable
sudo ufw allow 443
sudo ufw status
EXIT RELAY (only enable if you know what you are doing)
Set up a reverse DNS with a name containing “tor-exit”.
Add the following lines to the torrc configuration file:
ExitRelay 1
DirPort 80
DirPortFrontPage /var/www/index.html
Download the sample Exit Notice HTML page:
wget https://gitweb.torproject.org/tor.git/plain/contrib/operator-tools/tor-exit-notice.html -0 DirPortFrontPage /var/www/index.html
Allow traffic on port 80 through the firewall and restart the tor service:
sudo ufw allow 80
sudo systemctl restart tor@default
Install a fast, reliable, uncensored DNS resolver on localhost:
sudo apt install unbound -y
sudo cp /etc/resolv.conf /etc/resolv.conf.backup
echo nameserver 127.0.0.1 | sudo tee /etc/resolv.conf
sudo chattr +i /etc/resolv.conf
Enable Unbound to start on boot:
sudo systemctl enable --now unbound
ADDITIONAL INFORMATION
The server should appear in the directory [Link] within 3 hours.
Each node goes through 4 phases in its lifecycle:
- 1st – 0 to 3 days
- Unmeasured
- 2nd – 3 to 8 days
- Remote Measurement
- 3rd – 8 to 68 days
- Ramping Up as a Guard Relay
- 4th – 68+ days
- Steady-state Guard Relay
Read more about the node lifecycle at [Link].
It is recommended to back up your Tor Identity Keys:
scp -r [email protected]:/var/lib/tor/keys .
Note: Port 22 may need to be allowed in the firewall before copying. Remember to block it afterward, or restrict access to a trusted source only.
Alternatives to running a Tor Node include Tor Bridge [Link] and Tor Snowflake [Link]. All types of volunteers are needed to keep the internet free and accessible.
TRAFFIC MONITORING AND LIMITING
Consider setting traffic limits to avoid overage fees from your ISP.
Append the following lines to /etc/tor/torrc:
AccountingStart day 0:00
AccountingMax 50 GBytes
RelayBandwidthRate 25 MBytes
RelayBandwidthBurst 100 MBytes
Note: Speed values are in Megabytes, not Megabits.
The graph below shows CPU and bandwidth usage for a new node under different configurations:
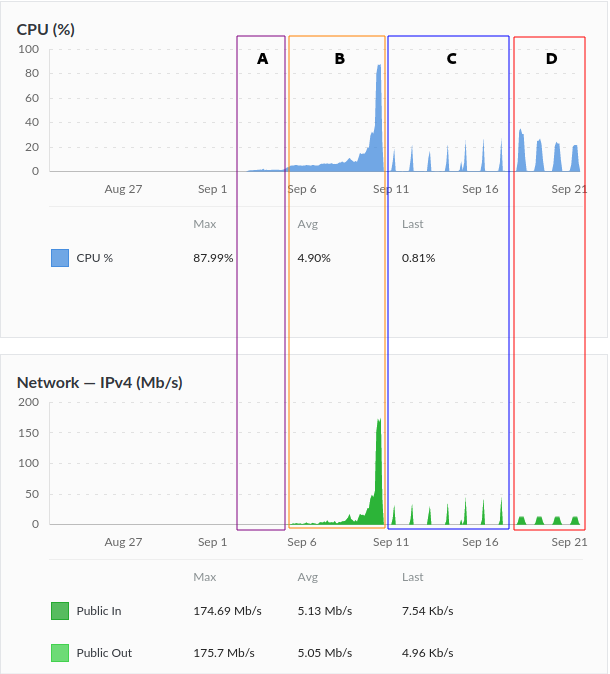
- A – Unmeasured (not relaying traffic yet).
- B – Remote Measurement followed by ramping up as a Guard Relay (traffic relayed progressively).
- C – A 35GB per-direction limit was applied to control total data usage.
- D – Both a daily limit and a speed cap of 1.5 MByte/s were applied, which resulted in higher CPU usage.
Do not be surprised if your node consumes 6TB of traffic (inbound + outbound) in under 3 days:
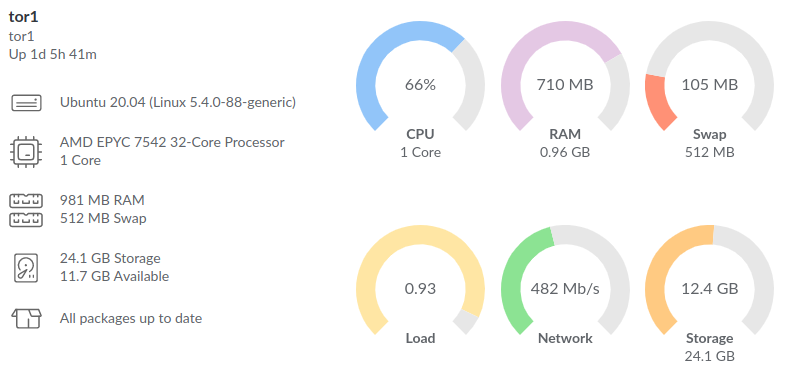
Monitor traffic in real-time with Tor Nyx [Link]:
sudo apt-get install nyx -y
sudo nano /etc/tor/torrc
Append the following lines:
ControlPort 9051
CookieAuthentication 1
Restart Tor and launch Nyx:
sudo systemctl restart tor@default
nyx
To run Nyx as another user, update the permissions of the token file:
sudo chmod 777 /run/tor/control.authcookie
Customize your Nyx console by editing:
nano .nyx/config
Examples can be found at [Link].
BONUS
As an alternative to unattended-upgrades, try uCareSystem [Link]:
wget https://github.com/Utappia/uCareSystem/releases/download/v25.07.22/ucaresystem-core_25.07.22_all.deb
sudo apt install ./ucaresystem-core_*.deb
sudo ucaresystem-core