Proxmox Virtual Environment (PVE) is an open-source hypervisor manager.
Based on Debian with a modified Ubuntu LTS kernel, it allows deployment and management of virtual machines (KVM) and containers (LXC).
Unlike XCP-ng, Proxmox VE includes a web interface and provides a REST API for third-party tools.
It can be downloaded for free at [Link]. If needed, use the USB Imager to create a bootable thumb drive [Link].
Creating a bootable USB for installation:
dd bs=1M conv=fdatasync if=./proxmox-ve_8.4-1.iso of=/dev/sdc
Updating and upgrading:
apt update
apt upgrade -y
apt dist-upgrade -y
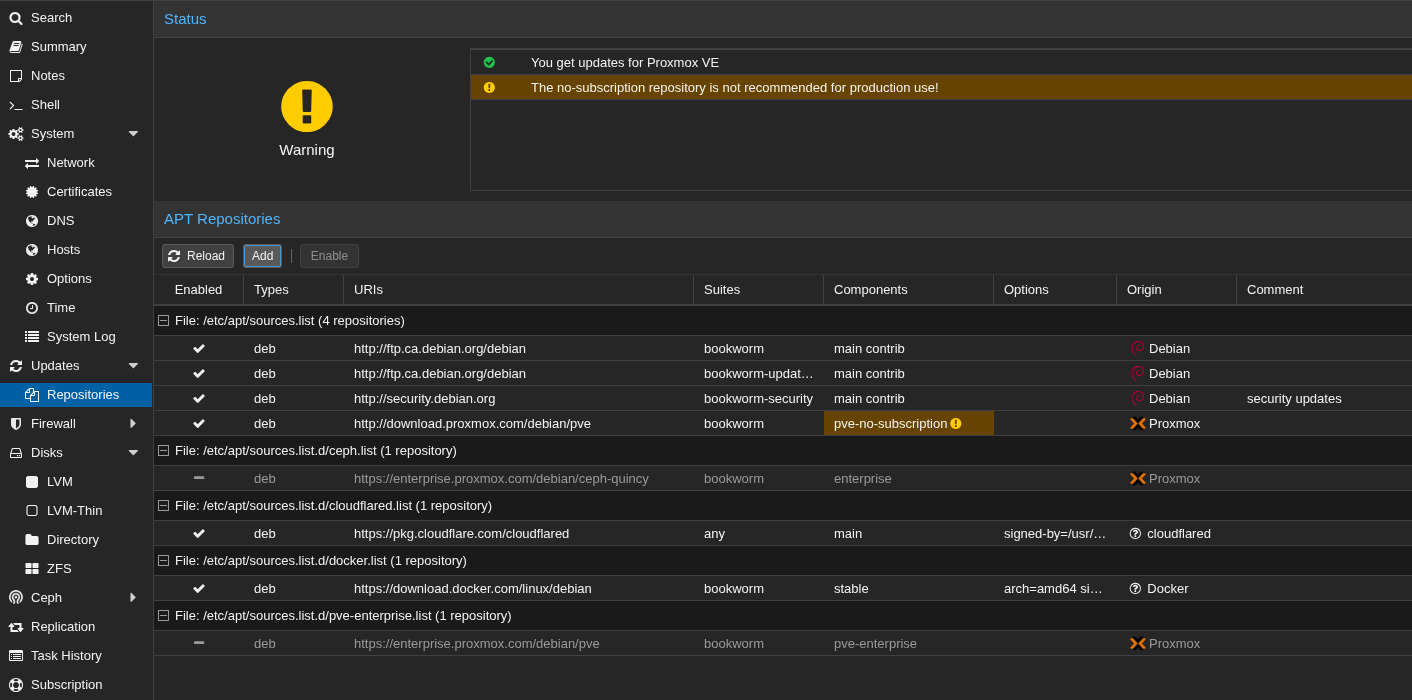
To avoid error messages about an unsigned repo (which requires a subscription), comment all lines in /etc/apt/sources.list.d/pve-enterprise.list and append:
deb http://download.proxmox.com/debian/pve bookworm pve-no-subscription
Go to https://192.168.1.103:8006/ in your browser and set a strong password for the default user root.
CLI COMMANDS
- man qm
- qm list
- qm start 100
- qm shutdown 100
- qm reboot 100
- qm reset 100
- qm stop 100
- qm config 100
- qm set -onboot 1 100
- man pct
- pct list
- pct start 101
- pct shutdown 101
- pct reboot 101
- pct config 101
- pct set -memory 1024 101
- pct enter 101
INSTALLING THE GUEST AGENT
sudo apt install qemu-guest-agent -y
BEFORE CREATING AN IMAGE FROM A VM
sudo rm -rf /etc/ssh/ssh_host_*
sudo truncate -s 0 /etc/machine-id
sudo dpkg-reconfigure openssh-server
IMPORTING A VM
wget http://192.168.1.100:8080/Kali-Linux-2021.4-virtualbox-amd64.ova
tar xvf Kali-Linux-2021.4-virtualbox-amd64.ova
qm importovf 100 ./Kali-Linux-2021.4-virtualbox-amd64.ovf Storage --format qcow2
If the disk import (*.ovf) fails, create a new VM manually, then run:
qemu-img convert -f vmdk Kali-Linux-2021.4-virtualbox-amd64-disk001.vmdk Kali-disk001.qcow2 -O qcow2
qm importdisk 100 Kali-disk001.qcow2 Storage
OTHER CLI TIPS
Wiping a secondary disk from the CLI:
wipefs -fa /dev/nvme0n1
dd if=/dev/zero of=/dev/nvme0n1 bs=1M count=1000
udevadm settle
reboot
APPLIANCE MANAGER
pveam update
pveam available
pveam download local debian-10-turnkey-nextcloud_16.1-1_amd64.tar.gz
ATTACHING A USB DEVICE TO A VM (PASSTHROUGH)
In the example below, I am attaching an Intel AX200 Wireless Adapter (Wi-Fi 6).
lsusb | grep AX200
Output: Bus 001 Device 002: ID 8087:0029 Intel Corp. AX200 Bluetooth
qm set 112 -usb0 host=8087:0029,usb3=yes
Output: update VM 112: -usb0 host=8087:0029
OR
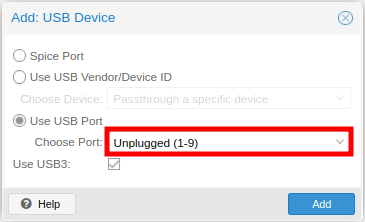
Using the Web UI:
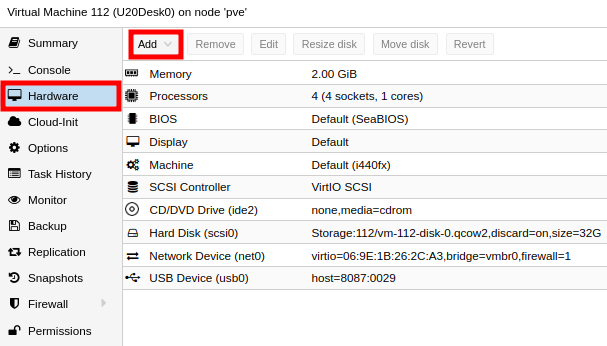
Experiment to find the option that best fits your needs:

Pull and list the latest available container templates:
sudo pveam update
sudo pveam available
ATTACHING A DISK TO A VM (PASSTHROUGH)
Stop the VM, then attach the disk:
qm set 101 -scsi1 /dev/sdX
PROXMOX BACKUP SERVER (PBS)
PBS is an open-source backup solution for VMs, containers, and physical (Debian/Ubuntu) hosts [Link].
After installation, the PBS web interface is available on port 8007 (e.g., https://10.10.10.10:8007/).
Installing the PBS Client on Debian/Ubuntu physical hosts:
echo "deb [arch=amd64] http://download.proxmox.com/debian/pbs-client bullseye main" | sudo tee /etc/apt/sources.list.d/pbs-client.list
sudo wget http://enterprise.proxmox.com/debian/proxmox-release-bullseye.gpg -O /etc/apt/trusted.gpg.d/proxmox-release-bullseye.gpg
sudo apt update
sudo apt install proxmox-backup-client -y
Backing up the root filesystem:
sudo su -
proxmox-backup-client backup root.pxar:/ --repository 10.10.10.10:backup1
Backing up with an encryption key:
proxmox-backup-client key create backup.key
proxmox-backup-client backup root.pxar:/ --repository 10.10.10.10:backup1 --keyfile ./backup.key
Listing backups and snapshots:
proxmox-backup-client list --repository 10.10.10.10:backup1
proxmox-backup-client snapshot list --repository 10.10.10.10:backup1
Setting an environment variable for the target repository:
export PBS_REPOSITORY="10.10.10.10:backup1"
echo $PBS_REPOSITORY
Mapping a directory from the host to a guest CT:
sudo nano /etc/pve/nodes/<NODE>/lxc/<ID>.conf
...
mp0: /HOST/PATH/,mp=/GUEST/PATH,mountoptions=noatime
BONUS
Proxmox does not officially run on the Raspberry Pi, but Pimox does [Link].
Pimox is an adapted build of Proxmox tailored for the Raspberry Pi 4.
See this post for a step-by-step guide on how to install, configure, and use it [Link].
Warning: Before converting any instance into a template, wipe the machine ID to prevent all deployed from it from having the same fingerprints. sudo truncate -s 0 /etc/machine-id and sudo truncate -s 0 /var/lib/dbus/machine-id.
Applying NAT to the network on vmbr1:
sudo nano /etc/sysctl.conf
net.ipv4.ip_forward = 1
sudo nano /etc/nftables.conf
table inet nat {
    chain prerouting {
        type nat hook prerouting priority -100; policy accept;
    }
    chain postrouting {
        type nat hook postrouting priority 100; policy accept;
        oifname "vmbr0" masquerade
    }
}
table inet filter {
    chain forward {
        type filter hook forward priority 0; policy drop;
        iifname "vmbr1" oifname "vmbr0" accept
        ct state established,related accept
    }
}
sudo sysctl -p
sudo nft -f /etc/nftables.conf
Disabling, recovering, and managing MFA via CLI:
mv /etc/pve/priv/tfa.cfg /etc/pve/priv/tfa.cfg_DISABLED
mv /etc/pve/priv/tfa.cfg_DISABLED /etc/pve/priv/tfa.cfg
Running Snap packages inside LXC
On Proxmox, edit the LXC config:
nano /etc/pve/lxc/XXX.conf
Add the following lines:
lxc.mount.entry = /dev/fuse dev/fuse none bind,create=file,optional
lxc.mount.auto=cgroup:rw
Inside the LXC, install the required dependencies:
sudo apt update && sudo apt dist-upgrade
sudo apt install squashfuse fuse
sudo apt install snapd
sudo mkdir /lib/modules
Install the Snap package. It may fail on the first attempt, but it will work on the second.
Tips for IPv4 and IPv6 Networks
This example has a “WAN” interface configured along with two isolated “LANs“: one on a physical IPv4 network and the other on a virtual IPv6 network.

auto lo
iface lo inet loopback

iface enp0s31f6 inet manual

iface enx7cc2c6357dd7 inet manual

auto vmbr0
iface vmbr0 inet static
        address 192.168.1.103/24
        gateway 192.168.1.1
        bridge-ports enp0s31f6
        bridge-stp off
        bridge-fd 0
#IPv4 LAN

auto vmbr1
iface vmbr1 inet static
        address 10.1.1.1/24
        bridge-ports enx7cc2c6357dd7
        bridge-stp off
        bridge-fd 0
#IPv4 PXE

auto vmbr2
iface vmbr2 inet6 static
        address 2a11:6c7:2000:c500::1/56
        bridge-ports none
        bridge-stp off
        bridge-fd 0
#IPv6 Only

source /etc/network/interfaces.d/*
For aggregating multiple physical adapters into one logical interface:

auto lo
iface lo inet loopback

auto nic0
iface nic0 inet manual

auto nic1
iface nic1 inet manual

auto nic2
iface nic2 inet manual

auto nic3
iface nic3 inet manual

auto bond0
iface bond0 inet manual
        bond-slaves nic0 nic1 nic2 nic3
        bond-miimon 100
        bond-mode 802.3ad
        bond-xmit-hash-policy layer2+3

auto vmbr0
iface vmbr0 inet static
        address 192.168.1.104/24
        gateway 192.168.1.1
        bridge-ports bond0
        bridge-stp off
        bridge-fd 0

source /etc/network/interfaces.d/*
Enable No-Subscription Package Repository
DHCP ON PROXMOX
nano /etc/network/interfaces
auto vmbr0
iface vmbr0 inet dhcp
        bridge-ports bond0
        bridge-stp off
        bridge-fd 0
ifreload -a
TROUBLESHOOTING
A new drive or leftover data drives from a previous Proxmox installation may get stuck. To resolve:
dmsetup ls
dmsetup remove <NAME_TO_REMOVE>