Technologies like PXE (Preboot Execution Environment) and its open-source implementation iPXE are essential for managing multiple machines or deploying operating systems at scale (e.g., in a data centre).
PXE Boot Chain
- NIC with PXE Firmware
- BIOS capable of booting from NIC
- DHCP with options 66 and 67
- TFTP server with NBP
- and so on.
DHCP option 66 (“next server”) specifies the address of the TFTP server, and option 67 (“bootfile name”) specifies the NBP (Network Bootstrap Program). For example, 66 set to 10.1.1.1 and 67 set to pxelinux.0.
The chain is necessary because the NBP must be very small, as it is a pre-boot program designed to fetch and load the target system.

The OS installer can be served from the same TFTP server or shared via HTTP, NFS, or SMB.
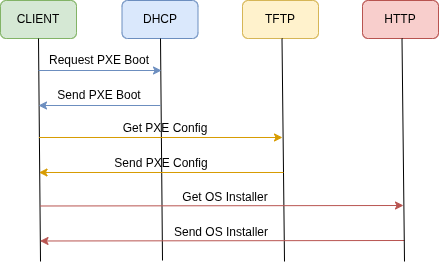
Note: The DHCP, TFTP, and HTTP servers can run on the same host or on different ones. For example, DHCP could be handled by a network appliance such as a Cisco router, TFTP by a NAS, and HTTP by any machine on the LAN or the Internet.
INDEX
- Installing
- DHCP Server
- TFTP Server
- HTTP Server
- Configuring
- NAT / Routing
- PXE Boot
- iPXE Boot
- PXE the Easy Way
- Auto Install
- Ubuntu Server
INSTALLING PACKAGES
apt update && apt upgrade -y
apt install isc-dhcp-server tftpd-hpa pxelinux syslinux-common -y
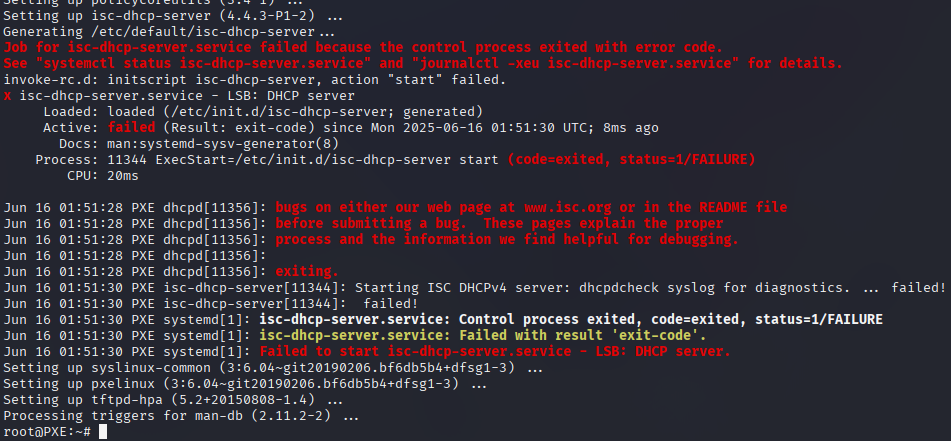
If you see an error message immediately after installation, that is expected. The DHCP service failed to start because another DHCP server is already active on the same network segment.
DHCP SERVER
Specify the network interface the DHCP service should bind to.
nano /etc/default/isc-dhcp-server

Define the parameters to be assigned to the client’s network adapter.
nano /etc/dhcp/dhcpd.conf
subnet 10.1.1.0 netmask 255.255.255.0 {
  range 10.1.1.100 10.1.1.200;
  option routers 10.1.1.1;
  option broadcast-address 10.1.1.255;
  option domain-name-servers 1.1.1.1;
  next-server 10.1.1.1;
  filename "pxelinux.0";
}
Note: In this example, the DHCP and TFTP servers are the same host. If running TFTP on a different server, update the next-server IP accordingly.
Apply the changes.
systemctl restart isc-dhcp-server
systemctl enable isc-dhcp-server
The equivalent commands to set options 66 and 67 on a Ubiquiti EdgeRouter are:
$ configure
# show service dhcp-server
# set service dhcp-server shared-network-name LAN subnet 10.1.1.0/24 bootfile-name pxelinux.0
# set service dhcp-server shared-network-name LAN subnet 10.1.1.0/24 tftp-server-name 10.1.1.1
# commit
# save
This is what the DHCP offer looks like in a packet capture.
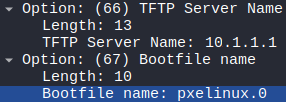
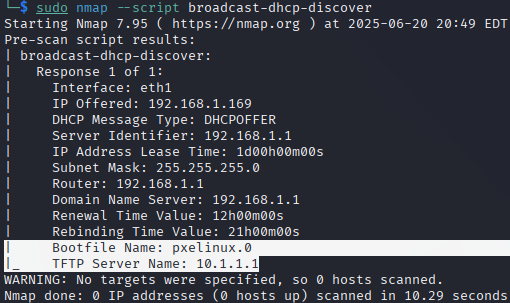
It can also be observed using the Nmap script broadcast-dhcp-discover.
nmap --script broadcast-dhcp-discover
TFTP SERVER
By default, the TFTP server root directory is /srv/tftp/. Netboot images need to be placed there.
Debian 12 Netboot
mkdir -p /srv/tftp/debian
cd /srv/tftp/debian
wget http://deb.debian.org/debian/dists/bookworm/main/installer-amd64/current/images/netboot/debian-installer/amd64/linux
wget http://deb.debian.org/debian/dists/bookworm/main/installer-amd64/current/images/netboot/debian-installer/amd64/initrd.gz
PXE Boot with TFTP-HPA
cd /srv/tftp/
cp /usr/lib/PXELINUX/pxelinux.0
cp /usr/lib/syslinux/modules/bios/menu.c32
cp /usr/lib/syslinux/modules/bios/ldlinux.c32
cp /usr/lib/syslinux/modules/bios/libutil.c32
mkdir -p /srv/tftp/pxelinux.cfg
nano /srv/tftp/pxelinux.cfg/default
DEFAULT menu.c32
PROMPT 0
MENU TITLE PXE Boot Menu
TIMEOUT 50

LABEL debian
    MENU LABEL Install Debian 12
    KERNEL debian/linux
    APPEND initrd=debian/initrd.gz
Apply the configuration.
systemctl restart tftpd-hpa
systemctl enable tftpd-hpa
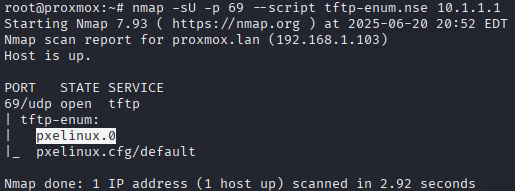
Use the Nmap script tftp-enum.nse to test the TFTP service.
nmap -sU -p 69 --script tftp-enum.nse 10.1.1.1
PXE Boot with Dnsmasq (alternative to TFTP-HPA)
Dnsmasq provides DNS, DHCP, and TFTP in a single daemon.
Installation and configuration.
apt remove --purge tftpd-hpa -y
apt install dnsmasq -y
nano /etc/dnsmasq.d/pxe.conf
#port=0                                              # Disable DNS
enable-tftp                                          # Enable TFTP
tftp-root=/srv/tftp
dhcp-boot=pxelinux.0
pxe-service=x86PC, "Boot from network", pxelinux
log-queries                                          # Logging
log-facility=/var/log/dnsmasq.log
interface=eth1                                       # Bind only to vmbr1 interface
except-interface=lo
bind-interfaces
dhcp-range=10.1.1.100,10.1.1.200,12h                 # DHCP pool
dhcp-option=3,10.1.1.1                               # Default gateway
dhcp-option=6,10.1.1.1                               # DNS server
systemctl restart dnsmasq
INTERNET ACCESS
Since a netinstall requires Internet access to fetch packages, the PXE boot server needs to perform NAT.
echo "net.ipv4.ip_forward=1" >> /etc/sysctl.d/99-ipforward.conf
sysctl -p /etc/sysctl.d/99-ipforward.conf
nano /etc/nftables.conf
#!/usr/sbin/nft -f
table ip nat {
    chain prerouting {
        type nat hook prerouting priority 0;
    }
    chain postrouting {
        type nat hook postrouting priority 100;
        oifname "eth0" masquerade
    }
}
systemctl restart nftables
nft list ruleset
SERVING ISO FILES ON LAN
It is also possible to boot from an ISO over the network via HTTP or NFS.
HTTP
Install Nginx and get iPXE.
apt install nginx -y
mkdir -p /srv/tftp/ipxe
cd /srv/tftp/ipxe
wget https://boot.ipxe.org/ipxe.lkrn
mkdir -p /var/www/html/ipxe
cd /var/www/html/ipxe
cp /usr/lib/syslinux/memdisk .
cp /usr/lib/syslinux/modules/bios/sanboot.c32 .
nano boot.ipxe
#!ipxe

menu iPXE Boot Menu
item ubuntu Ubuntu ISO
item shell iPXE Shell
choose distro && goto ${distro}

:ubuntu
sanboot http://releases.ubuntu.com/noble/ubuntu-24.04.2-live-server-amd64.iso
#kernel http://10.1.1.1/isos/linux ip=dhcp url=http://releases.ubuntu.com/noble/ubuntu-24.04.2-live-server-amd64.iso
#initrd http://10.1.1.1/isos/initrd.gz
#boot

:shell
shell
Note: The memdisk lines are commented out due to its memory limit of around 700 MB. Use sanboot instead, which handles larger ISO files up to 2 GB.
Get the ISOs.
mkdir -p /var/www/html/isos
cd /var/www/html/isos
wget https://releases.ubuntu.com/24.04/netboot/amd64/initrd -O initrd.gz
wget https://releases.ubuntu.com/24.04/netboot/amd64/linux
Create the chain: PXELINUX + iPXE.
nano /srv/tftp/pxelinux.cfg/default
Append the following block.
LABEL iPXE Boot
    MENU LABEL Boot using iPXE
    KERNEL ipxe/ipxe.lkrn
    APPEND dhcp && chain http://10.1.1.1/ipxe/boot.ipxe
PXE BOOT THE EASY WAY
NetBoot.xyz [Link]
Set DHCP option 67 to netboot.xyz.kpxe.
A single-line Docker deployment makes this even simpler.
docker run -d --name=netbootxyz -p 3000:3000 -p 8080:80 -p 69:69/udp -v /srv/config:/config -v /srv/assets:/assets --restart unless-stopped ghcr.io/netbootxyz/netbootxyz
Ports exposed:
3000Dashboard8080Assets (ISOs)69/udpTFTP (NBP and configs)
Navigate to the dashboard at http://10.1.1.1:3000/.
LinuxServer.io [Link]
(pending)
iVentoy [Link]
(pending)
UBUNTU AUTO INSTALL
In the iPXE configuration, set the following.
kernel http://10.1.1.1/vmlinuz root=/dev/ram0 ramdisk_size=3500000 cloud-config-url=/dev/null autoinstall ds=nocloud;s=http://10.1.1.1 ip=dhcp url=http://10.1.1.1/ubuntu.iso initrd=initrd.magic
initrd http://10.1.1.1/initrd
Then create the necessary files.
touch meta-data
touch vendor-data
nano user-data
Add the following content, adjusting the parameters as needed.
#cloud-config
autoinstall:
  version: 1
  refresh-installer:
    update: true
    channel: latest/stable
  apt:
    disable_components: []
    fallback: abort
  mirror-selection:
    geoip: true
  packages:
    - htop
    - curl
    - nano
    - iputils-ping
    - qemu-guest-agent
  drivers:
    install: true
  refresh-installer:
    channel: stable
    update: yes
  storage:
    layout:
      name: direct
  user-data:
    disable_root: false
  identity:
    hostname: ubuntu-server
    realname: ubuntu
    username: ubuntu
    password: "$y$...password...hash"
  kernel:
    package: linux-generic
  keyboard:
    layout: us
    toggle: null
    variant: ''
  locale: en_US.UTF-8
  network:
    version: 2
    renderer: networkd
    ethernets:
        alleths:
            match:
                name: e*
            dhcp4: true
  oem:
    install: auto
  source:
    id: ubuntu-server-minimal
    search_drivers: true
  ssh:
    install-server: true
    allow-pw: true
    authorized-keys:
      - "id_rsa AAAAA"
  updates: security
  timezone: America/Toronto
  late-commands:
    - curtin in-target -- apt update
    - curtin in-target -- apt upgrade -y
BONUS
As an alternative to the well-known Ventoy [Link], check out Aegis-Boot [Link], a signed UEFI Secure Boot rescue environment.