IPv4 commonly uses NAT to let many devices share one public IP address, adding a layer of protection by hiding internal devices.
In IPv6, each device gets its own public (global) IP, which brings both new benefits and new security challenges.
IPv4 and IPv6 can work together, but they don’t fully mix. This post covers how to handle different scenarios using:
- Dual-Stack Networking
- NAT66
- DNS64 + NAT64
- Filtering Traffic
This is a continuation of the post about IPv6-Only Environment [Link].
DUAL-STACK
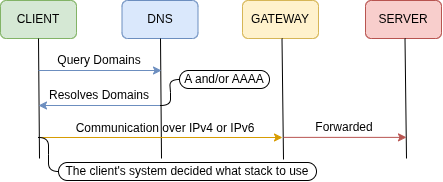
Dual-stack means running both IPv4 and IPv6 on the same network or device, allowing communication over either protocol.
Some consider dual-stack the easier path to transition from IPv4-only to IPv6. Others argue it doubles complexity and that NAT64 is the better approach.
NAT66
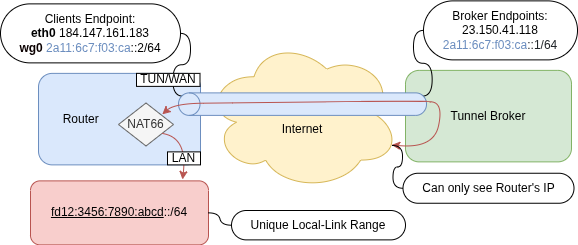
NAT66 hides an internal IPv6 network behind a single public IPv6 address, similar to how IPv4 NAT works.
The internal network can use either global or unique local IPv6 addresses, depending on the network design.
One reason to use NAT66 is security: it blocks unsolicited incoming connections from the internet, even if the firewall is misconfigured or a device is compromised.
Unique Local Addresses (ULA)
fc00::/8— Reserved (not yet defined).fd00::/8— Used for internal addressing (not publicly routable).
Set a ULA prefix to advertise. The /64 prefix must be in the fd00–fdff range to stay non-publicly routable. This example uses fd12:3456:7890:abcd::/64.
apt install radvd -y
nano /etc/radvd.conf
interface eth0 {
  AdvSendAdvert on;
  MaxRtrAdvInterval 600;
  MinRtrAdvInterval 200;
  prefix fd12:3456:7890:abcd::/64 {
    AdvOnLink on;
    AdvAutonomous on;
    AdvRouterAddr on;
  };
  RDNSS 2606:4700:4700::1001 {
    AdvRDNSSLifetime 1200;
  };
};
Assign an IP within the fd12:3456:7890:abcd::/64 prefix to the router’s internal NIC — for example, fd12:3456:7890:abcd::1.
Set up routing rules to masquerade outbound traffic and persist them across reboots.
ip6tables -A FORWARD -i eth0 -o wg0 -j ACCEPT
ip6tables -A FORWARD -i wg0 -o eth0 -m state --state ESTABLISHED,RELATED -j ACCEPT
ip6tables -t nat -A POSTROUTING -o wg0 -j MASQUERADE
apt install iptables-persistent -y
Outbound traffic from LAN to WAN (eth0 to wg0) is translated at the gateway. Return traffic (ESTABLISHED and RELATED) is allowed back through.
Monitor traffic translation between LAN and WAN:
sudo tcpdump ip6 -n -i eth0
sudo tcpdump ip6 -n -i wg0
Global Unicast Addresses (GUAs)
2000::/3— From2000::to3fff::(publicly routable).
The only change from the previous setup is applying a GUA /64 prefix in the Router Advertisement Daemon, then creating these routes instead:
ip6tables -A FORWARD -i eth0 -o wg0 -j ACCEPT
ip6tables -A FORWARD -i wg0 -o eth0 -j ACCEPT
apt install iptables-persistent -y
Note: Traffic is forwarded in both directions (LAN→WAN and WAN→LAN), meaning all hosts with global IPv6 addresses are directly exposed to the internet (DMZ).
DNS64 + NAT64
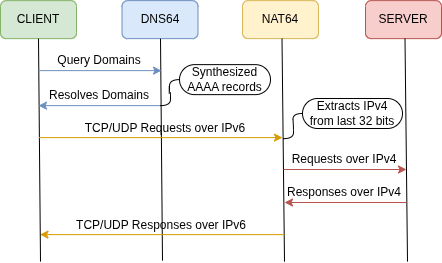
NAT64 is a transition technology that allows IPv6-only clients to reach IPv4 servers by translating IPv6 addresses to IPv4 at the network edge.
The NAT64 gateway performs this translation using a special IPv6 prefix — usually 64:ff9b::/96 — where the IPv4 address is embedded in the last 32 bits of the IPv6 address.
How does it work?
If a domain has an AAAA record, DNS resolves it normally and IPv6 traffic is routed as usual. If there is only an A record, DNS64 synthesizes a AAAA record from it.
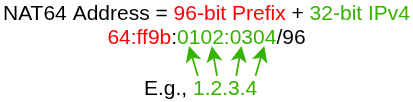
NAT64 then translates the IPv6 address back to IPv4 by extracting the last 32 bits, as shown above. Ideally, NAT64 sits at the edge of the IPv6-only LAN with at least one IPv4 address on the WAN side or at the ISP gateway. The quick alternative is to use an external DNS64+NAT64 service, at the cost of privacy and security (understand the risks before using such services).
- The Easy (Lazy) Way
Set the RDNSS to a free DNS64+NAT64 service, such as NAT64.net [Link] or Level66 [Link].

Multiple resolvers can also be set at once.
Manually via /etc/resolv.conf:
nameserver 2a00:1098:2b::1
nameserver 2001:67c:2960::64
nameserver 2a00:1098:2c::1
nameserver 2001:67c:2960::6464
nameserver 2a01:4f8:c2c:123f::1
For persistence with systemd-resolved, edit /etc/systemd/resolved.conf:
DNS=2a00:1098:2b::1 2001:67c:2960::64 2a00:1098:2c::1 2001:67c:2960::6464 2a01:4f8:c2c:123f::1
- The Proper Way
- Self-host NAT64 using Tayga or Jool.
- Self-host DNS64 with Bind9 or Unbound, or use a well-known public DNS64.
DNS64 with Bind9
sudo apt install bind9 -y
sudo nano /etc/bind/named.conf.options
options {
    dns64 64:ff9b::/96 {
        clients { any; };
    };
};
sudo systemctl restart bind9
DNS64 with Unbound
sudo apt install unbound -y
sudo nano /etc/unbound/unbound.conf.d/forward-zones.conf
forward-zone:
   name: "."
   forward-addr: 2606:4700:4700::1001
   forward-addr: 2001:4860:4860::8888
sudo nano /etc/unbound/unbound.conf.d/server.conf
include: "/etc/unbound/unbound.conf.d/*.conf"
server:
   module-config: "dns64 validator iterator"
   interface: ::
   access-control: ::0/0 refuse
   access-control: fd12:3456:7890:abcd::/64 allow
   dns64-prefix: 64:ff9b::/96
sudo systemctl restart unbound
Well-known public DNS64 services
Cloudflare and Google offer DNS64, they synthesize IPv6 addresses using the standard 64:ff9b::/96 prefix for local NAT64 translation, but do not provide NAT64 themselves.
nameserver 2606:4700:4700::64
nameserver 2001:4860:4860::64
nameserver 2606:4700:4700::6400
nameserver 2001:4860:4860::6464
NAT64 with Tayga (User-Space NAT64) [Link]
sudo sysctl -w net.ipv4.ip_forward=1
sudo sysctl -w net.ipv6.conf.all.forwarding=1
sudo apt install tayga -y
sudo nano /etc/tayga.conf
tun-device nat64
ipv4-addr 192.168.255.1
ipv6-addr fd12:3456:7890:abcd::1
prefix 64:ff9b::/96
dynamic-pool 192.168.255.0/24
data-dir /var/spool/tayga
sudo iptables -t nat -A POSTROUTING -o nat64 -j MASQUERADE
sudo iptables -t nat -A POSTROUTING -s 192.168.255.0/24 -j MASQUERADE
sudo systemctl enable tayga --now
NAT64 with Jool (Kernel-Based NAT64)
sudo apt install jool-dkms jool-tools -y
sudo modprobe jool
sudo jool instance add "nat64" --netfilter --pool6 64:ff9b::/96
sudo jool -i nat64 pool4 add 192.168.254.0/24
sudo jool -i nat64 status
sudo iptables -t nat -A POSTROUTING -s 192.168.254.0/24 -j MASQUERADE
FILTERING TRAFFIC
(pending)
BONUS
Dual-Stack, to prioritize IPv4 over IPv6 on Linux, adjust the address selection policy via the glibc mechanism:
echo "precedence ::ffff:0:0/96 100" >> /etc/gai.conf
SEE ALSO
IPv6-Only Environment with Free Global IPv6 Subnet [Link]